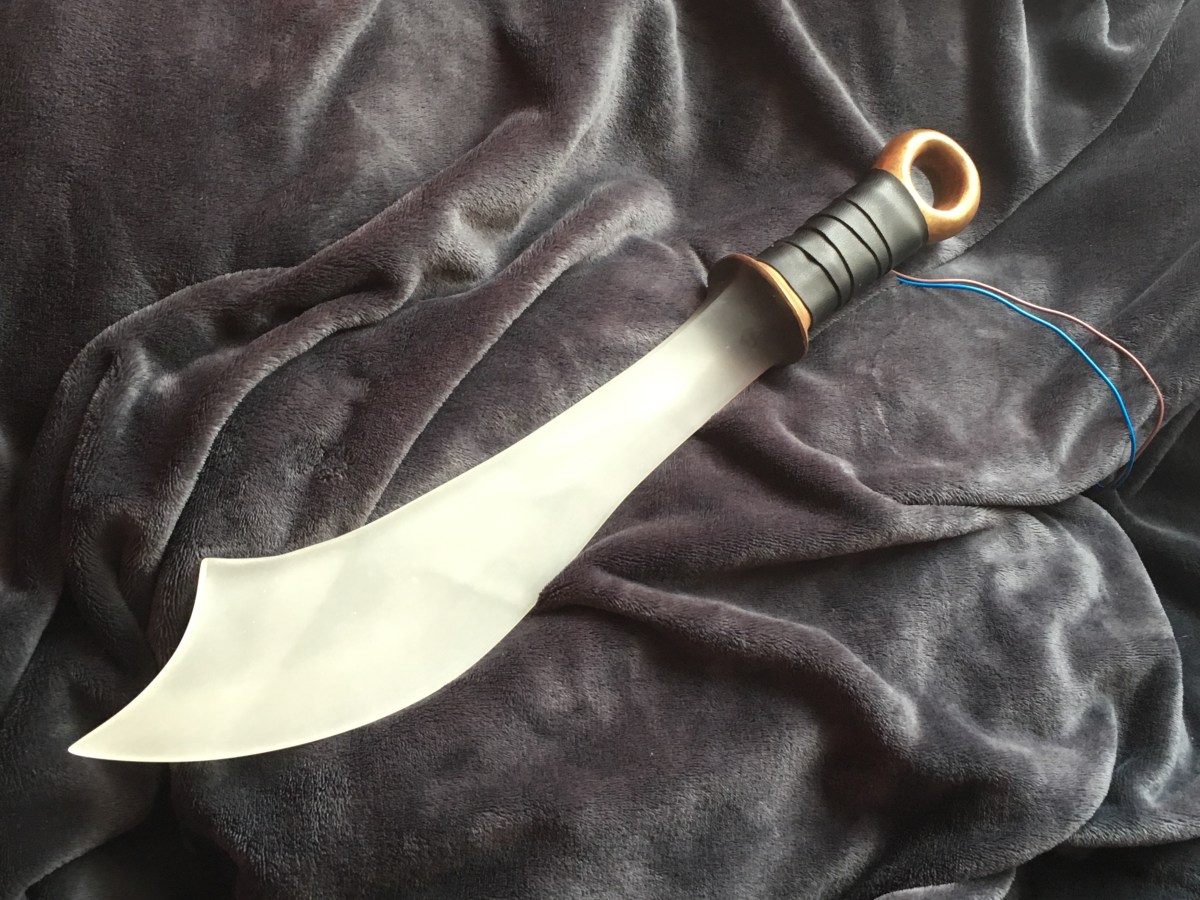
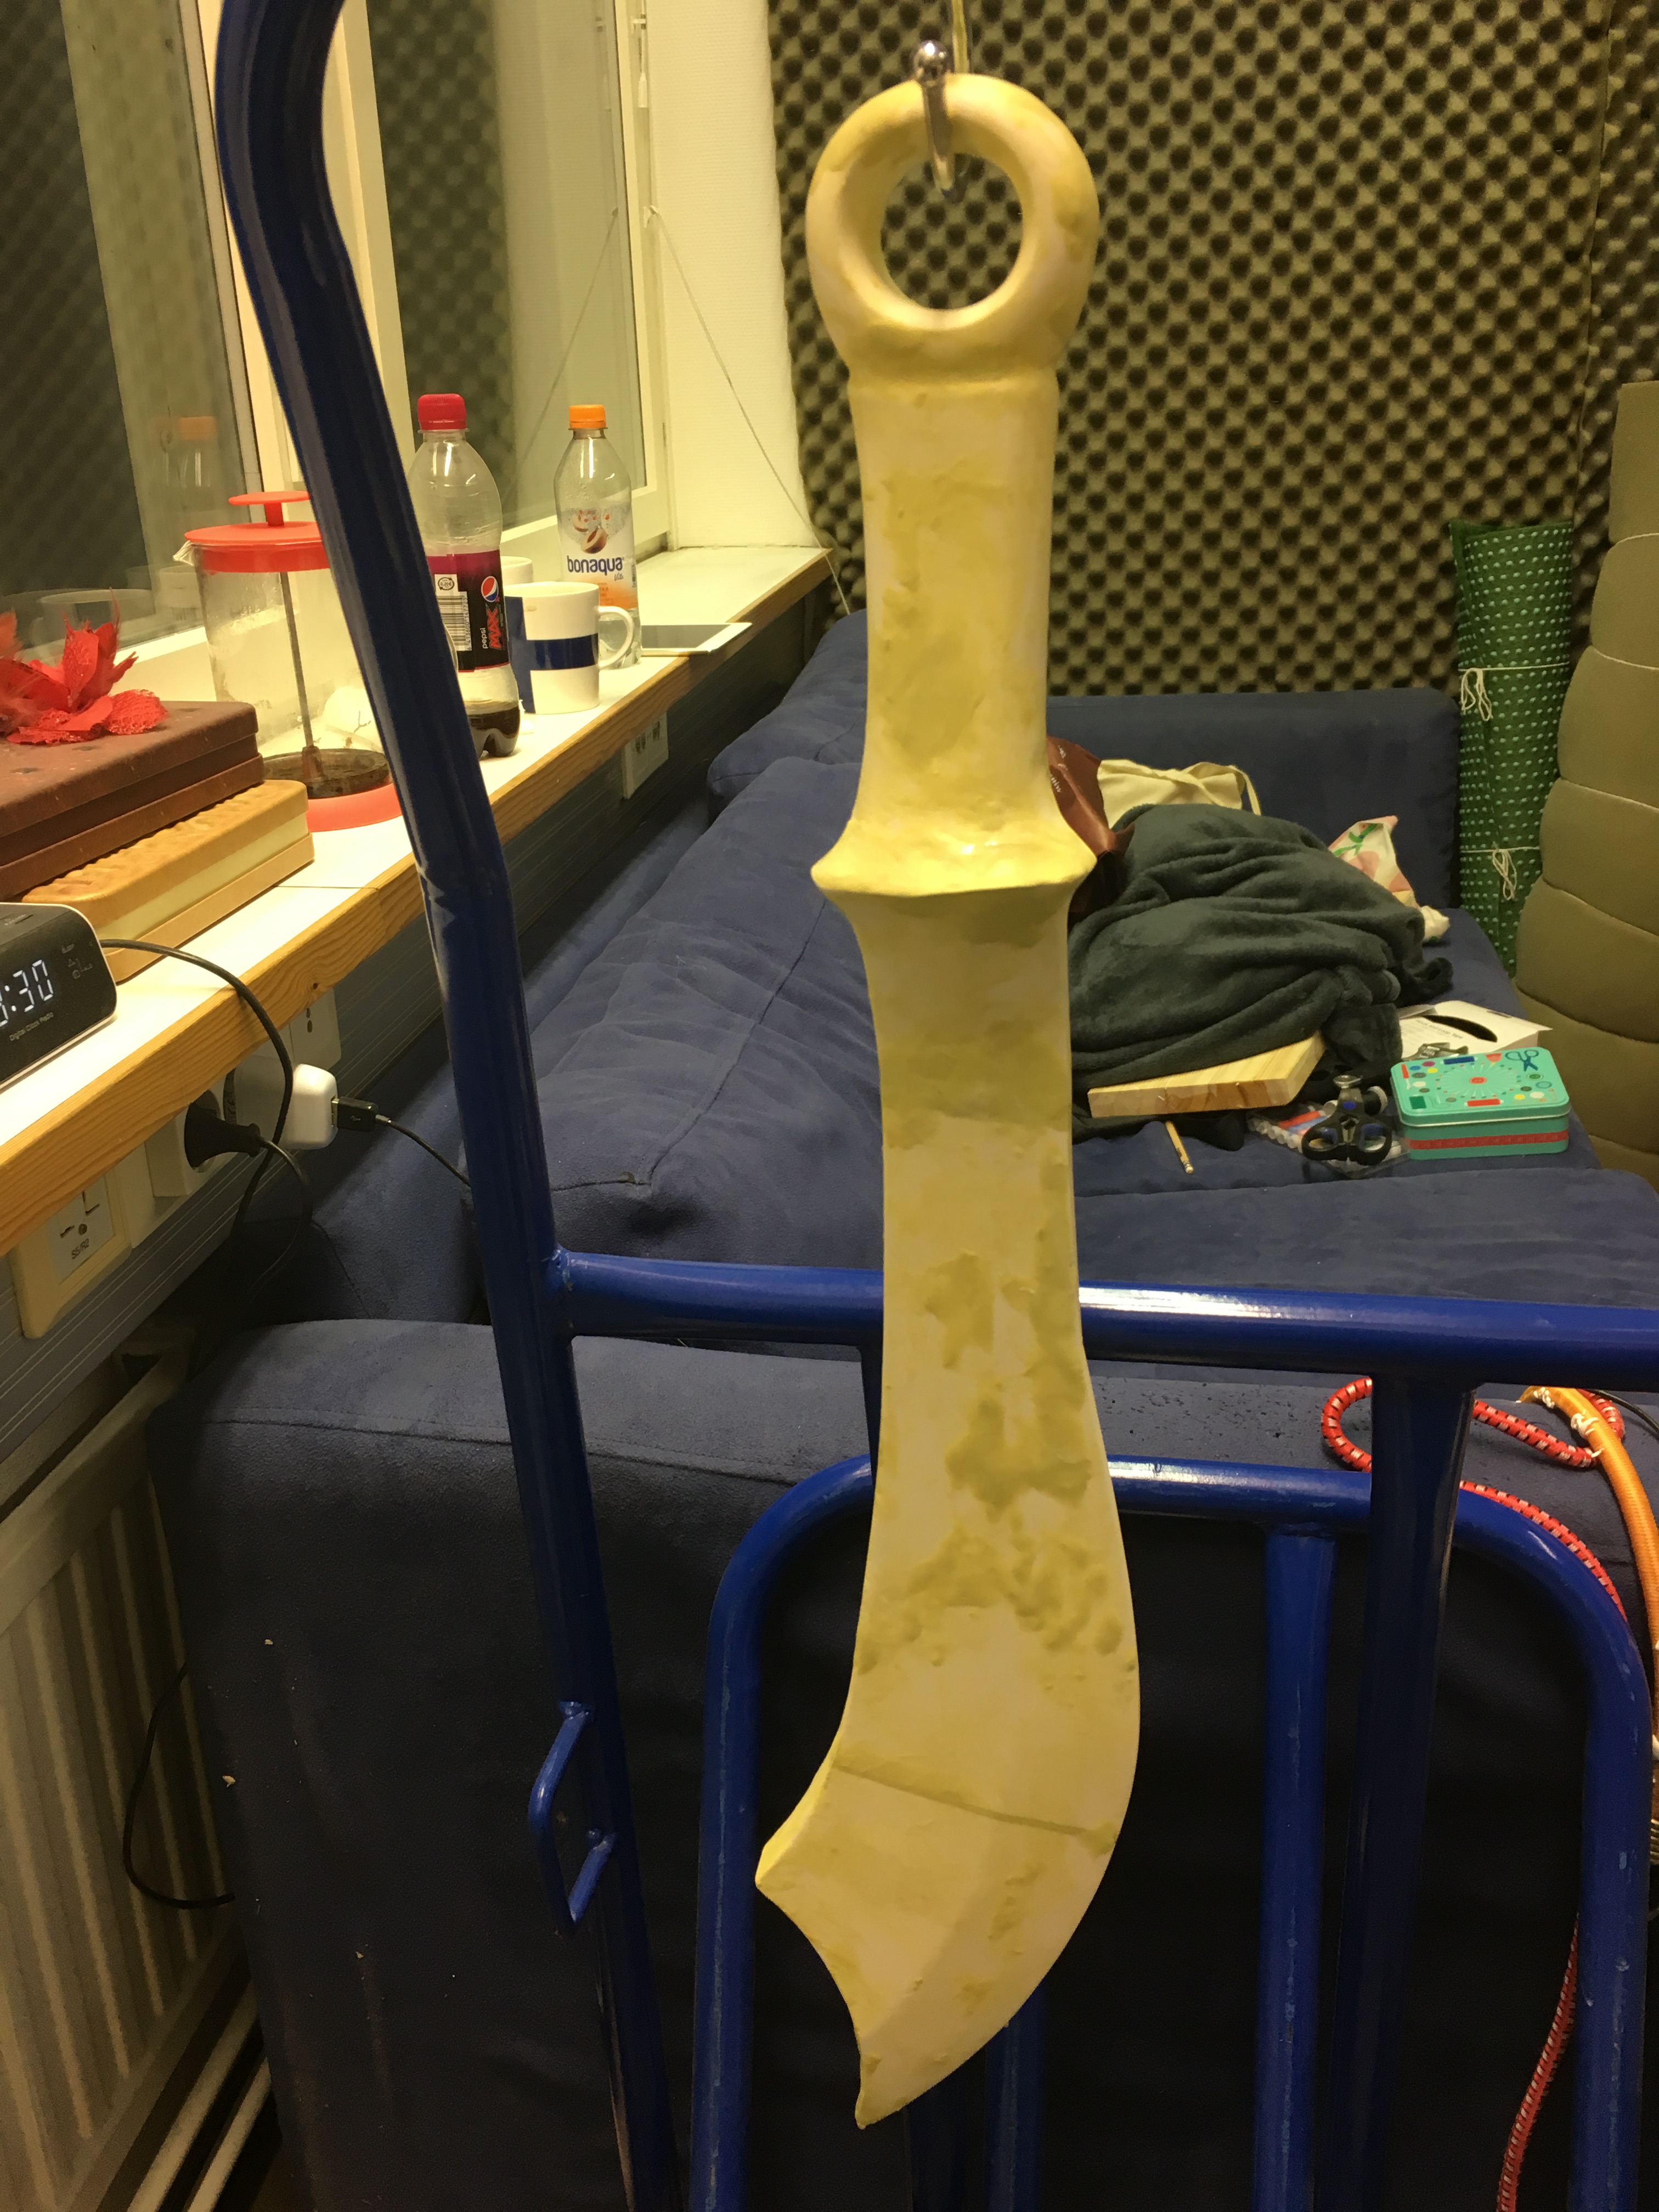
Yep, you read that right. The beautiful, exotic Zaapiel is coming to my Etsy shop. Possibly as early as this week!
The person who ordered this beauty requested a frosted look for a brighter glow.
Does it light up? Pffft, guys. You’re at Inklbade Studios. Of course it lights up!
Shiiiiney *o*Obligatory sauna pic. LOL
Why does the sword have a couple wires sticking out of it? This beauty is a custom job, designed to be decorate a pinball machine, so it needed to be modified to hook up directly to the machine. If you need any kind of custom modifications for power sources, you need only ask. I’m quite flexible.
Now everybody likes to see the insanity of my crafting process so let’s have some pics!
Draw!
Carve!
Carve more!
Box it!
Mould in alginate!
Smells gross!
Make a huge mess!
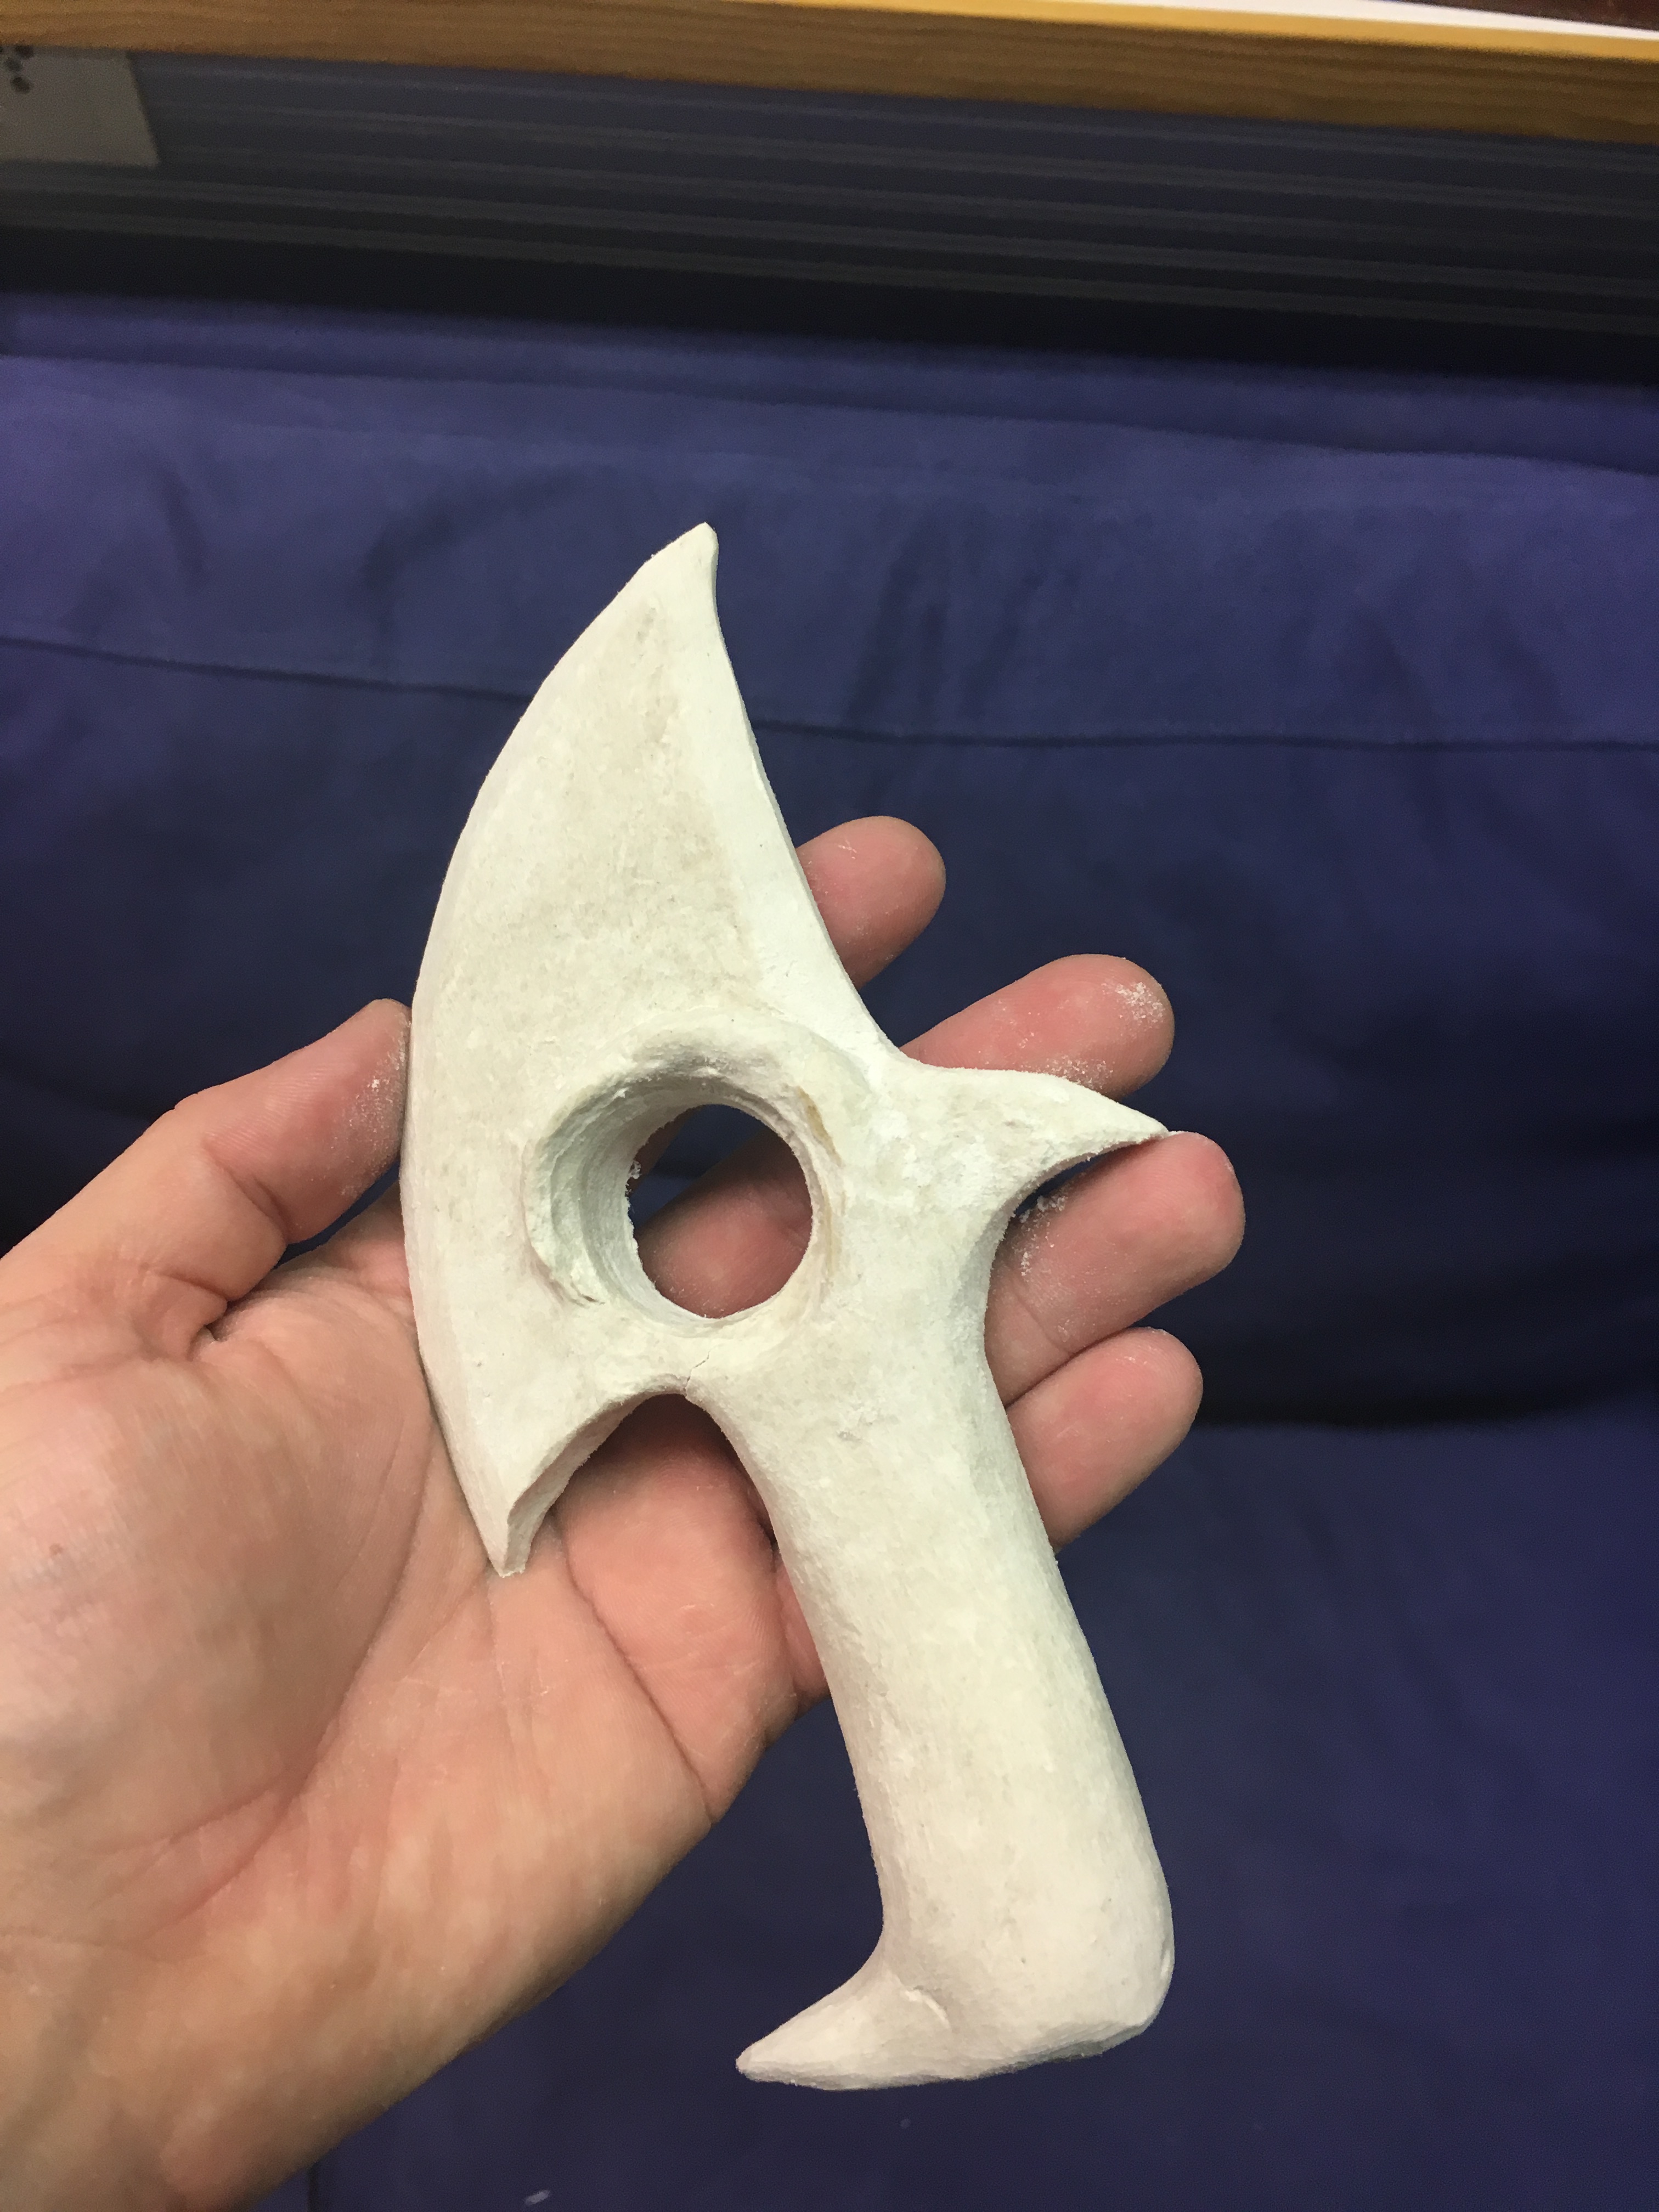
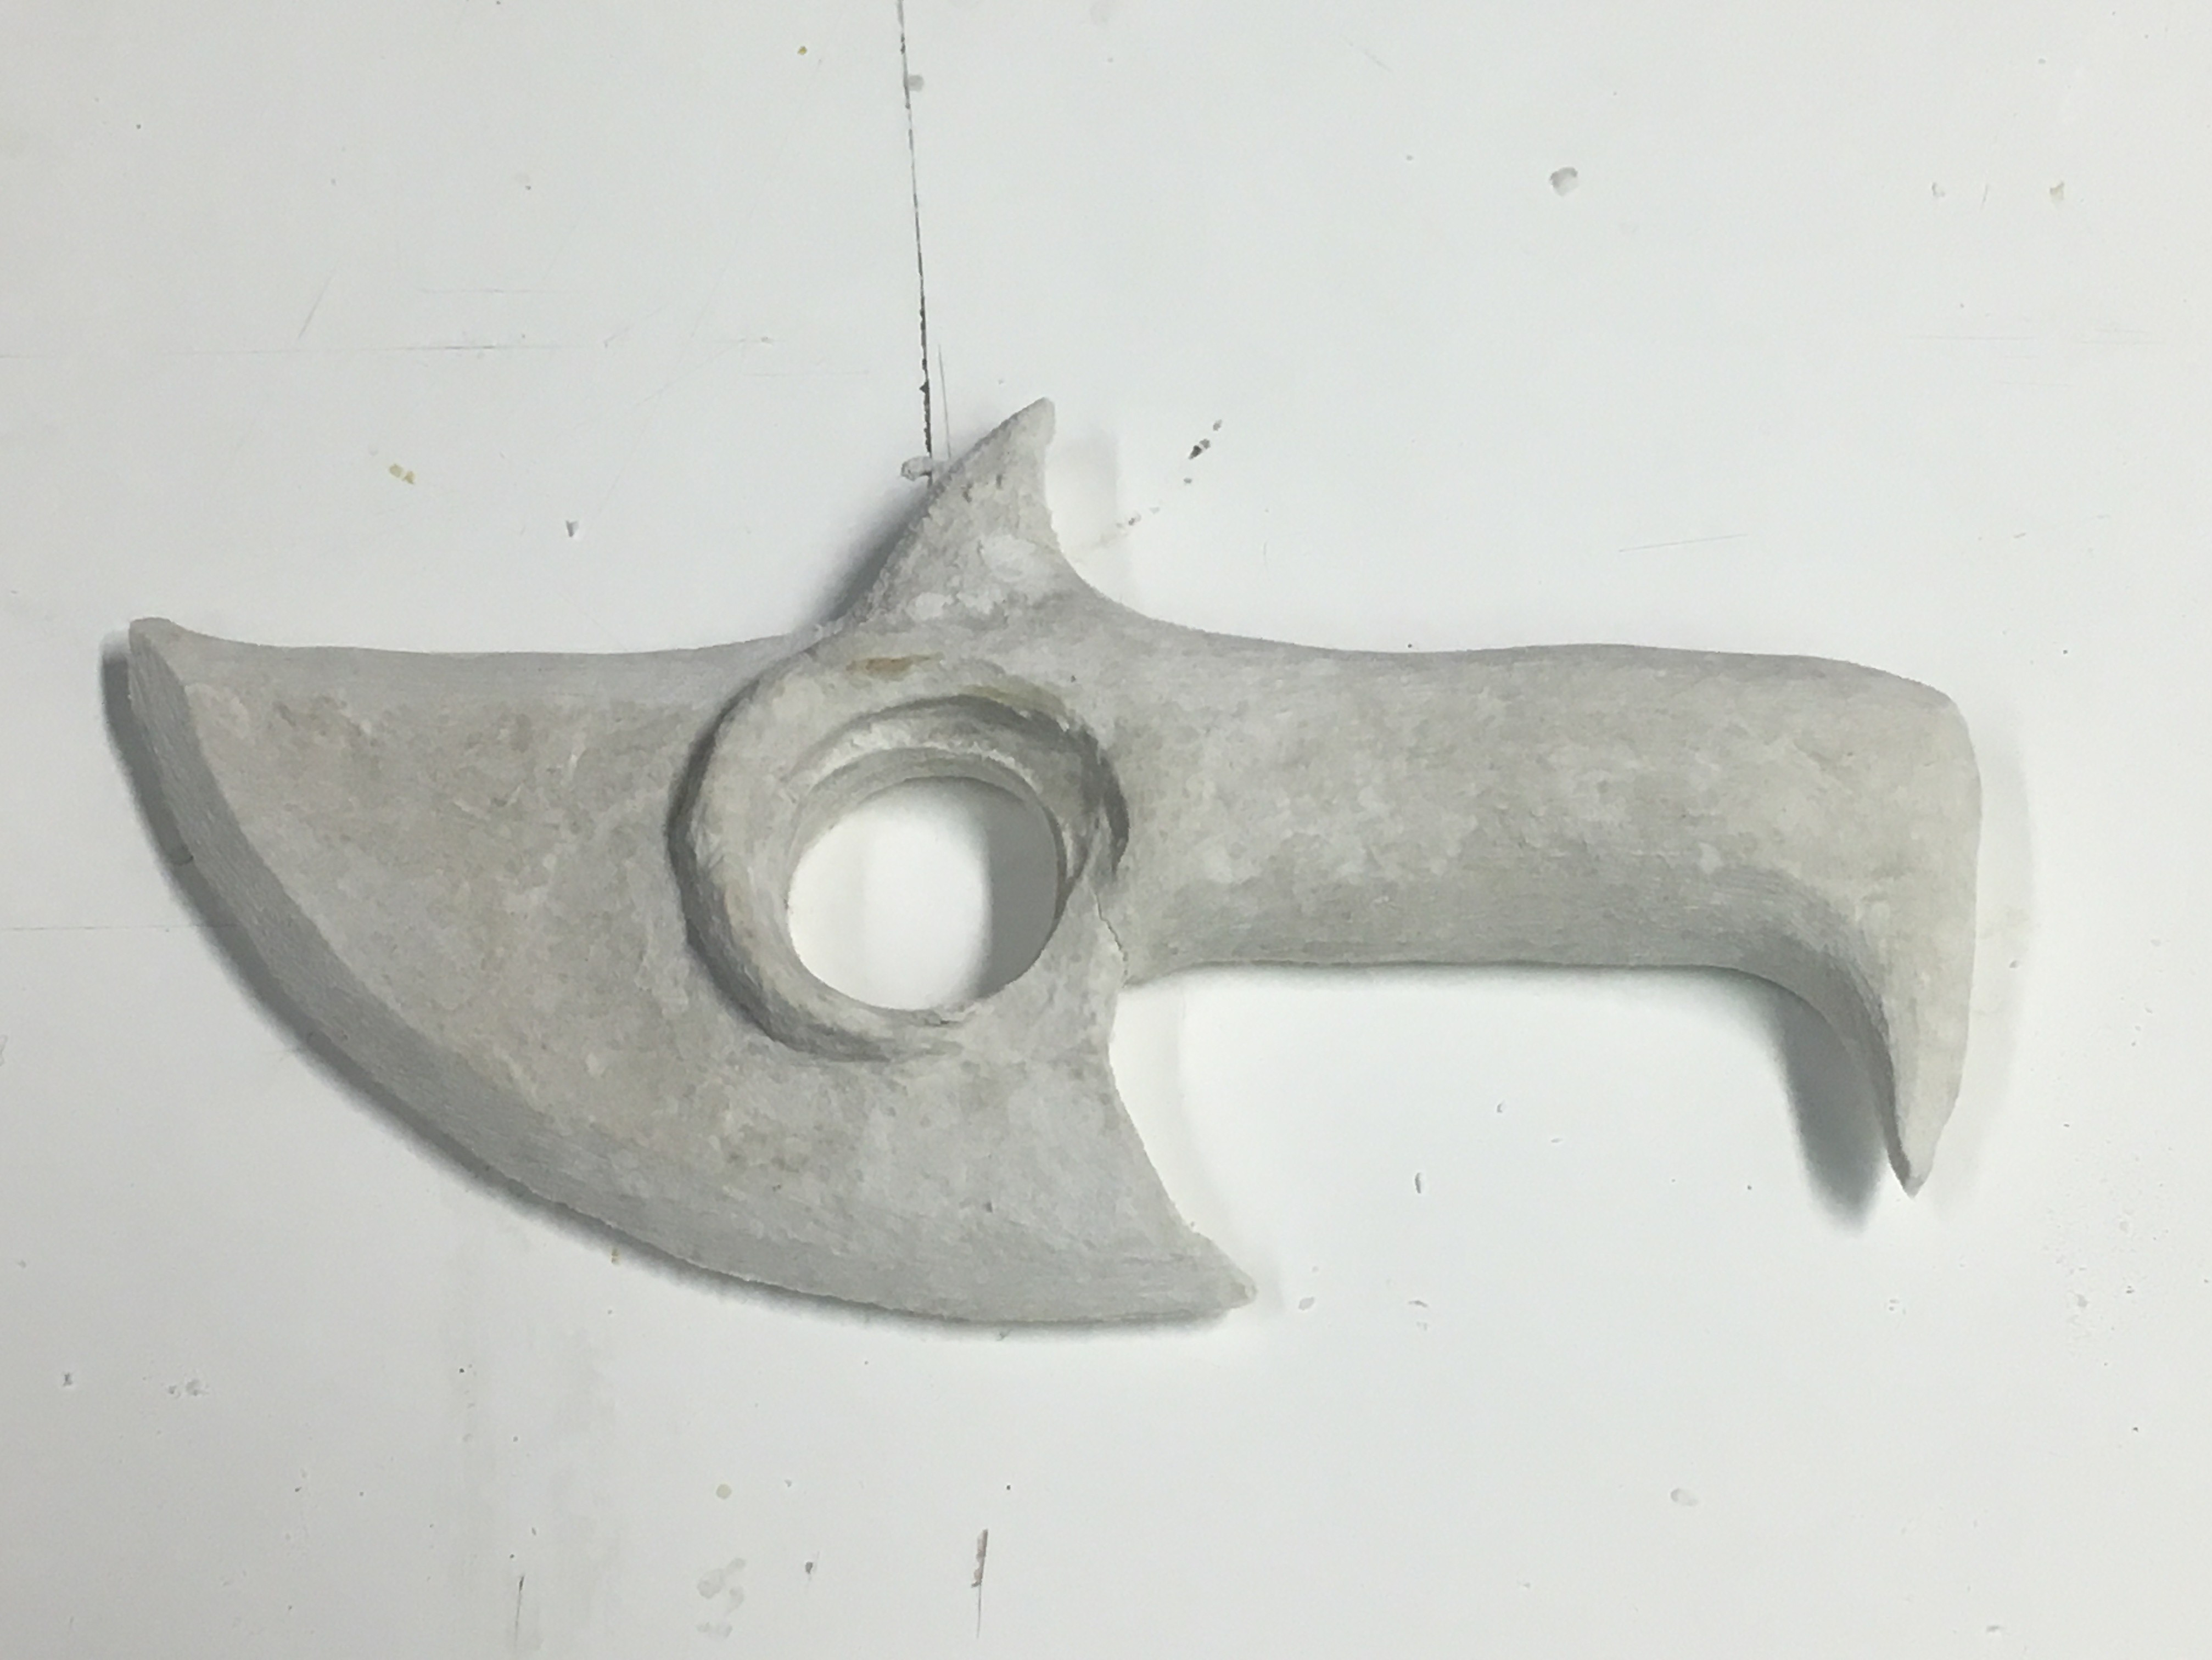
Crappy plaster prototype!
Break it while sanding!
Fix with Milliput and swearing!
Break it again!
*censored for profanity*
Start a religion worshipping Milliput!
Finish sanding!
Cover your trauma in black paint!
Box it!
Make a silicone mould!
Pour in resin and pray!
Sand it and fit in the lighting!
MORE MILLIPUT! *_*
Paint it! Wrap it! Act like you knew what you were doing the whole time!
Yeah! Never had a doubt. 🙂 … Not for a second. Nope.
So I’ve got one of these Zaapiels in the mould at work. I just have to go get it out and start sanding. The next question is: who would like a lovely glowing scimitar?
In other news, I am still working on the witchlights. The thing that I’m having problems with is getting the lid to line up properly and look like it’s part of the whole rock. I know how I want it to work but how to get it to that point is a real brain-twister.
Here’s what the underside of the witchlight looks like right now on my prototype. The lid at least sits flush on the opening and extends a few millimetres into the body of the rock so it doesn’t rattle around. But how to get it to look like there isn’t a seam? Hmm … still working on it. Thanks to everybody who’s been patient so far! I’m close to the solution.
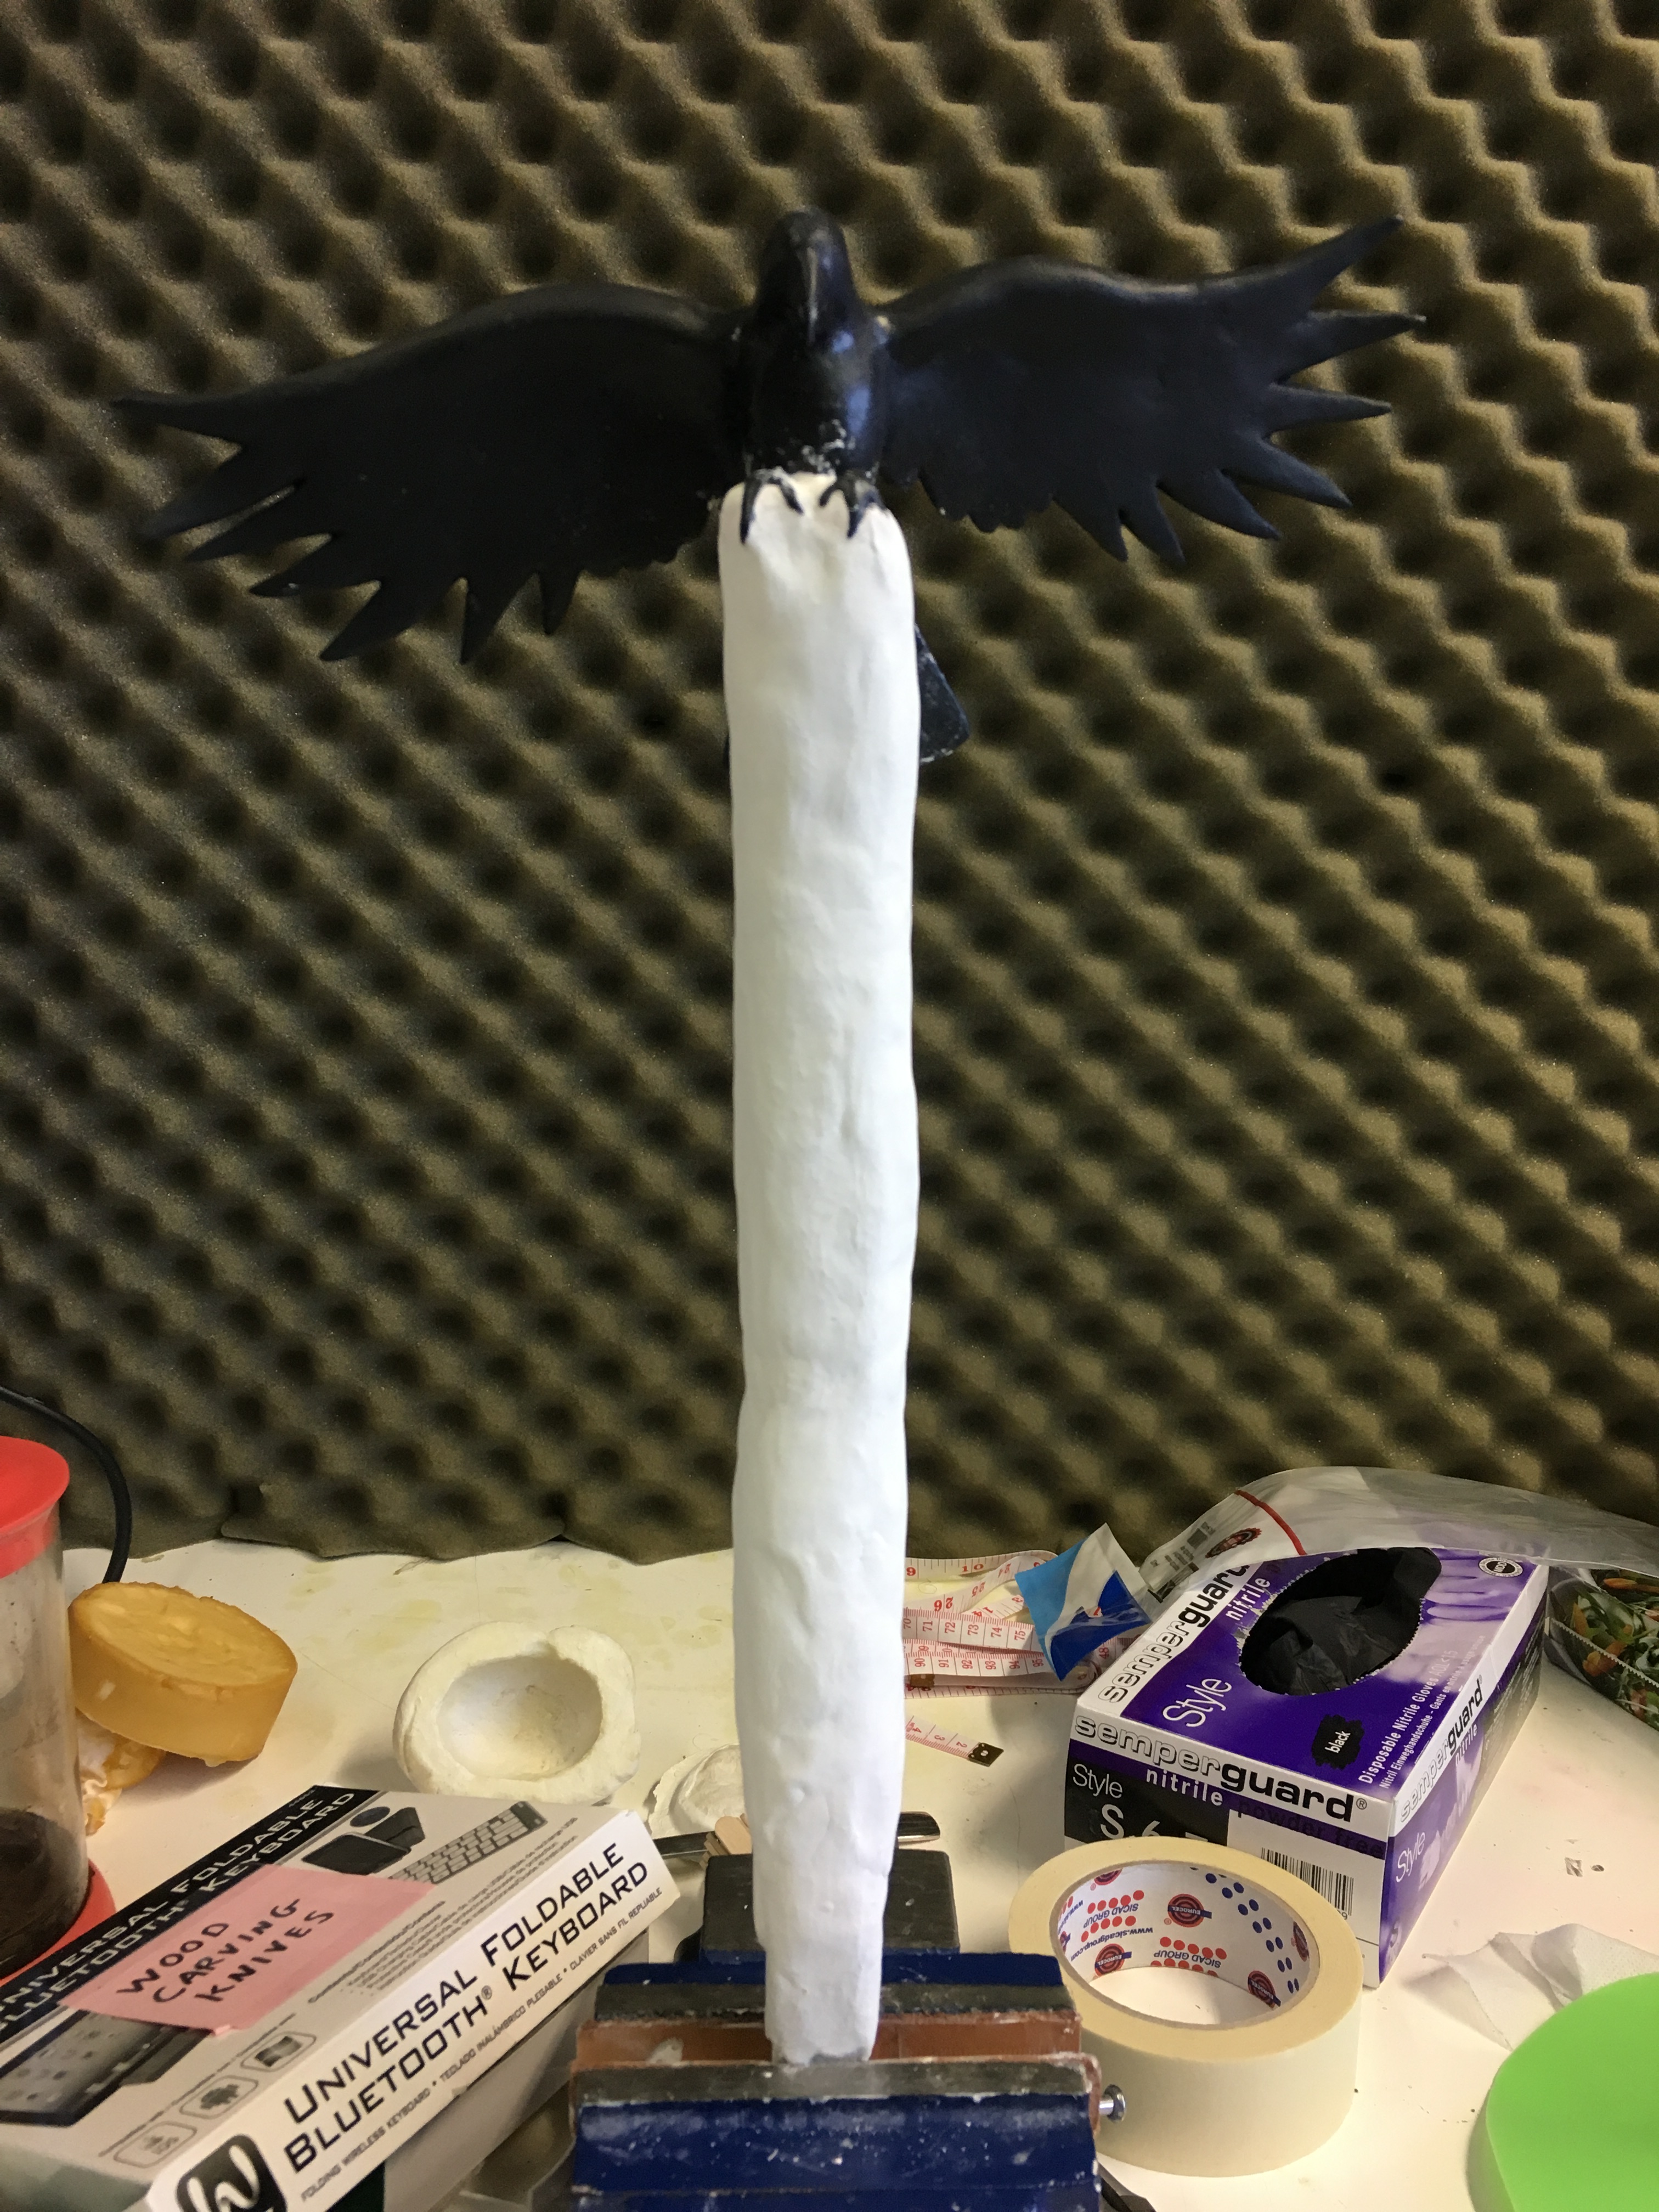
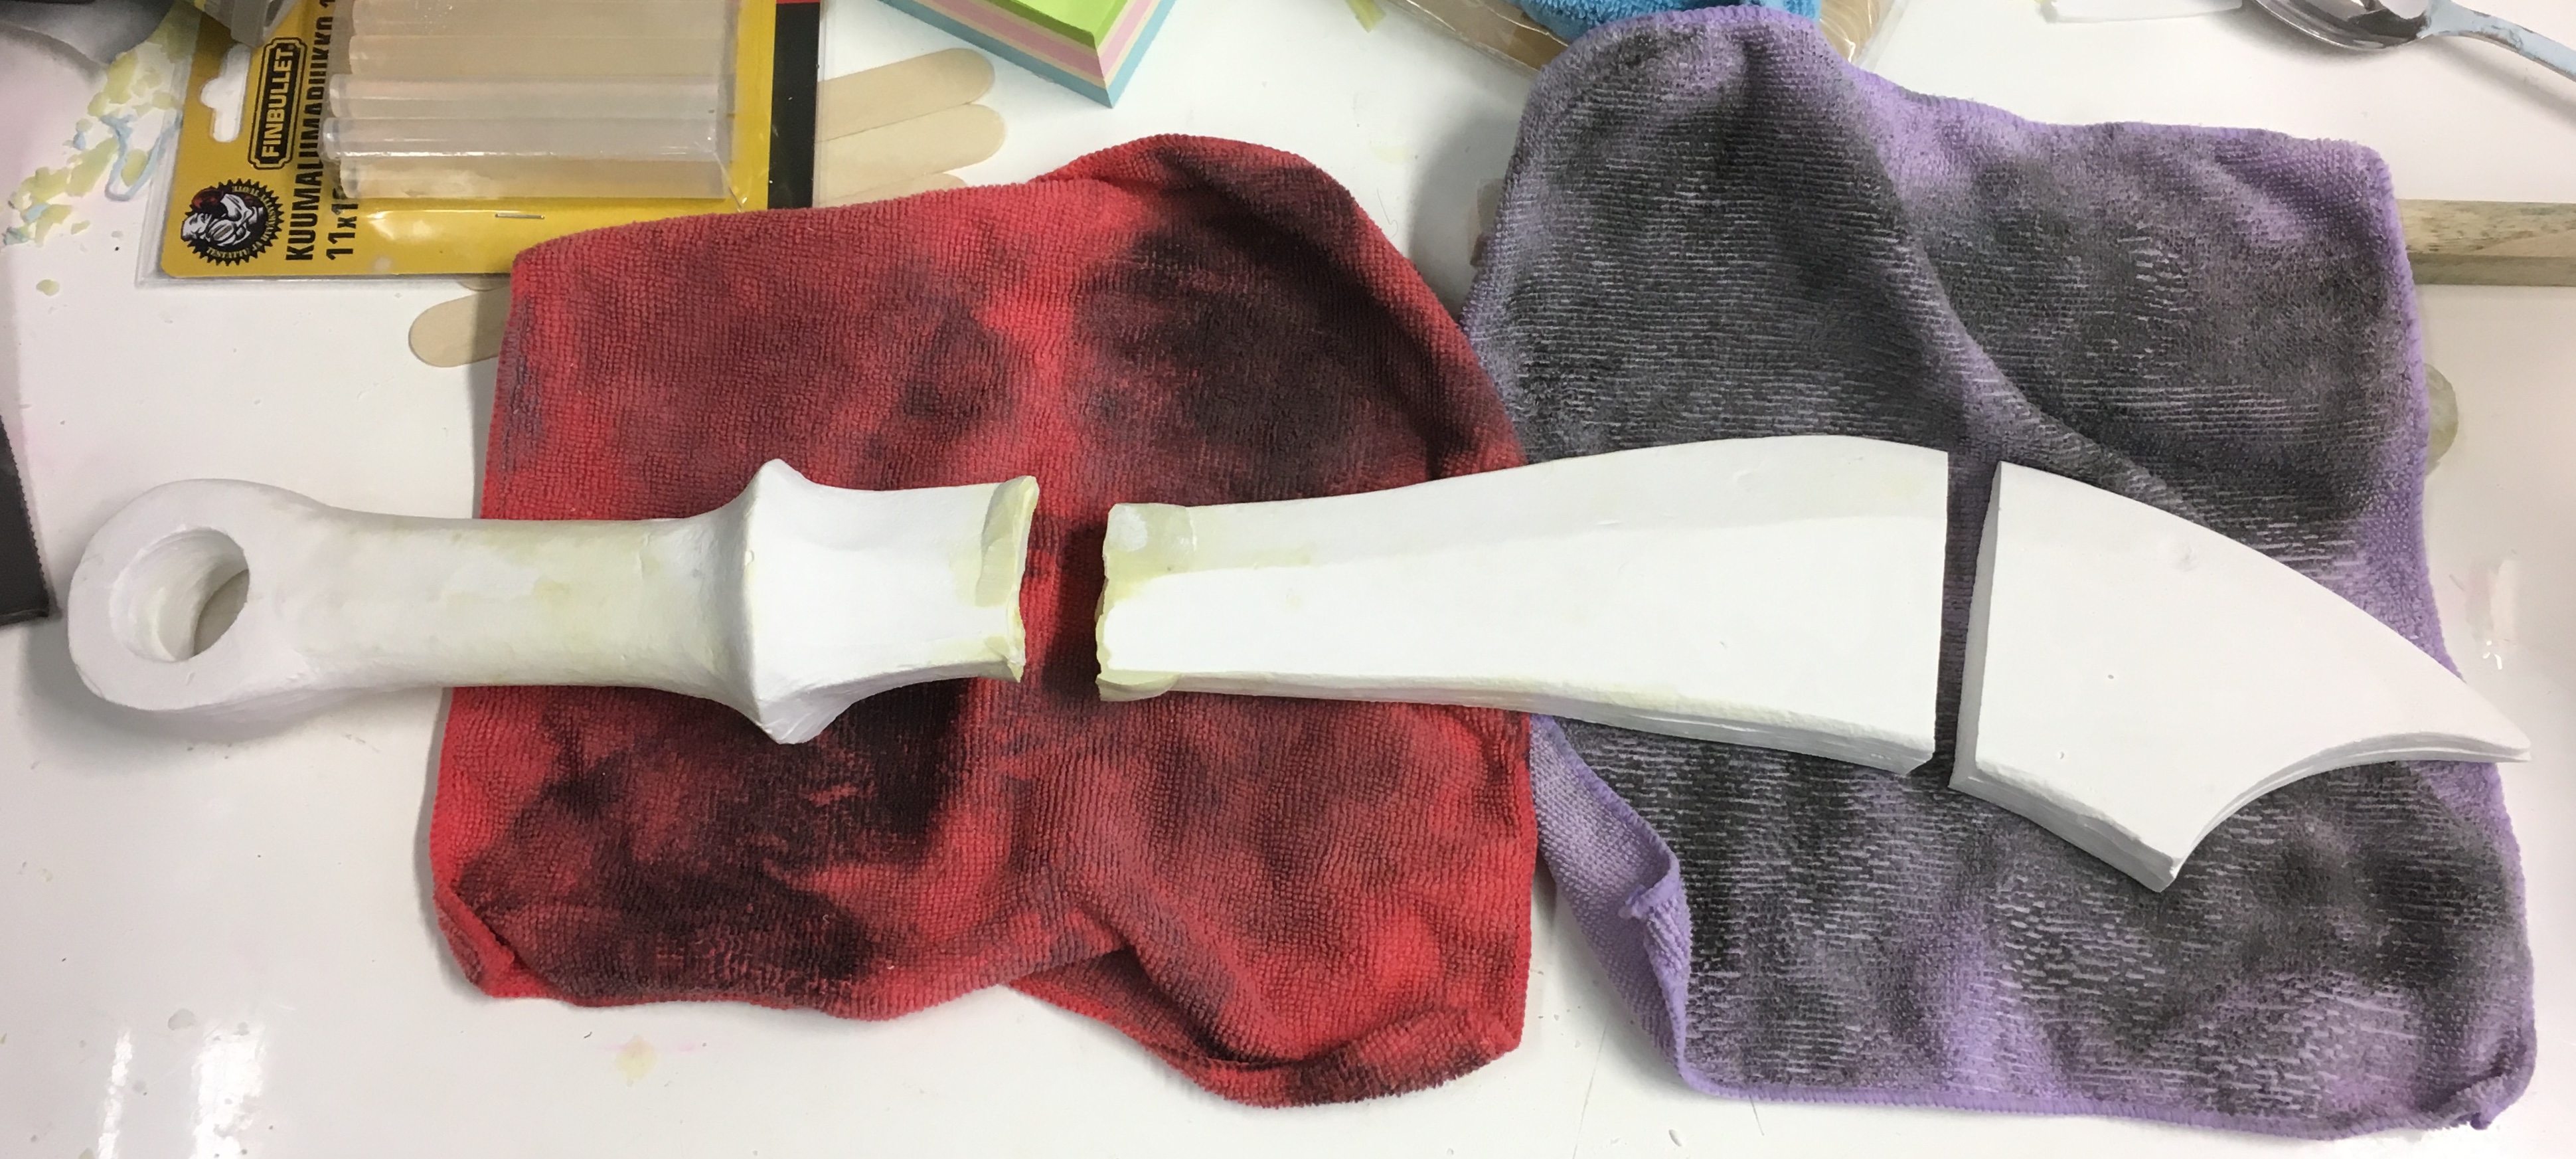
Here’s what I’ve got so far with my Raven’s Landing dagger. The icicle part is developing nicely but … I have to admit that the bird is simply too small for the size of the knife. That, and one wing is up a little higher than the other. I can’t really fix that so I’ve been forced to carefully saw the bird off the dagger and I will now have to sculpt another (LARGER) raven.
Don’t worry, the bird survived the removal and is doing just fine. I’ll keep it for some other project. Probably a Halloween decoration. I learned a lot with the first sculpting so I really don’t count it as time wasted.
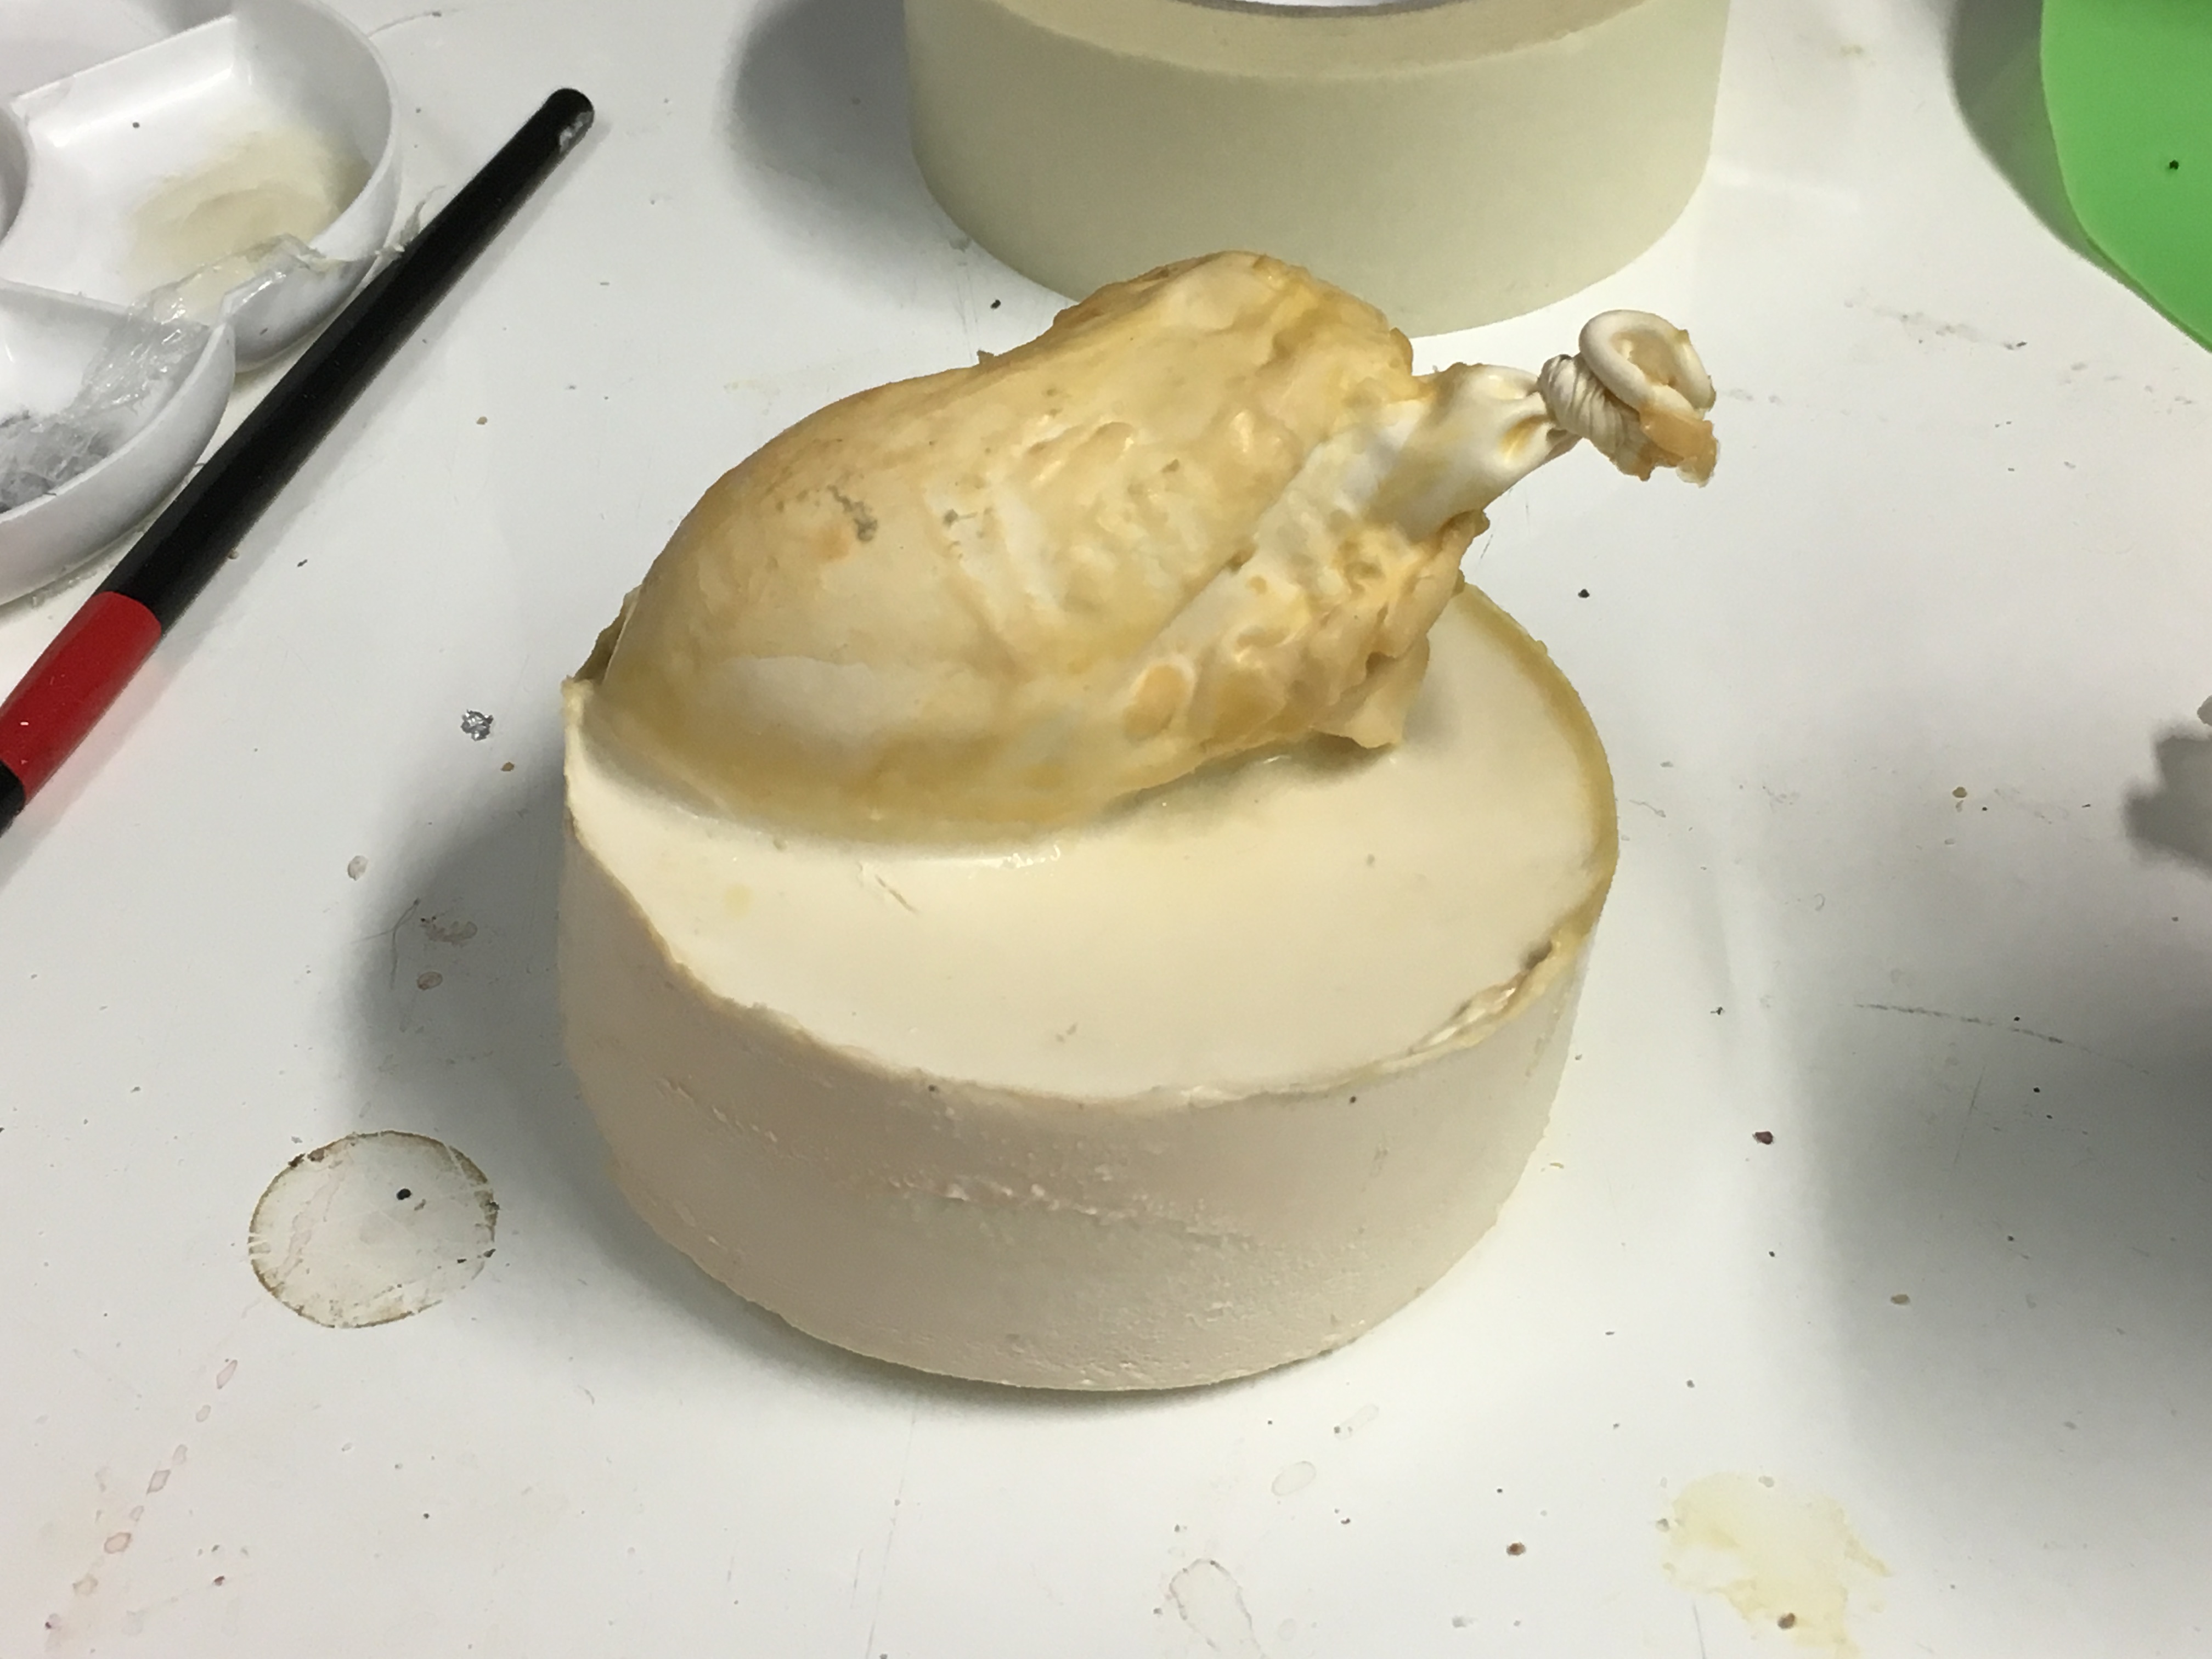
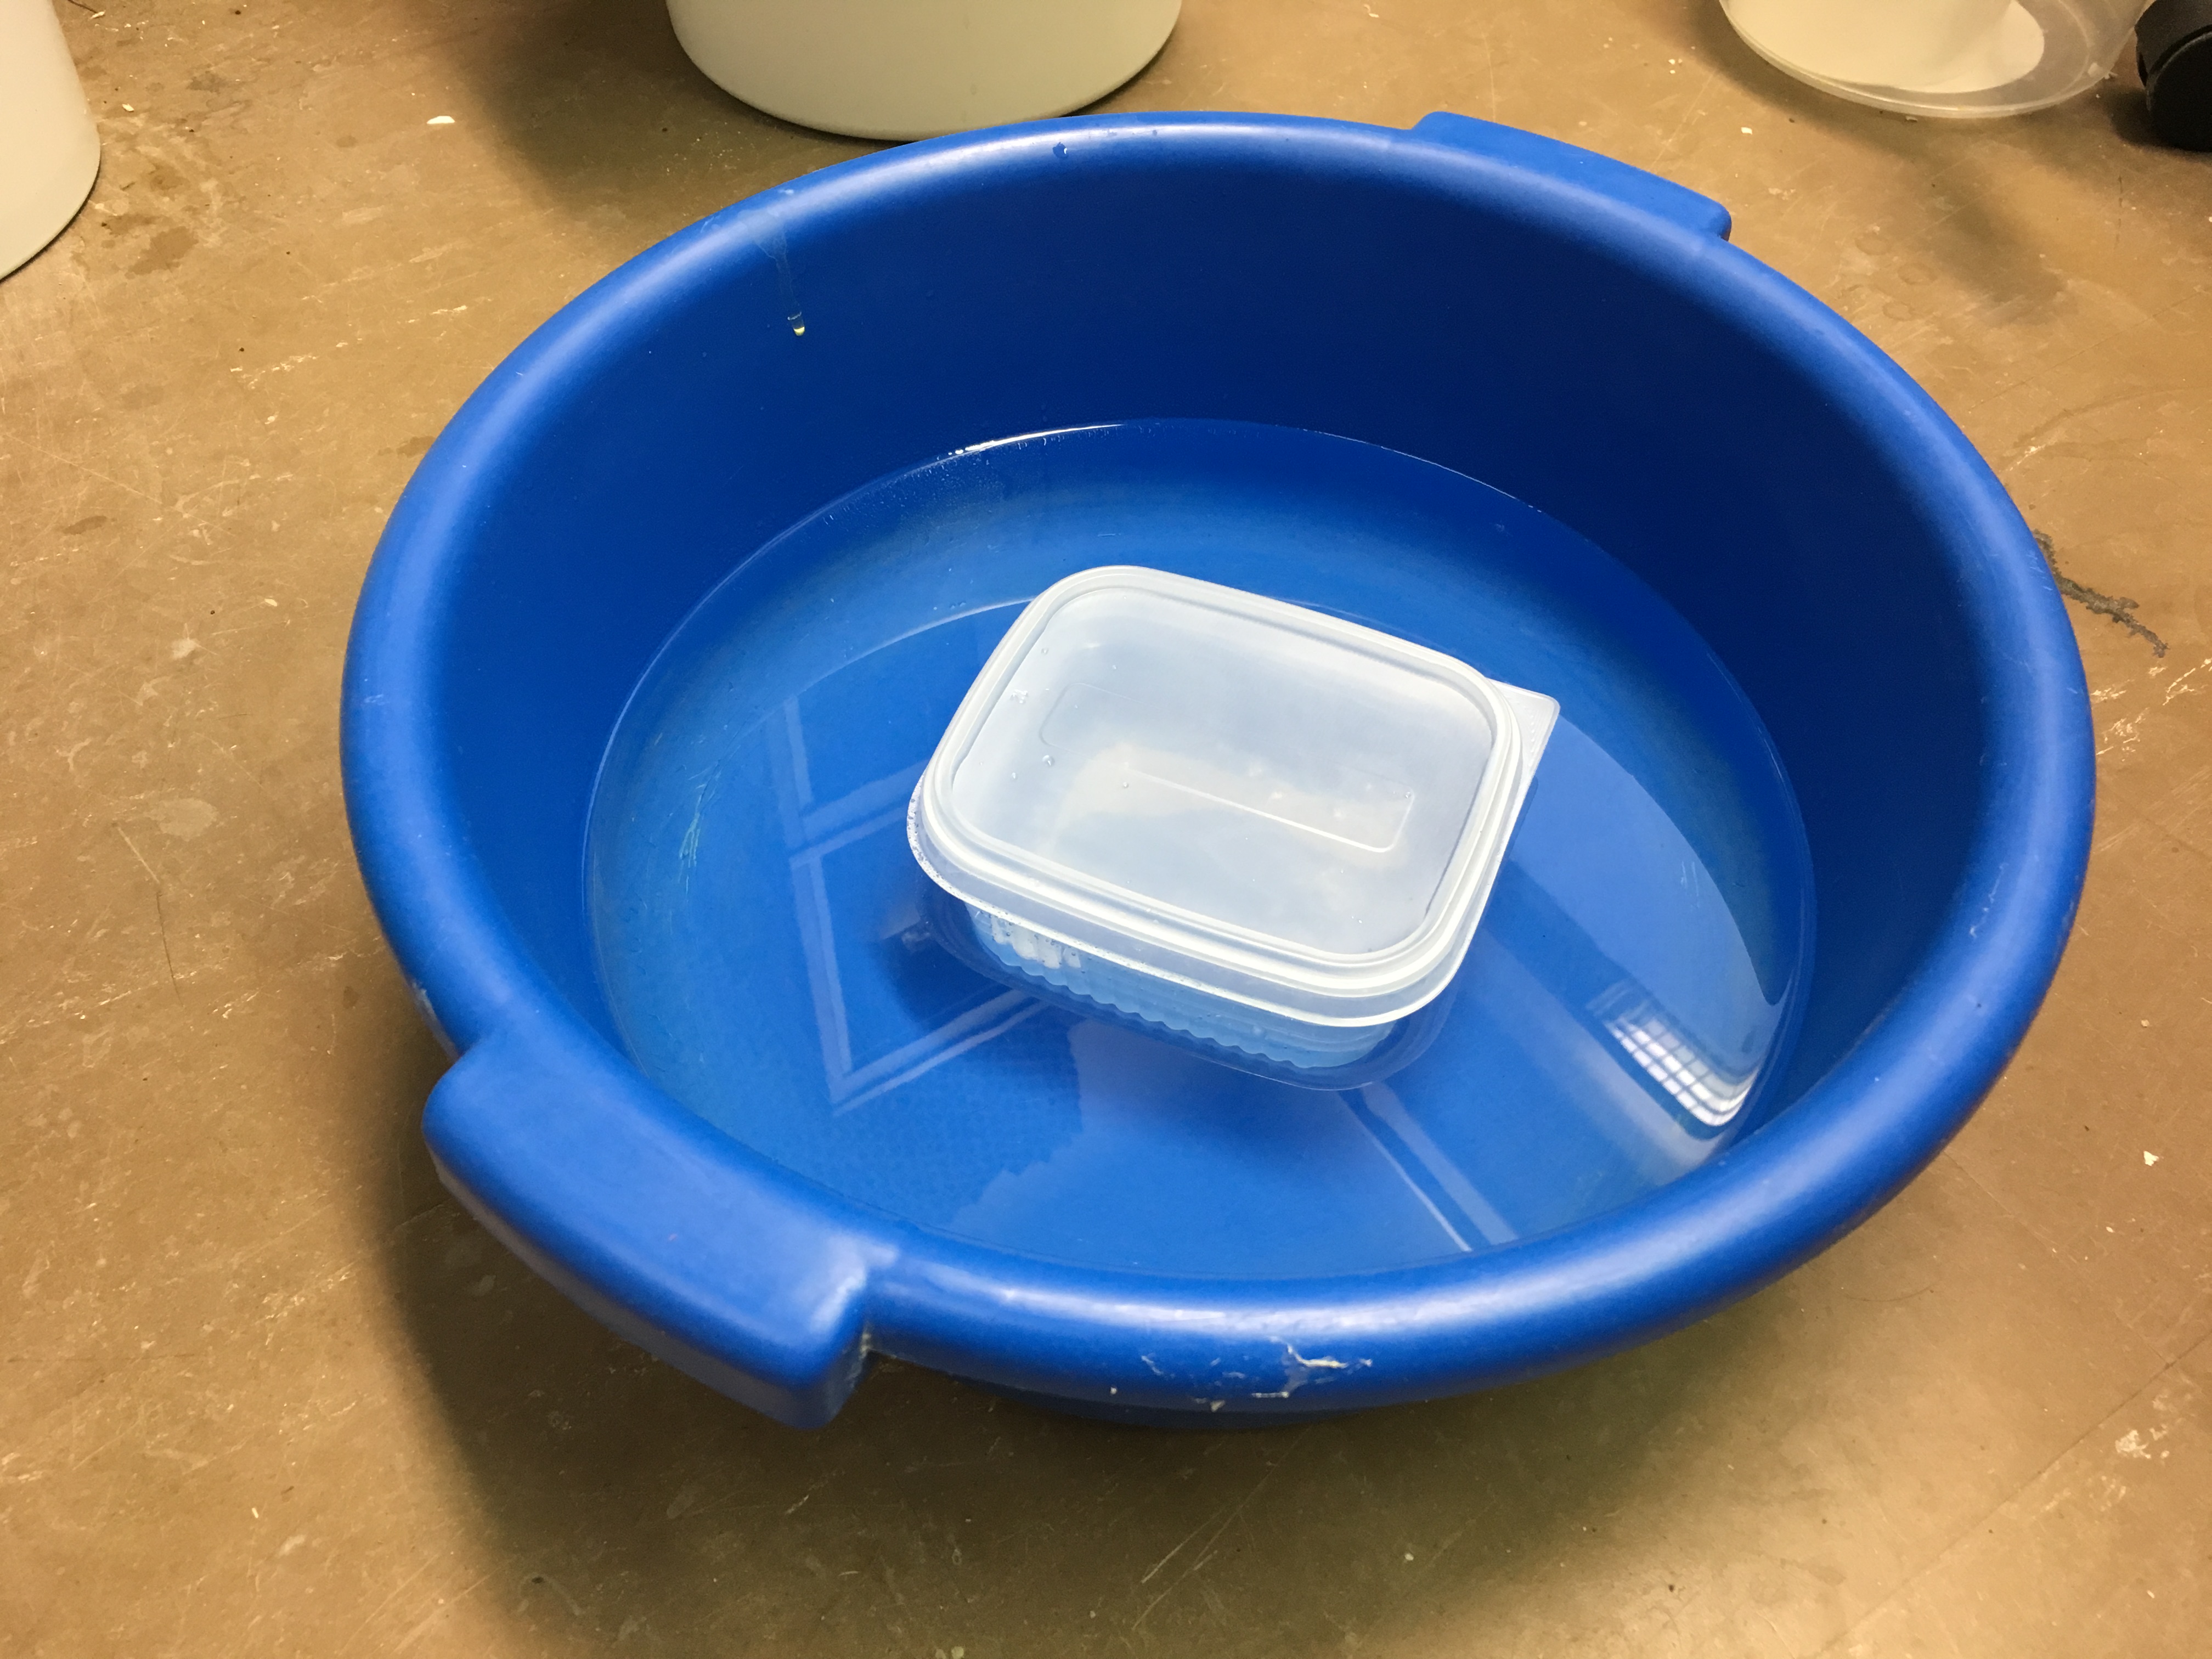
Now I’d like to introduce you to this little whoopsie. What happened to this thing? First I need to explain why there’s a balloon. When you have a container full of liquid latex for moulding, you need to be careful of it drying out on contact with the air. That includes the air inside the container! How do you preserve your latex for as long as possible?
You inflate a balloon a little bit and stick it in the container to take up space. That way, you get much less air touching the latex and it lasts longer.
That’s all well and good when you use your latex before its expiry date. I … didn’t. *sad trombone* So when the latex began to solidify inside the container, it bonded with the balloon (because it’s also made of latex!). It also gave the balloon several extra layers of latex, so now the air is trapped inside the very sorry looking thing and it can’t deflate.
I will keep this little abomination as a trophy of my failures. I shall call it “Garbage Heart” because it looks like some manner of artificial organ and can’t be used for anything but a paperweight.
What else have we got going on this week? I’m troubleshooting a problem I’m having with the Arabian Nights sword circuitry. (Can’t figure out where I flubbed up the circuit so I just have to do it again.
Annnd I have to go fight with Posti because they’re holding onto my carving cups until I pay them the duty fee. Which I already paid to customs directly. Have I mentioned lately how much I hate shipping? Get it together you guys. Seriously. It’s really hard to do business in a remote country when I can’t get my freaking stuff.
I got really in the swing of things last week and totally forgot to take pictures of most of the stuff I was doing! Silly me. Anyhow, I sanded and buffed the Arabian Nights sword. It’s ready for its light to be installed! I just have to go pick up the electronics this morning and then mill the slot for the electronics into the handle. I cannot wait to show you this project once it’s completed. I have some really great ideas for the handle.
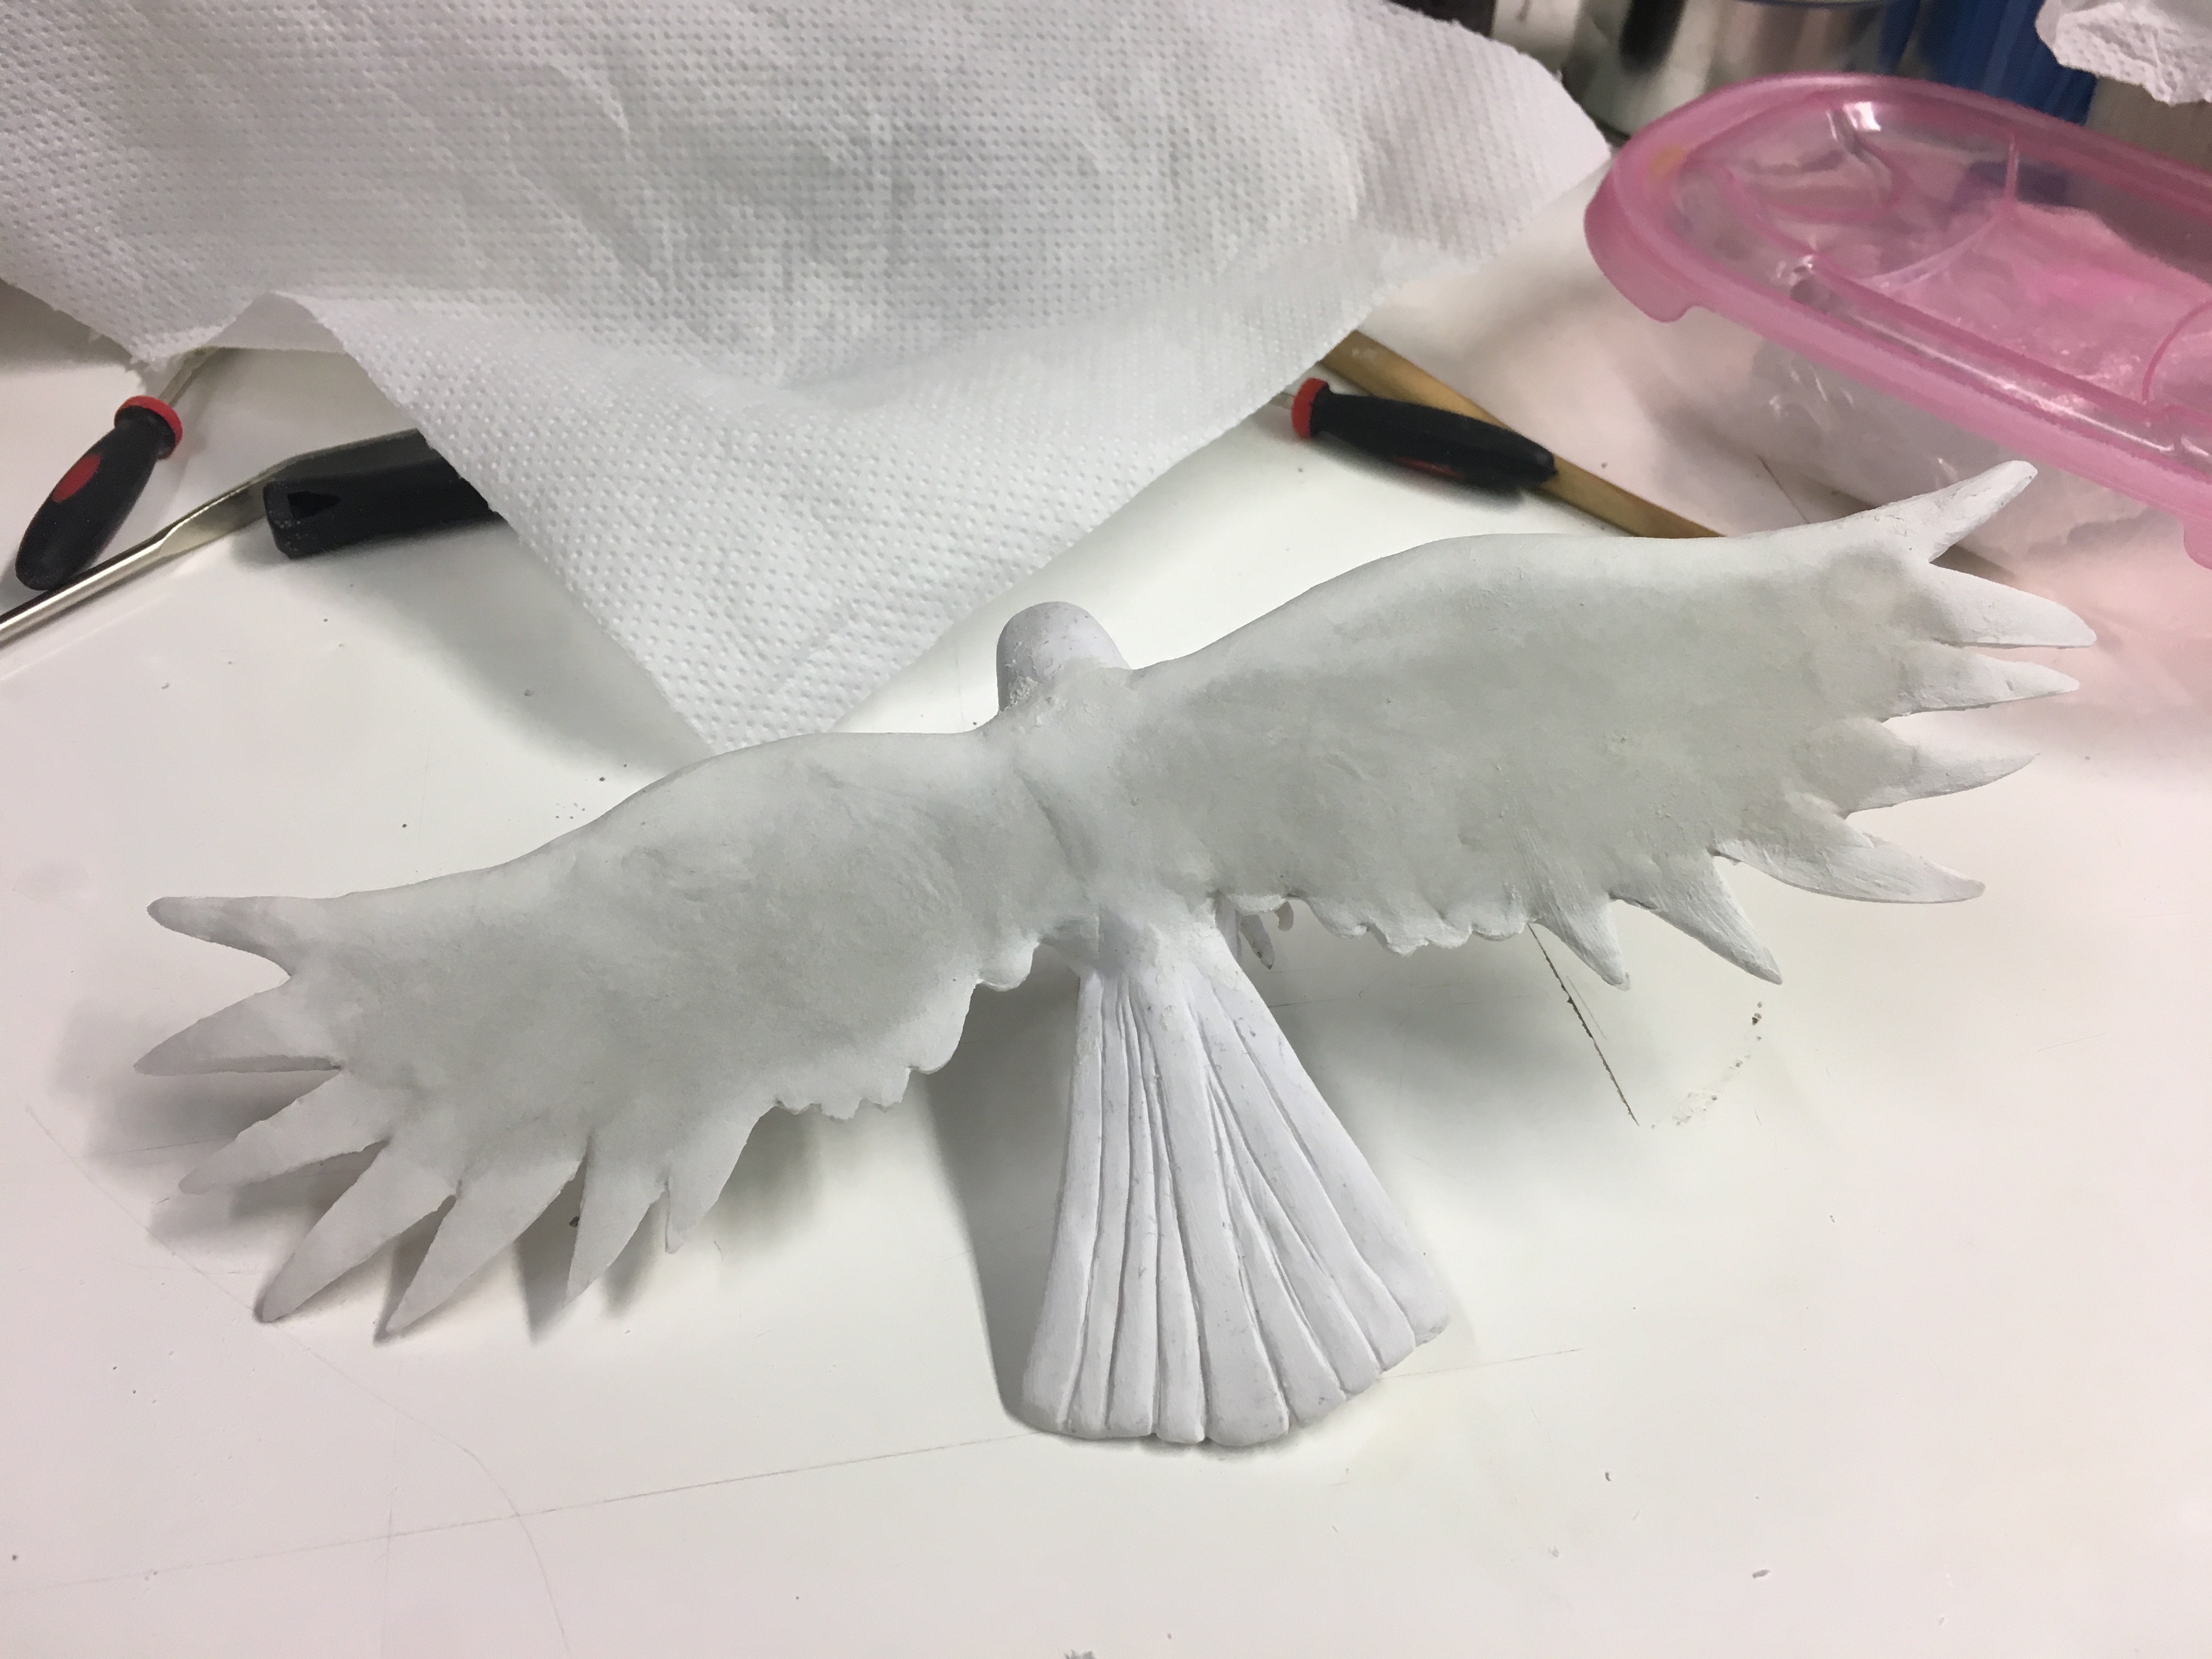
I also got the first layer of air-dry clay on the Raven’s Landing annnd …
You can see the problem can’t you? Yep. I mounted him too far back. He looks like he’s falling off backwards! The handle of the knife needs to be in line with the blade or the middle part there will just bend and snap when it’s used. No good!
So I simply sawed off the top portion of the stick where the raven is perched, cut a diagonal piece out of the blade, and re-mounted it with epoxy. It took a couple tries to get the angle right. Now it has a second layer of clay on it and is awaiting my attentions when I arrive at the workshop today. 🙂
I did a little more work on the witchlight prototype. I’ve been having issues with getting the “lid” to fit on it nice and flush so it’s not clear where the divide is. *grumble* Lots of tinkering because I have to wait for the air dry clay to dry in between each thing I change. Oh well. At least I should be done before the series ends. 😦 And here I thought the electronics were going to be the hard part! I figured that out ages ago.
Anyway. I’ve got to figure out where this electronics shop is so I can go get my lighting stuff. Wish me luck!
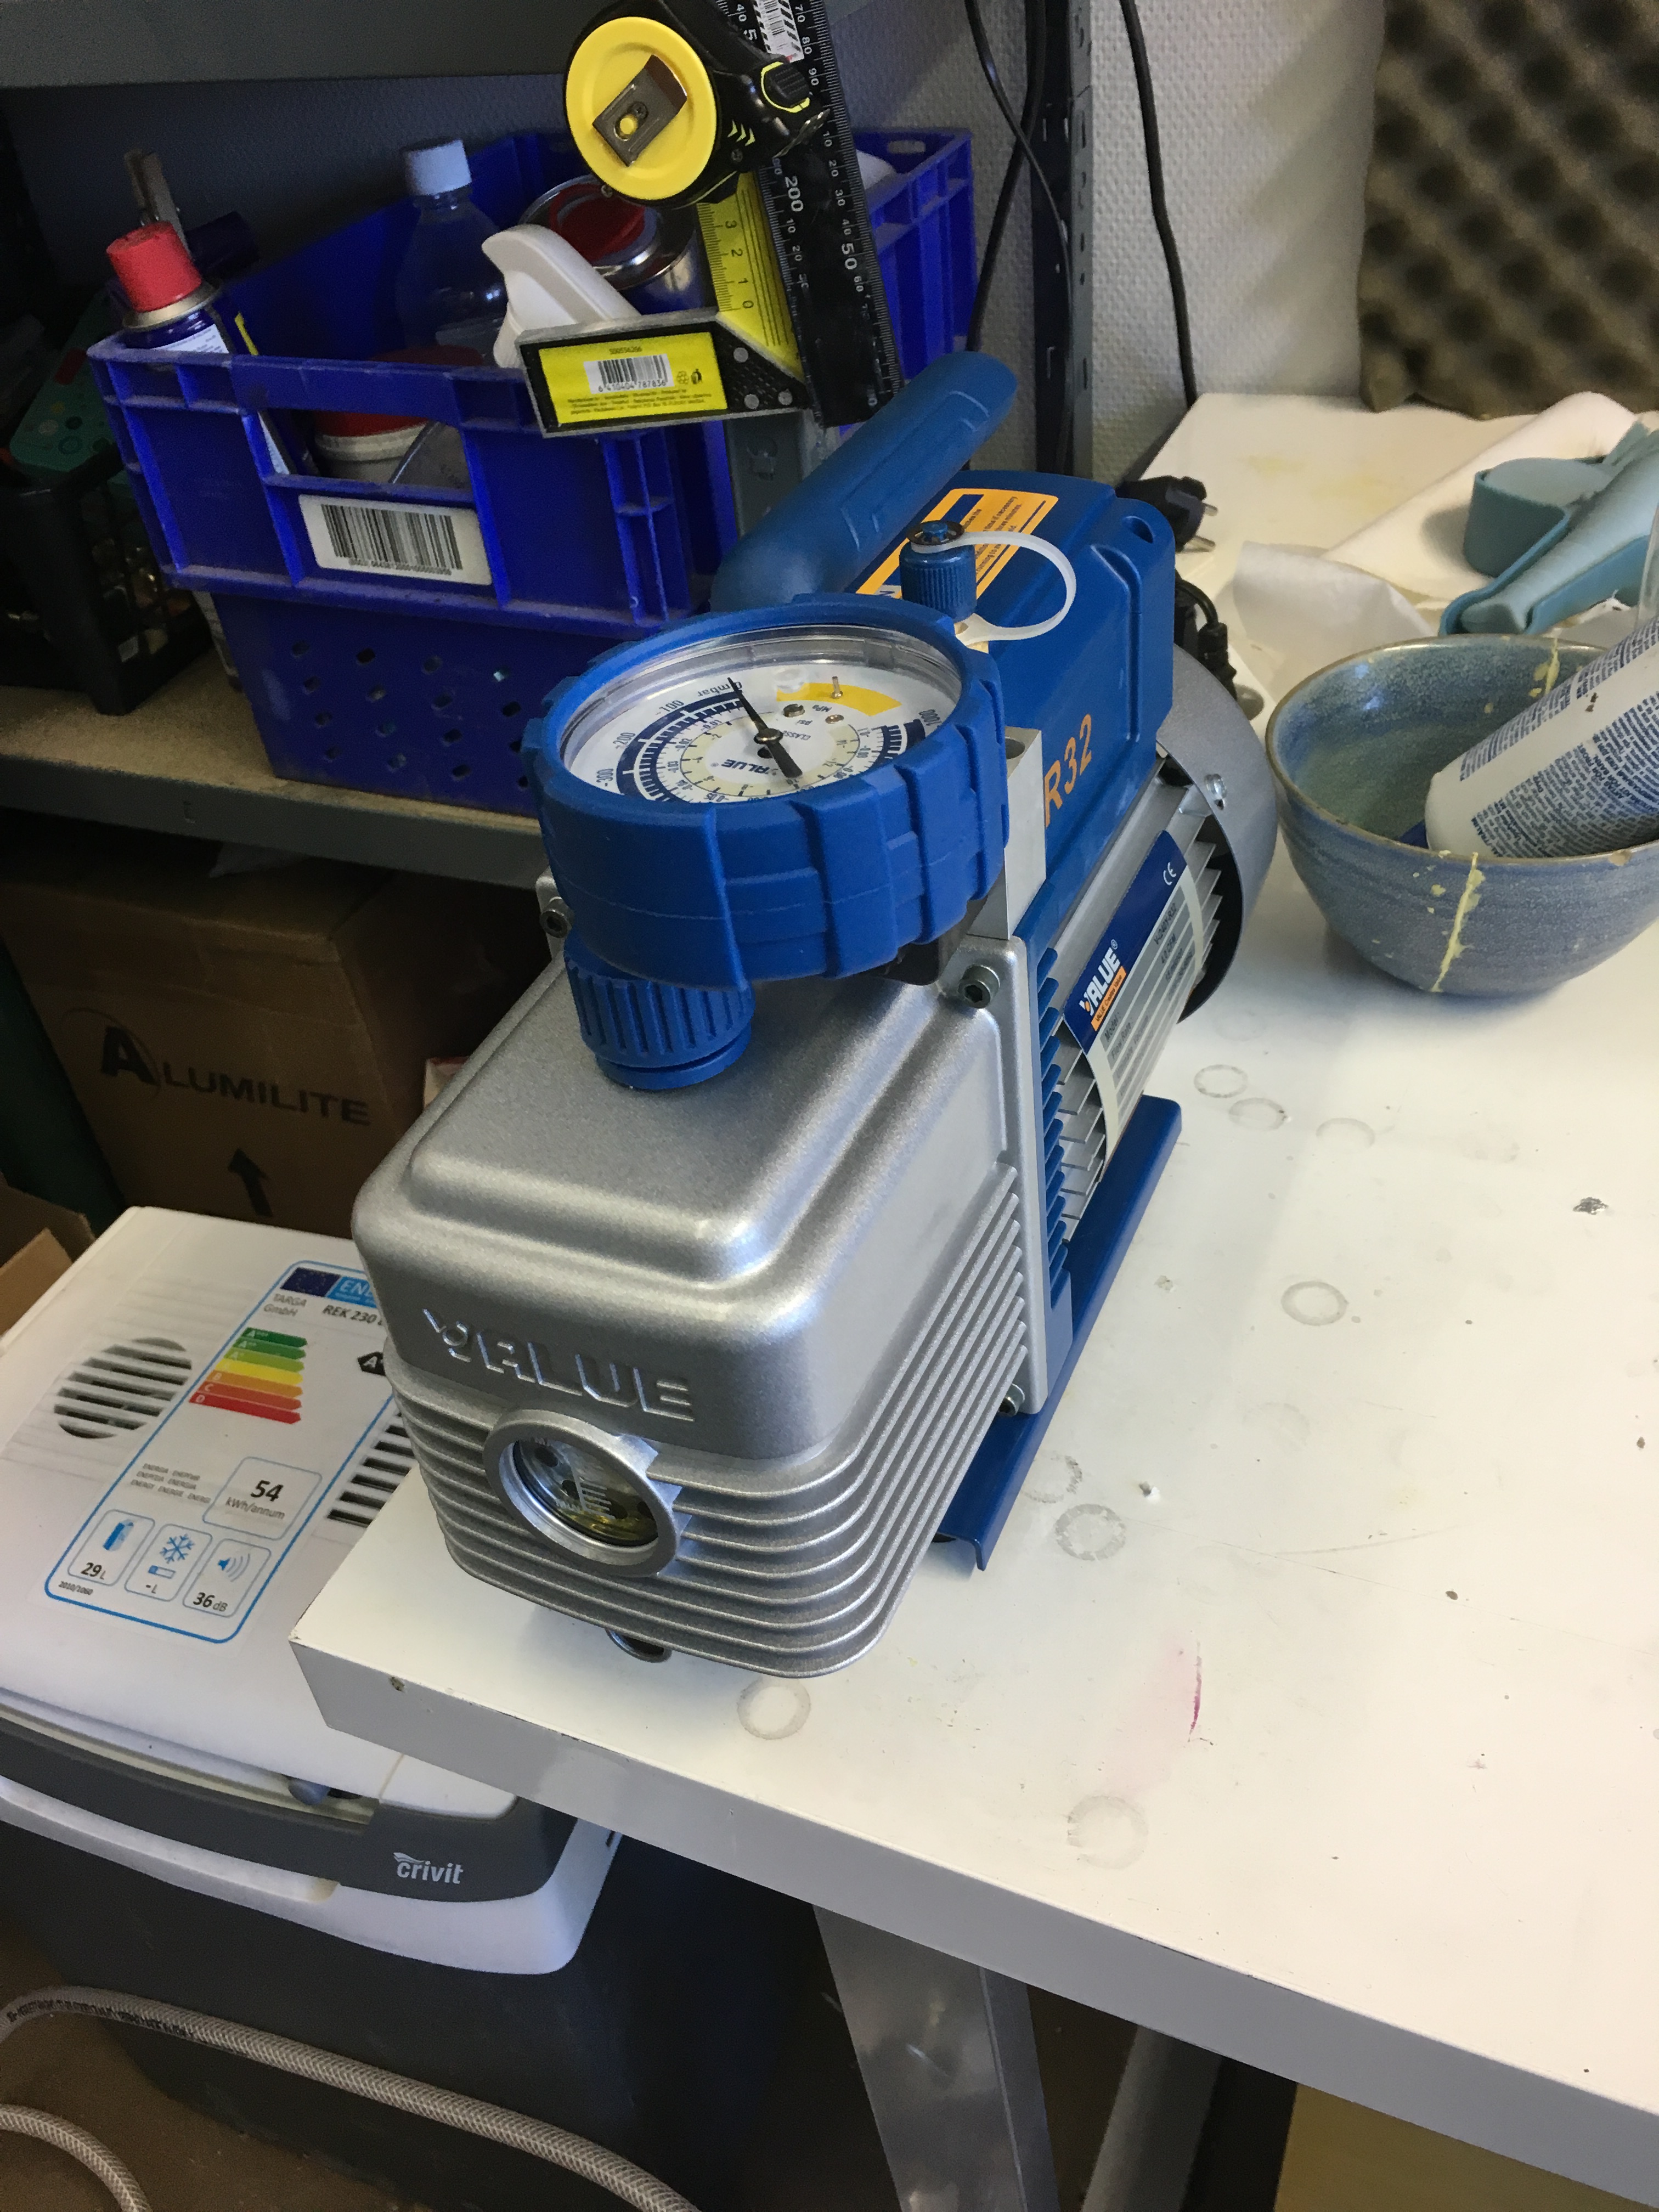
I have got some great news for you all. Check out my new baby!
What? You thought I had one of those stinking screaming mini-humans? Hah!
After I accidentally loaded my old vacuum pump with hydraulic oil instead of vacuum pump oil (oops!), it has never worked right again. Overheating. Loud banging noises. Foaming oil in the sight glass … It was bad. I needed a new one.
Thankfully, my buddies at Unicorn Tools had my back and got me a great price on a bigger, beefier vacuum pump. This one is getting pampered, I can tell you that much. They even sent along a spare container of the correct oil. Thank you guys so much! It takes about 3 seconds for this beast to pull all the air out of the vacuum chamber and it hums along like a champ under load. Love it!
Bask in its beauty.
And now that I have a working vacuum pump once again, I can cast things! Woo! Back to making swords!
Speaking of making swords …
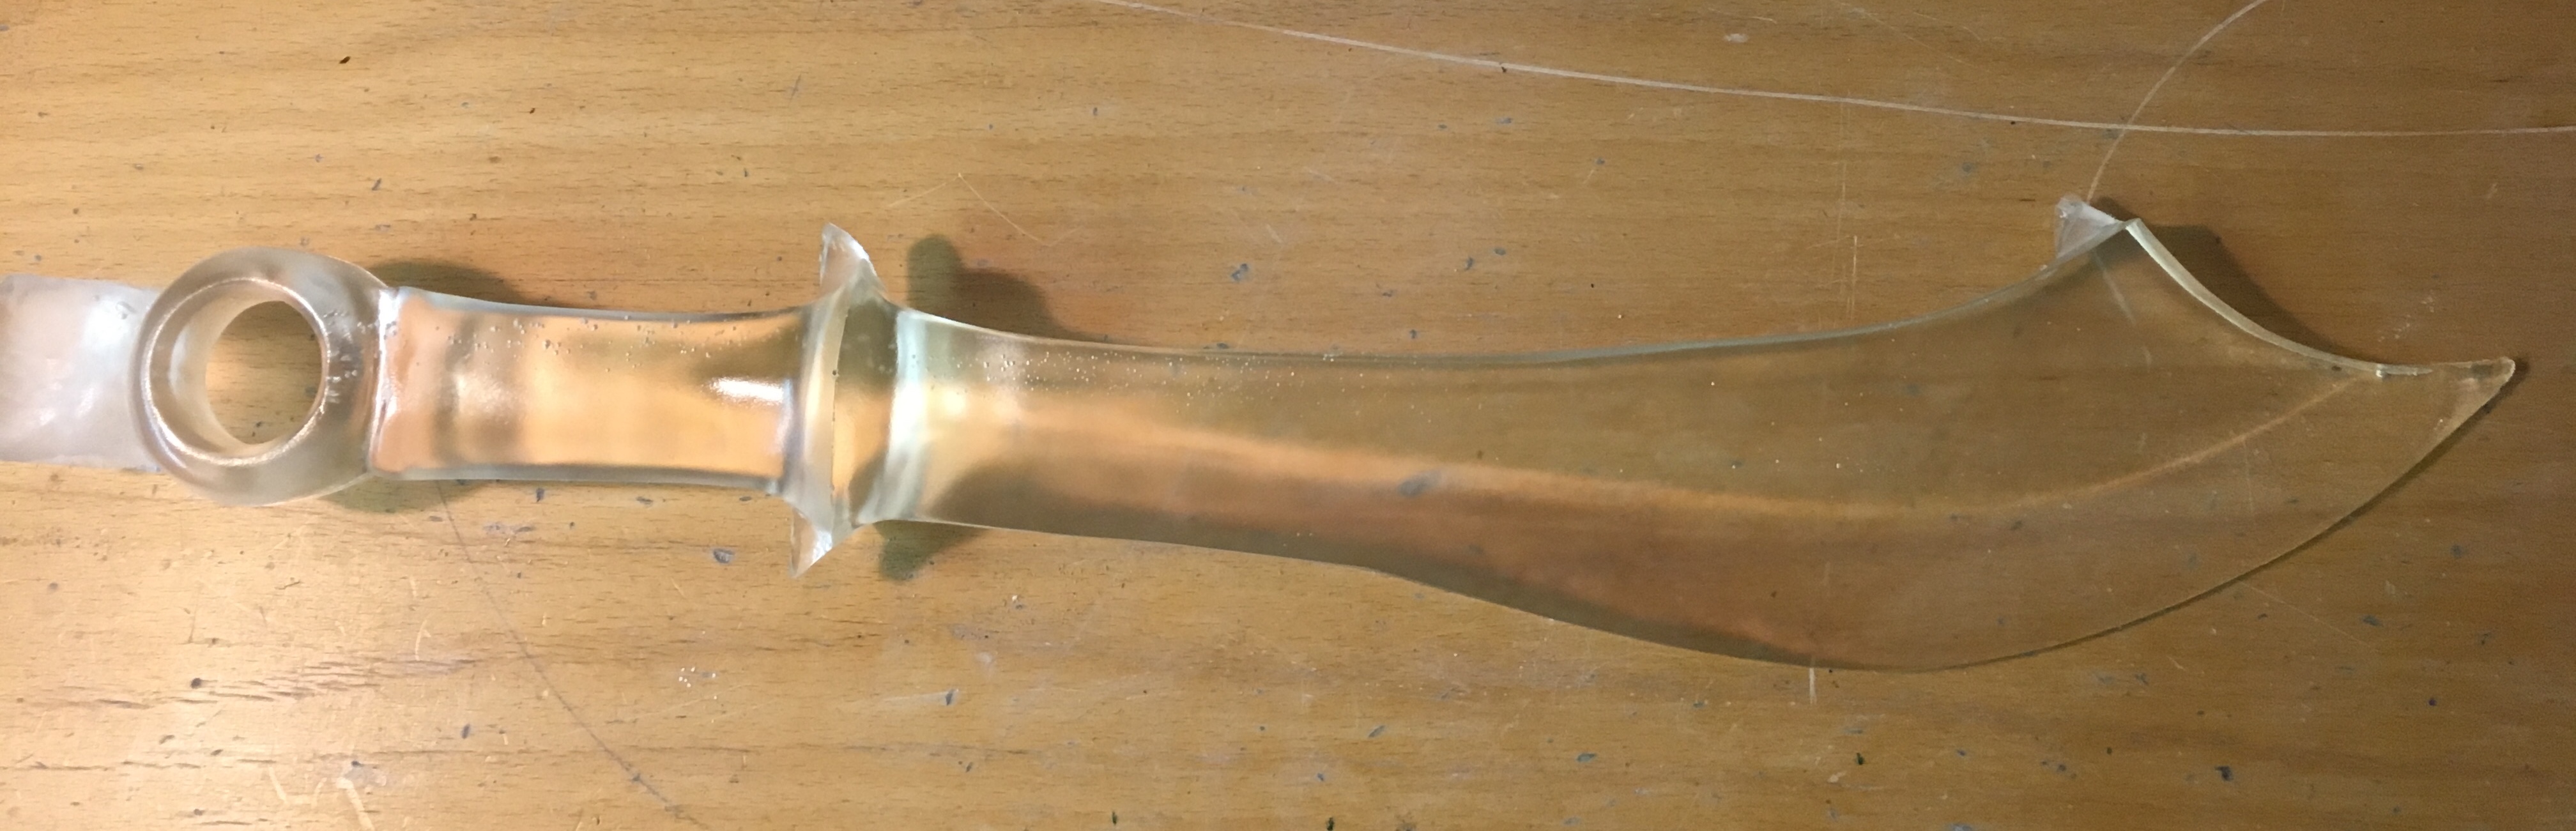
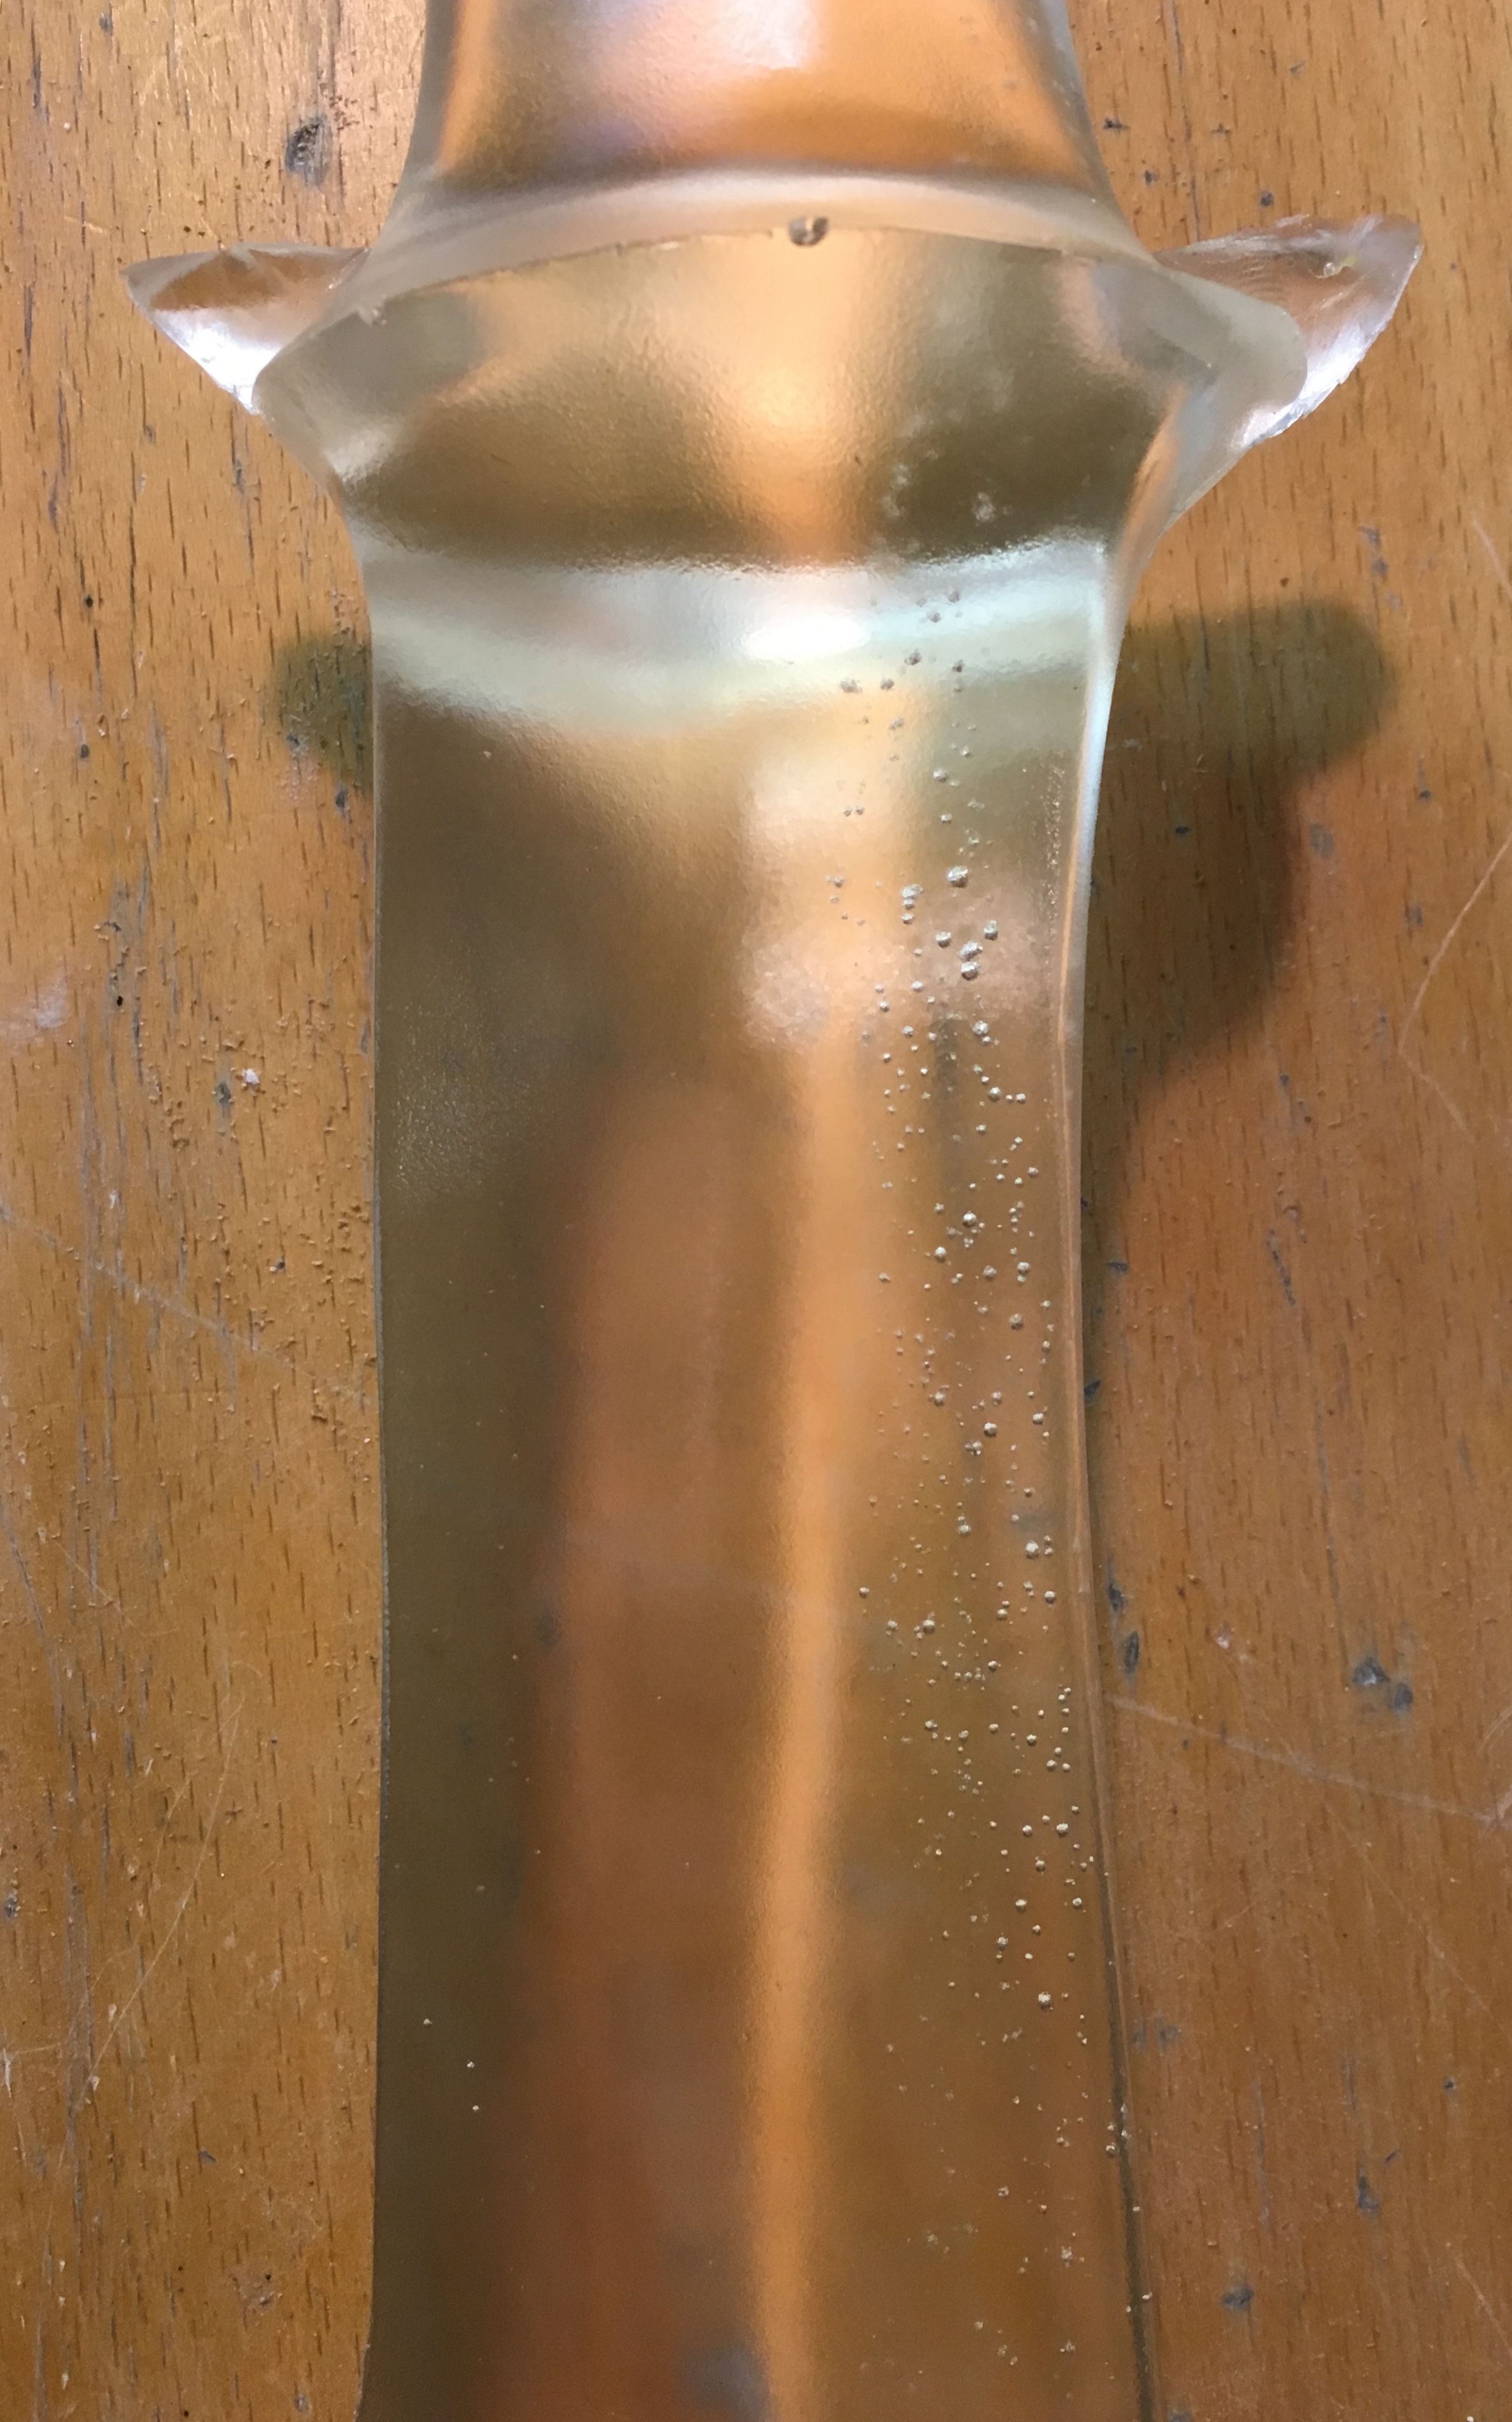
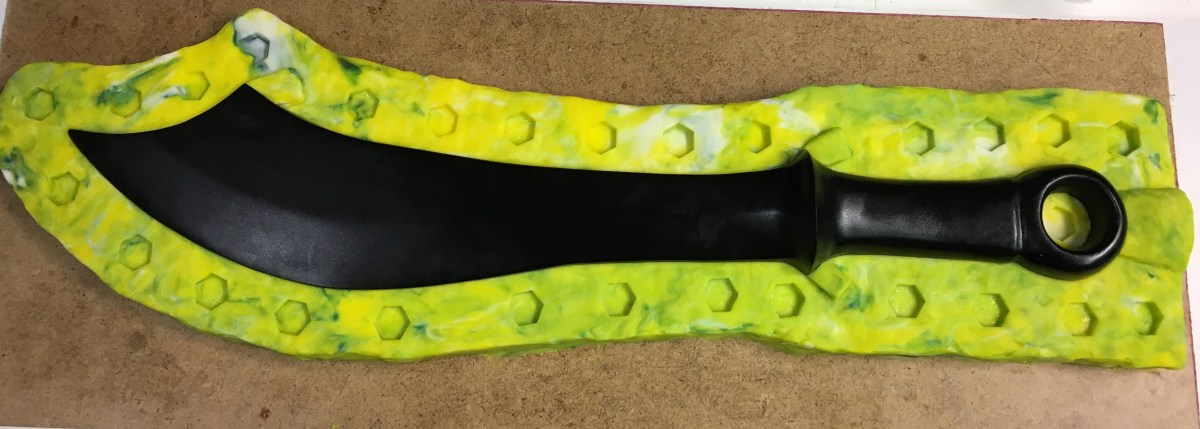
Oh yes I did. Those of you familiar with my models will recognise Zaapiel, the exotic ring-sword inspired blade. The funky “spikes” sticking off of it are simply the little tabs that are created by the bubble traps in the mould. They get trimmed off before sanding and polishing happens.
Now this sword has some bubbles in it due to a resin issue I had, but the person it’s for said it looked cool as-is so we’re going with it. If you look closely, it looks like they’re some kind of magic spell firing down the length of the blade from the hand of some powerful magus.
ZAP!
That’s going to look really cool when it’s lit up. 🙂
The issue I was having with the resin was that I was using Alumilite Clear Slow and this resin tends to “gel” up after a few months of not being used. If this happens to you, do not panic and do not throw it away. All you need to do is put it in a water-tight container and give it a hot water bath for a few hours and it will be liquid again.
I portioned out about 500mL of resin, stuck it in a Ziploc container, sealed it, and popped it in a hot water bath. Every now and then I took it out, dried it off really thoroughly, opened it up, and stirred it until it was the liquid consistency I wanted. Now, you’ll notice I emphasised “dried it off really thoroughly” and that’s because resin is really, really finicky about moisture. Even a little dampness. So you can imagine what a drop or two of water in the mix would do to it. Be careful when you’re handling it.
So I re-liquefied it, vacuumed it, and still got bubbles in the finished product? Yep. That was my fault. You see, resin cures faster when it’s warm. Annnnd I forgot to cool the resin down after its hot water bath. I just went straight to the degassing and mixing and pouring. Whoops. I got a little too gung-ho and eager to try out this new sword mould. So I should have gotten twelve minutes of working time with the resin but I had slightly less than that because it was quite warm and the bubbles couldn’t escape as well before it hardened.
But we still ended up with a really cool result so I guess I’m learning stuff about mould-making and handling my materials effectively. Yay for learning!
Today, of course, I move on to the next stage of the build and that means wet-sanding the whooooole surface and getting a consistent overall clarity and shine. And that means I’m working from home today where I have running water. Yup. Picture me standing in the bathroom with my hands in the sink for … let’s not think about how many hours. That’s my work day today. LOL
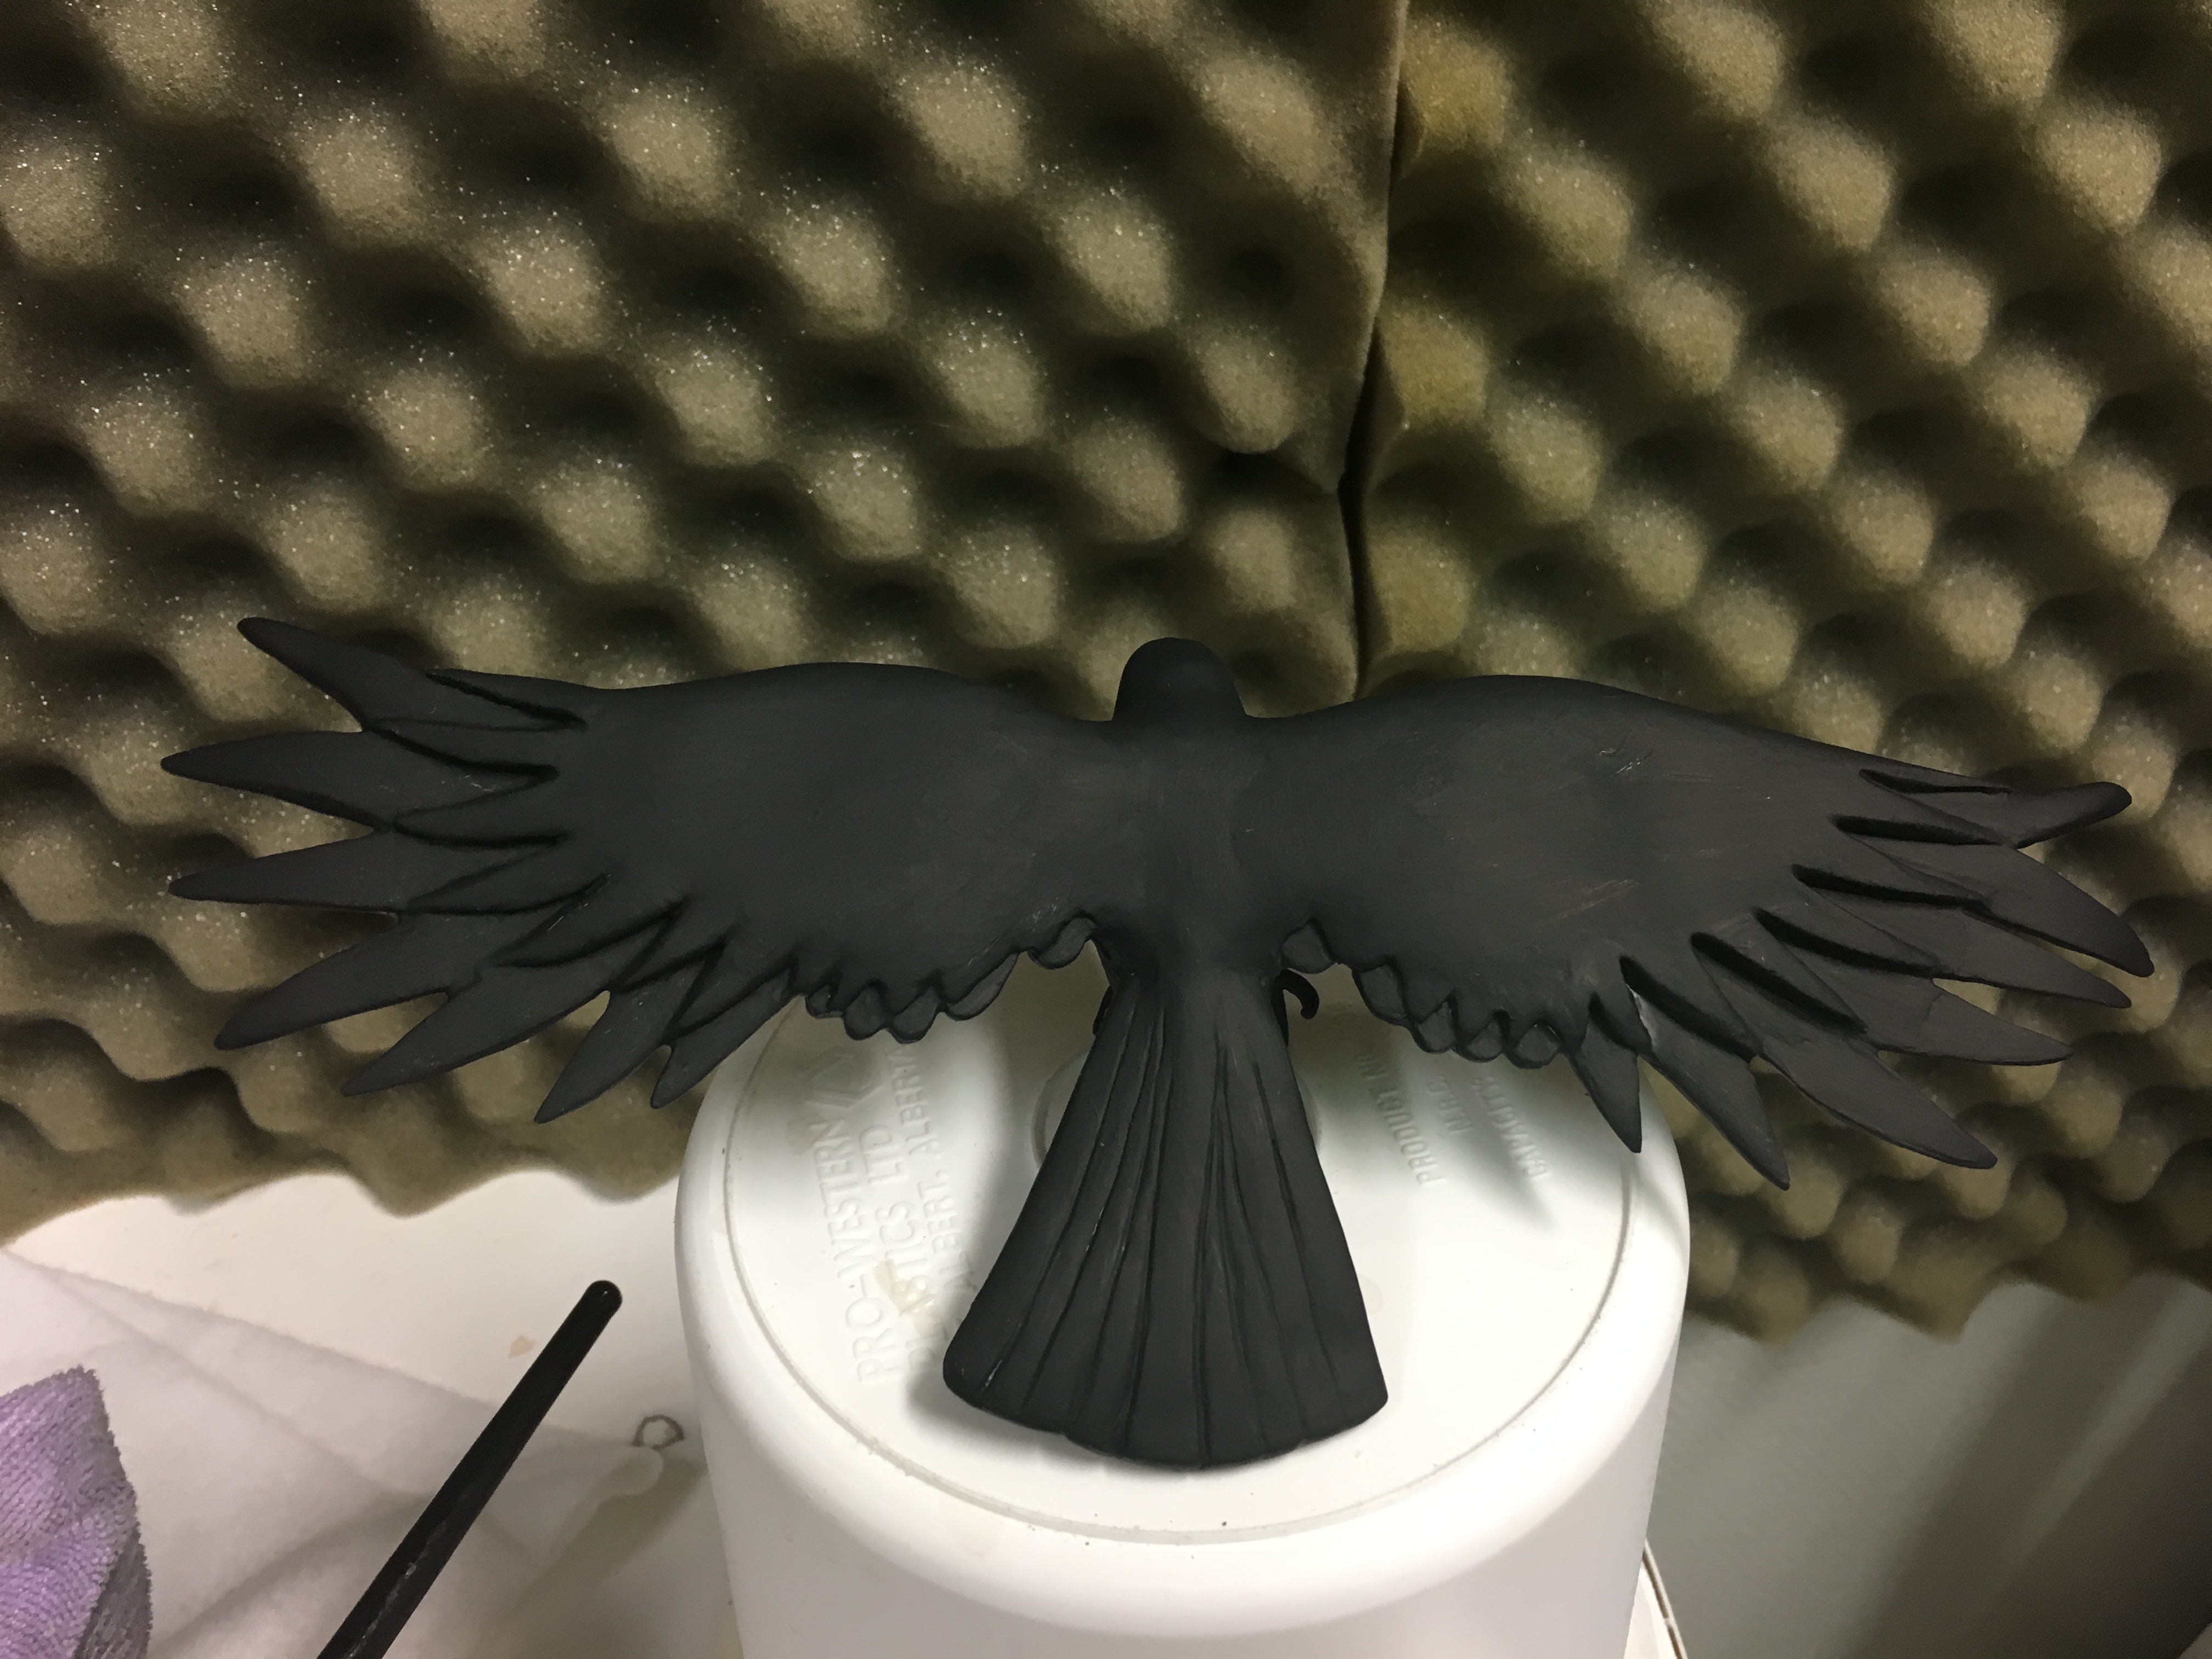
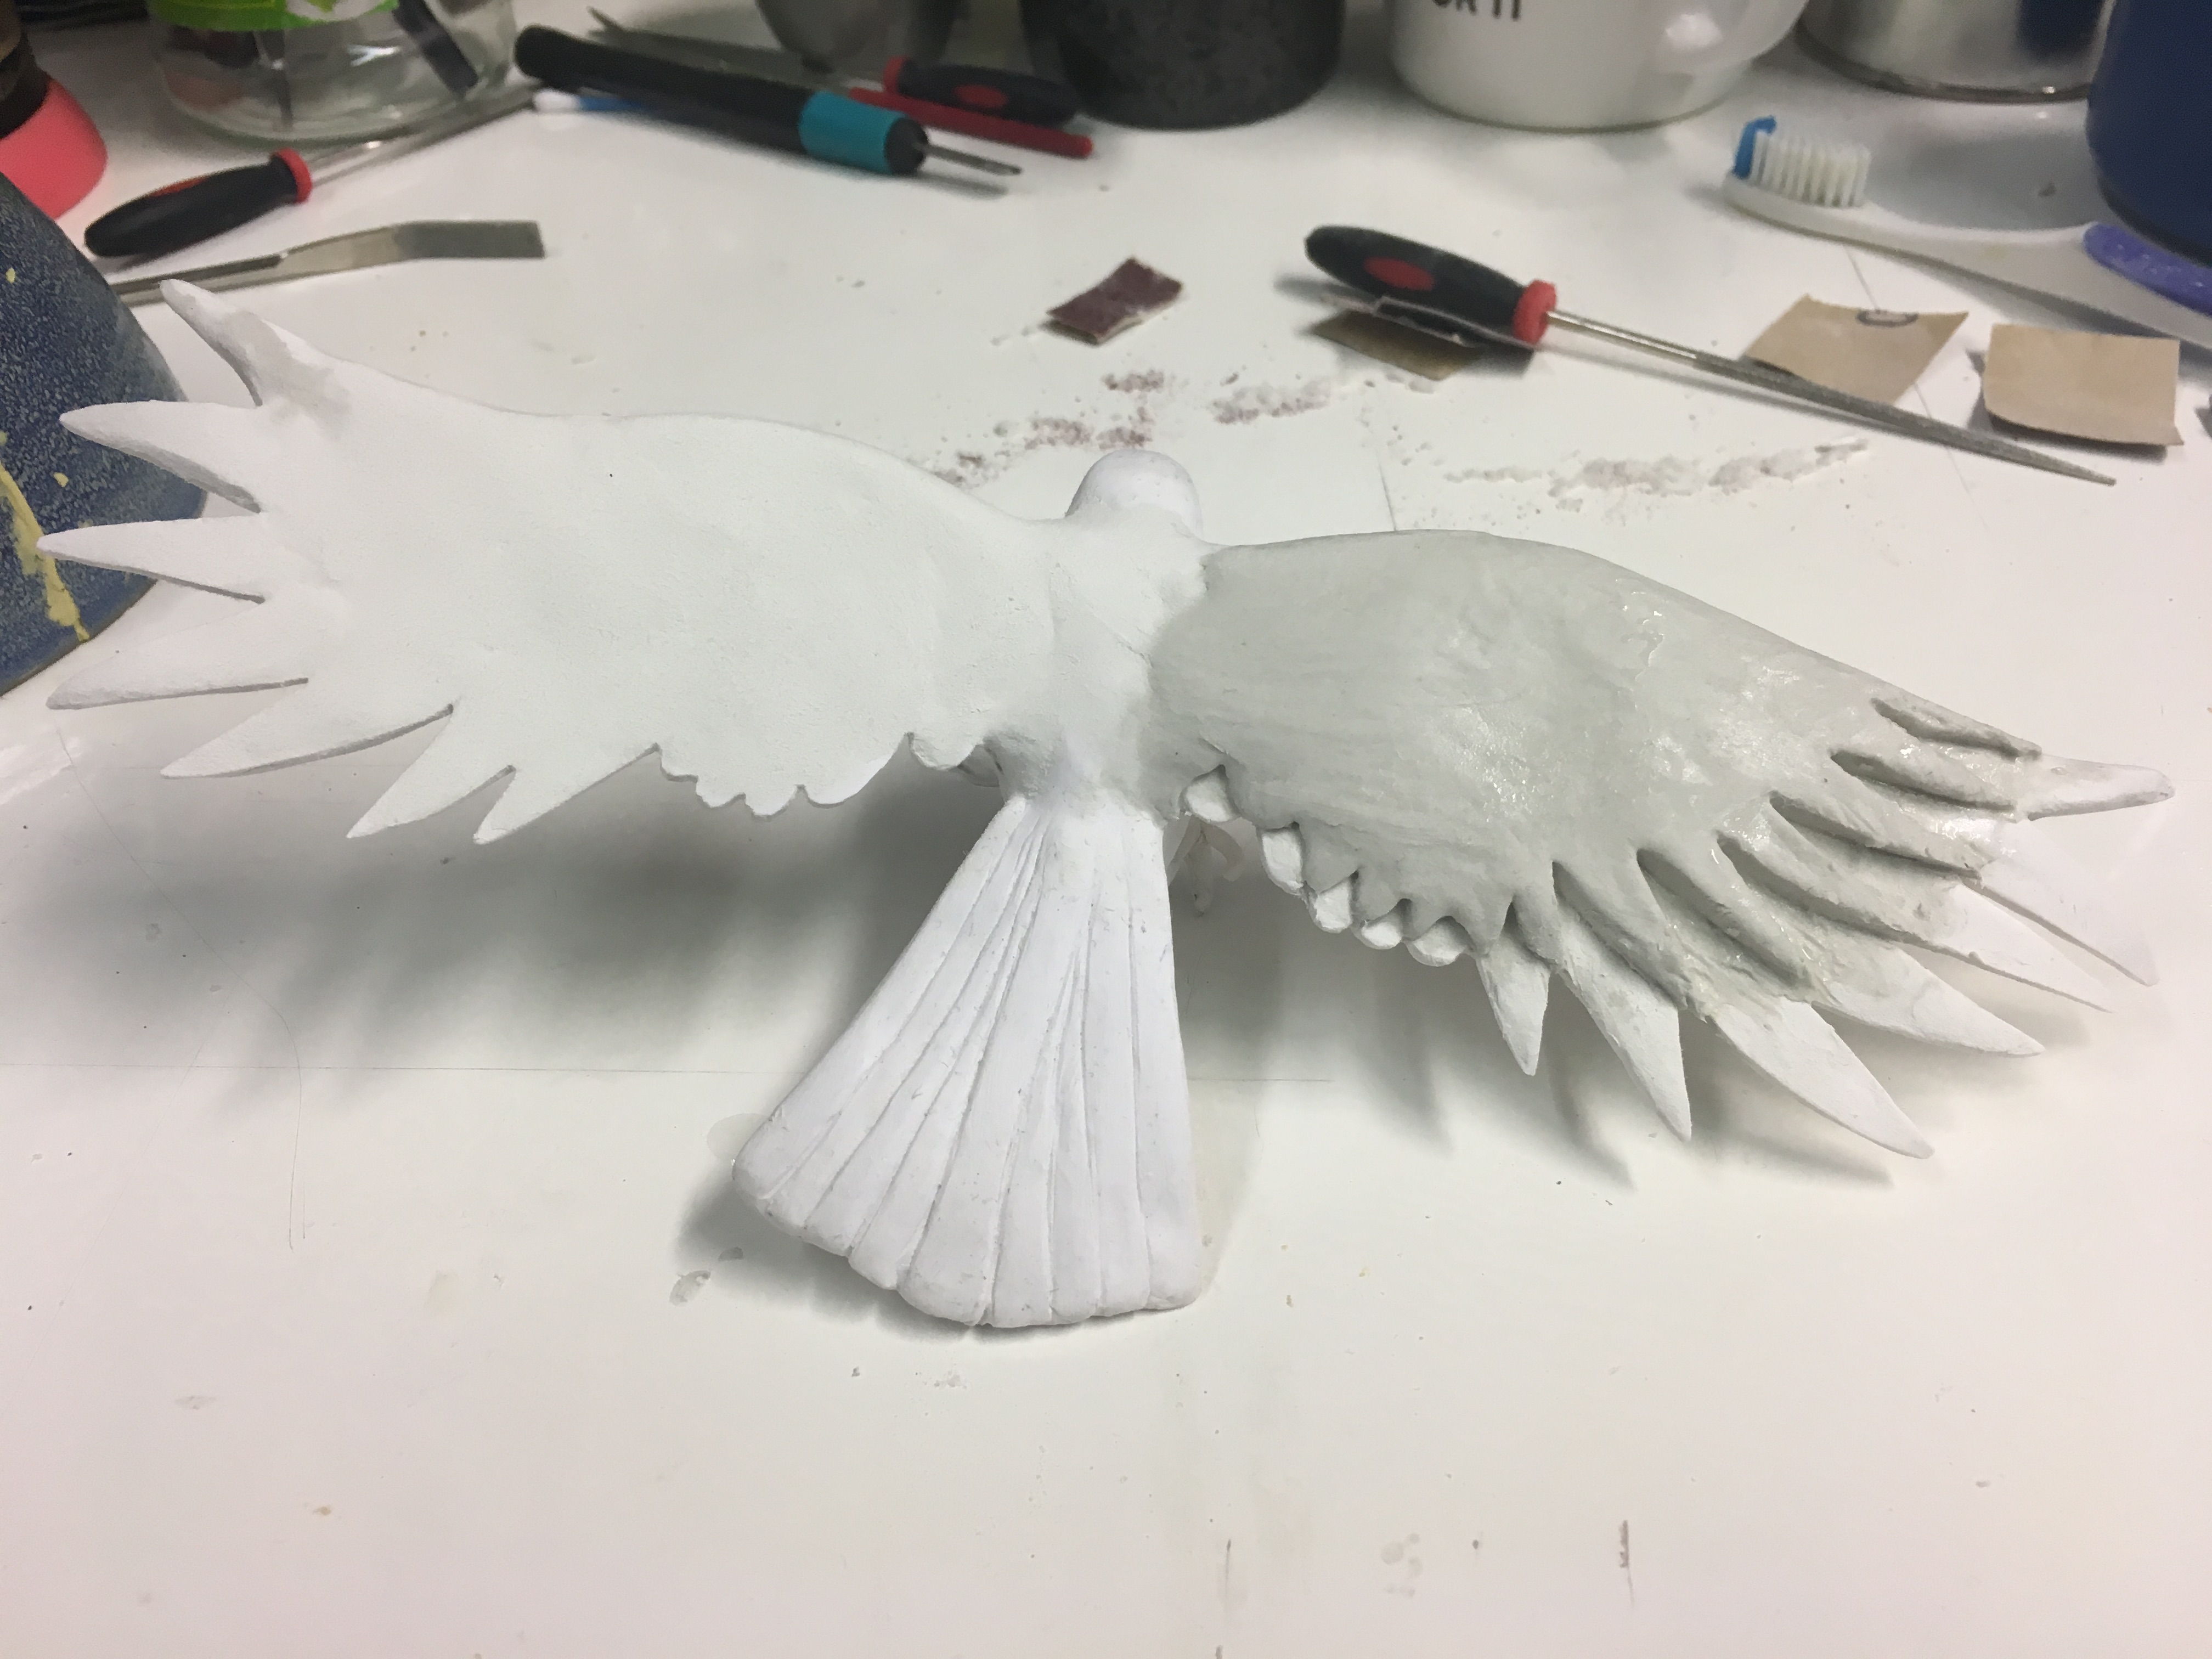
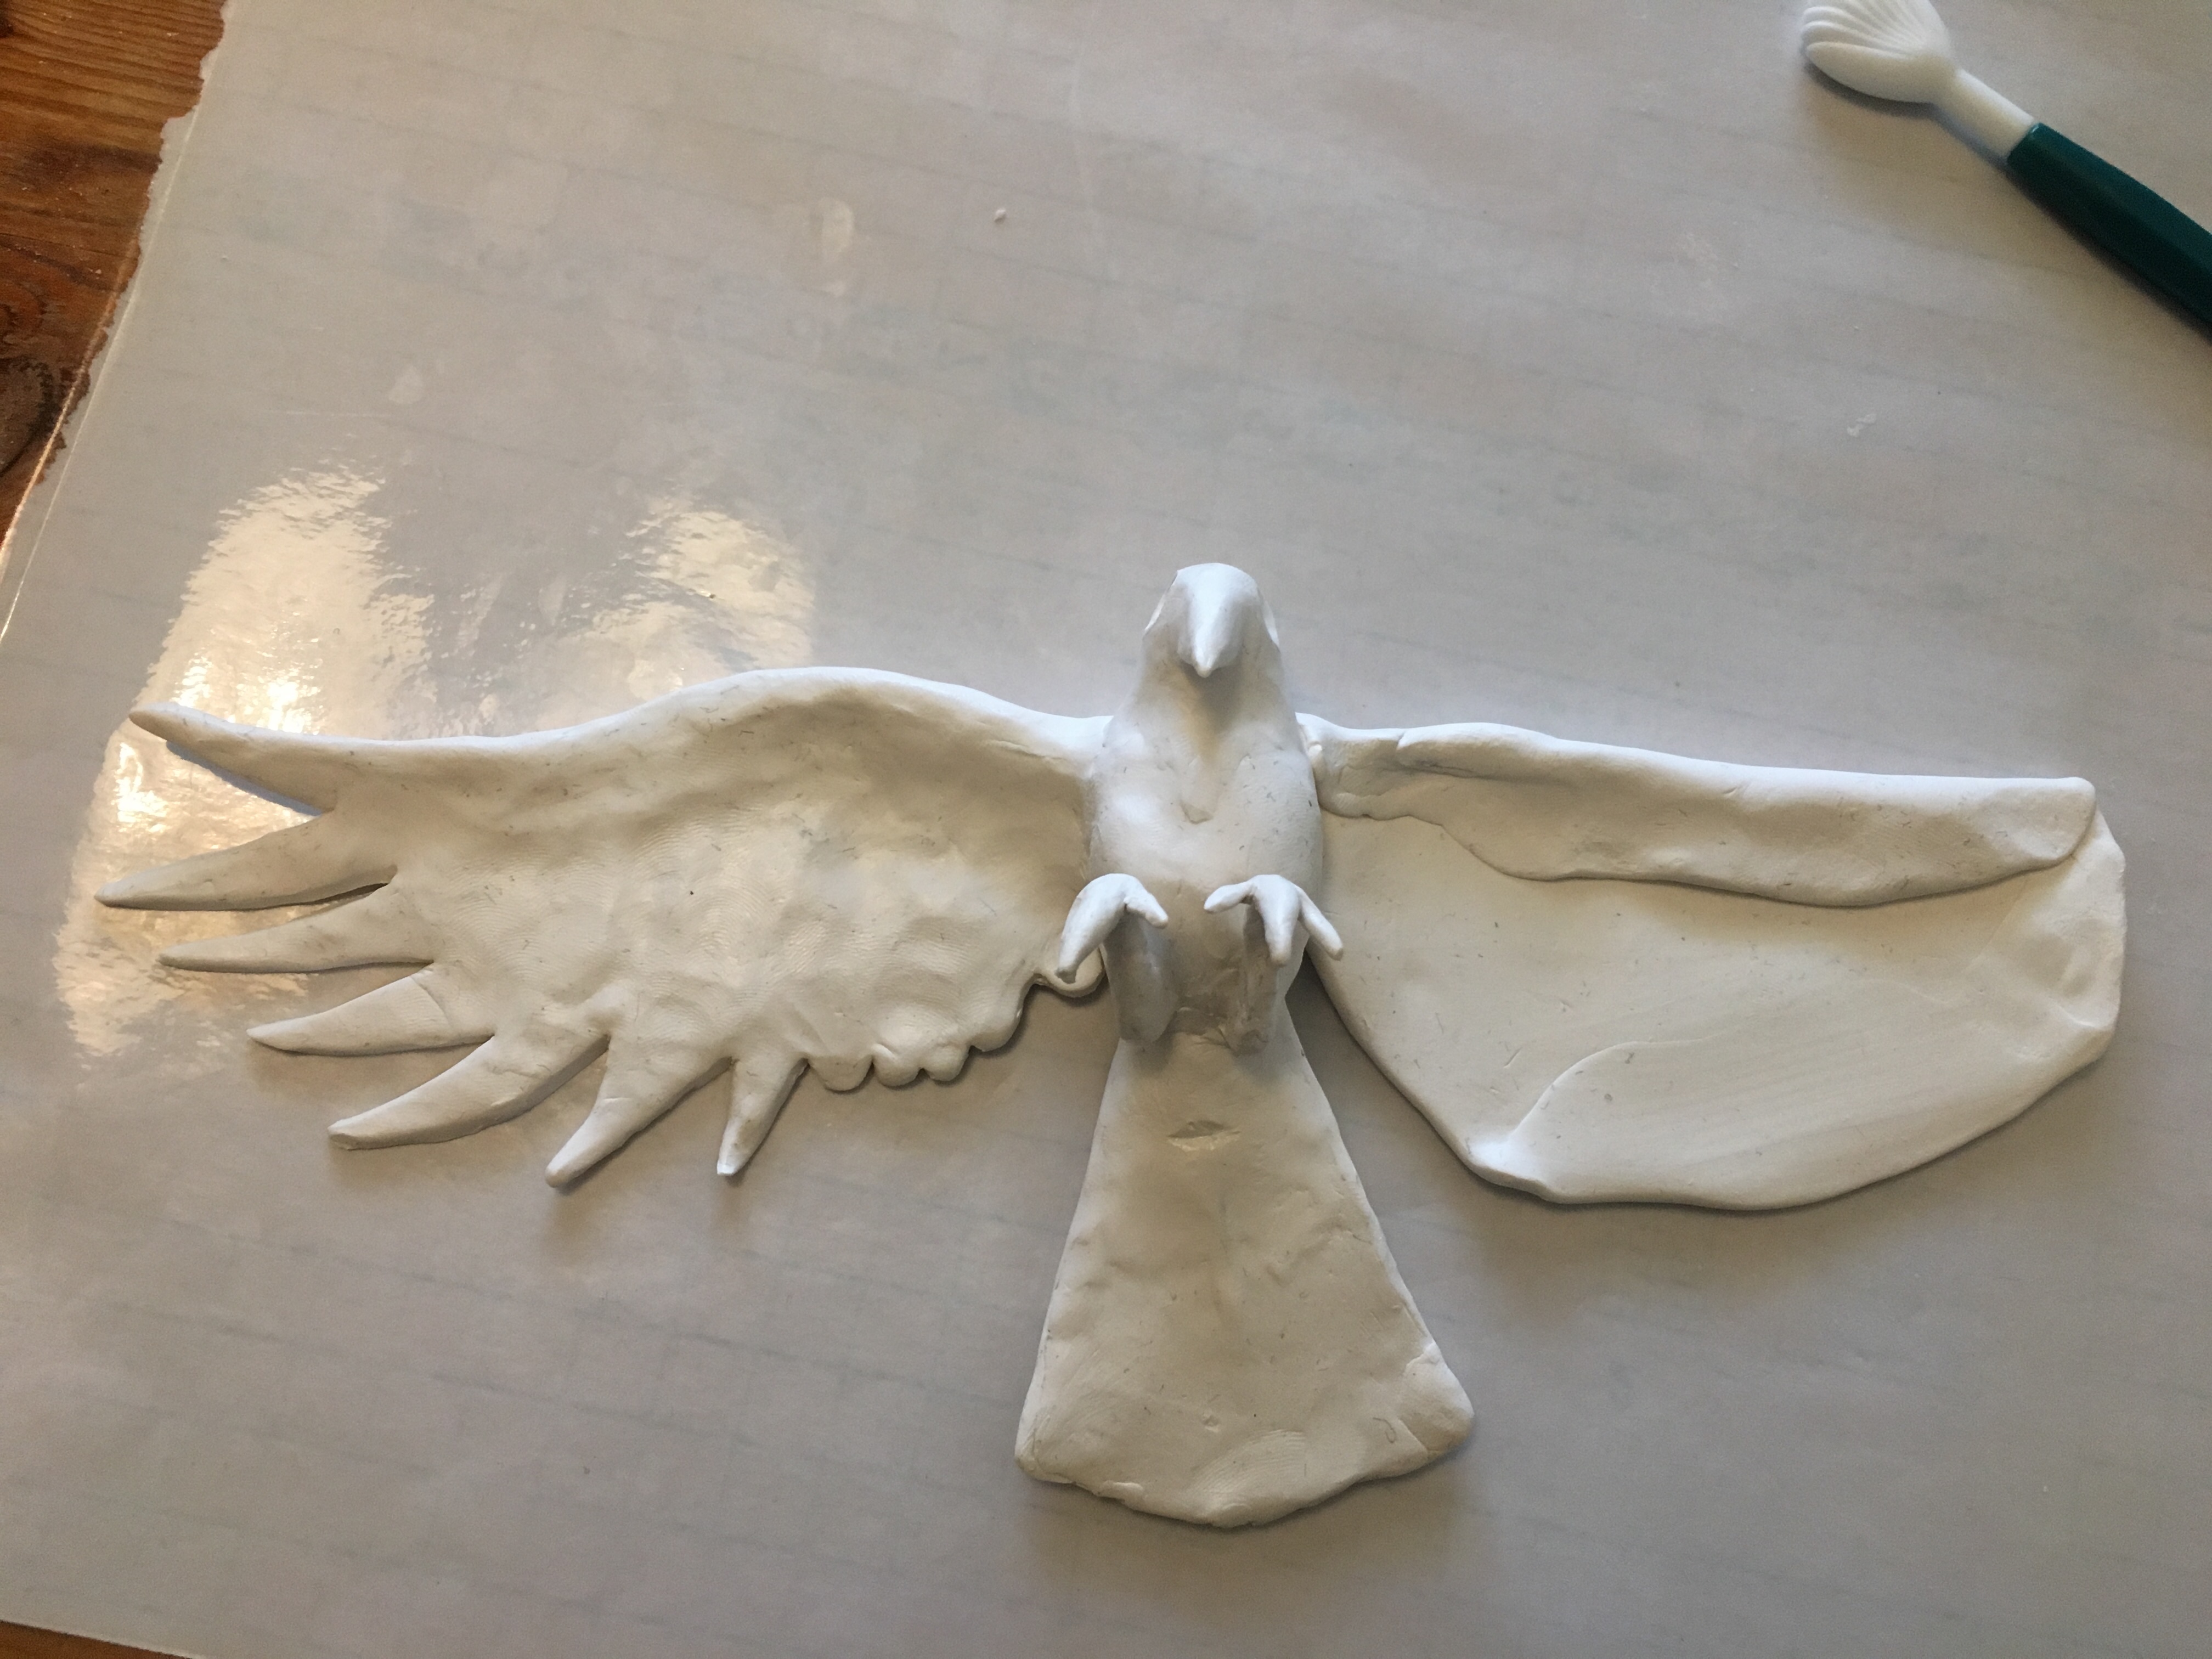
As a little bonus on the end here, check out where we are on the raven statuette!
Sorry it’s a little hard to see its features on camera. In person, though, the black paint makes it easier for me to see imperfections and correct them. I noticed that the angle of its beak was a little off on its right side so I had to do some sanding and filing and a little carving to get it the way I wanted it. This piece will be getting some more smoothing, re-painting (to check again for errors), and sealing before I move on to the next part of the project.
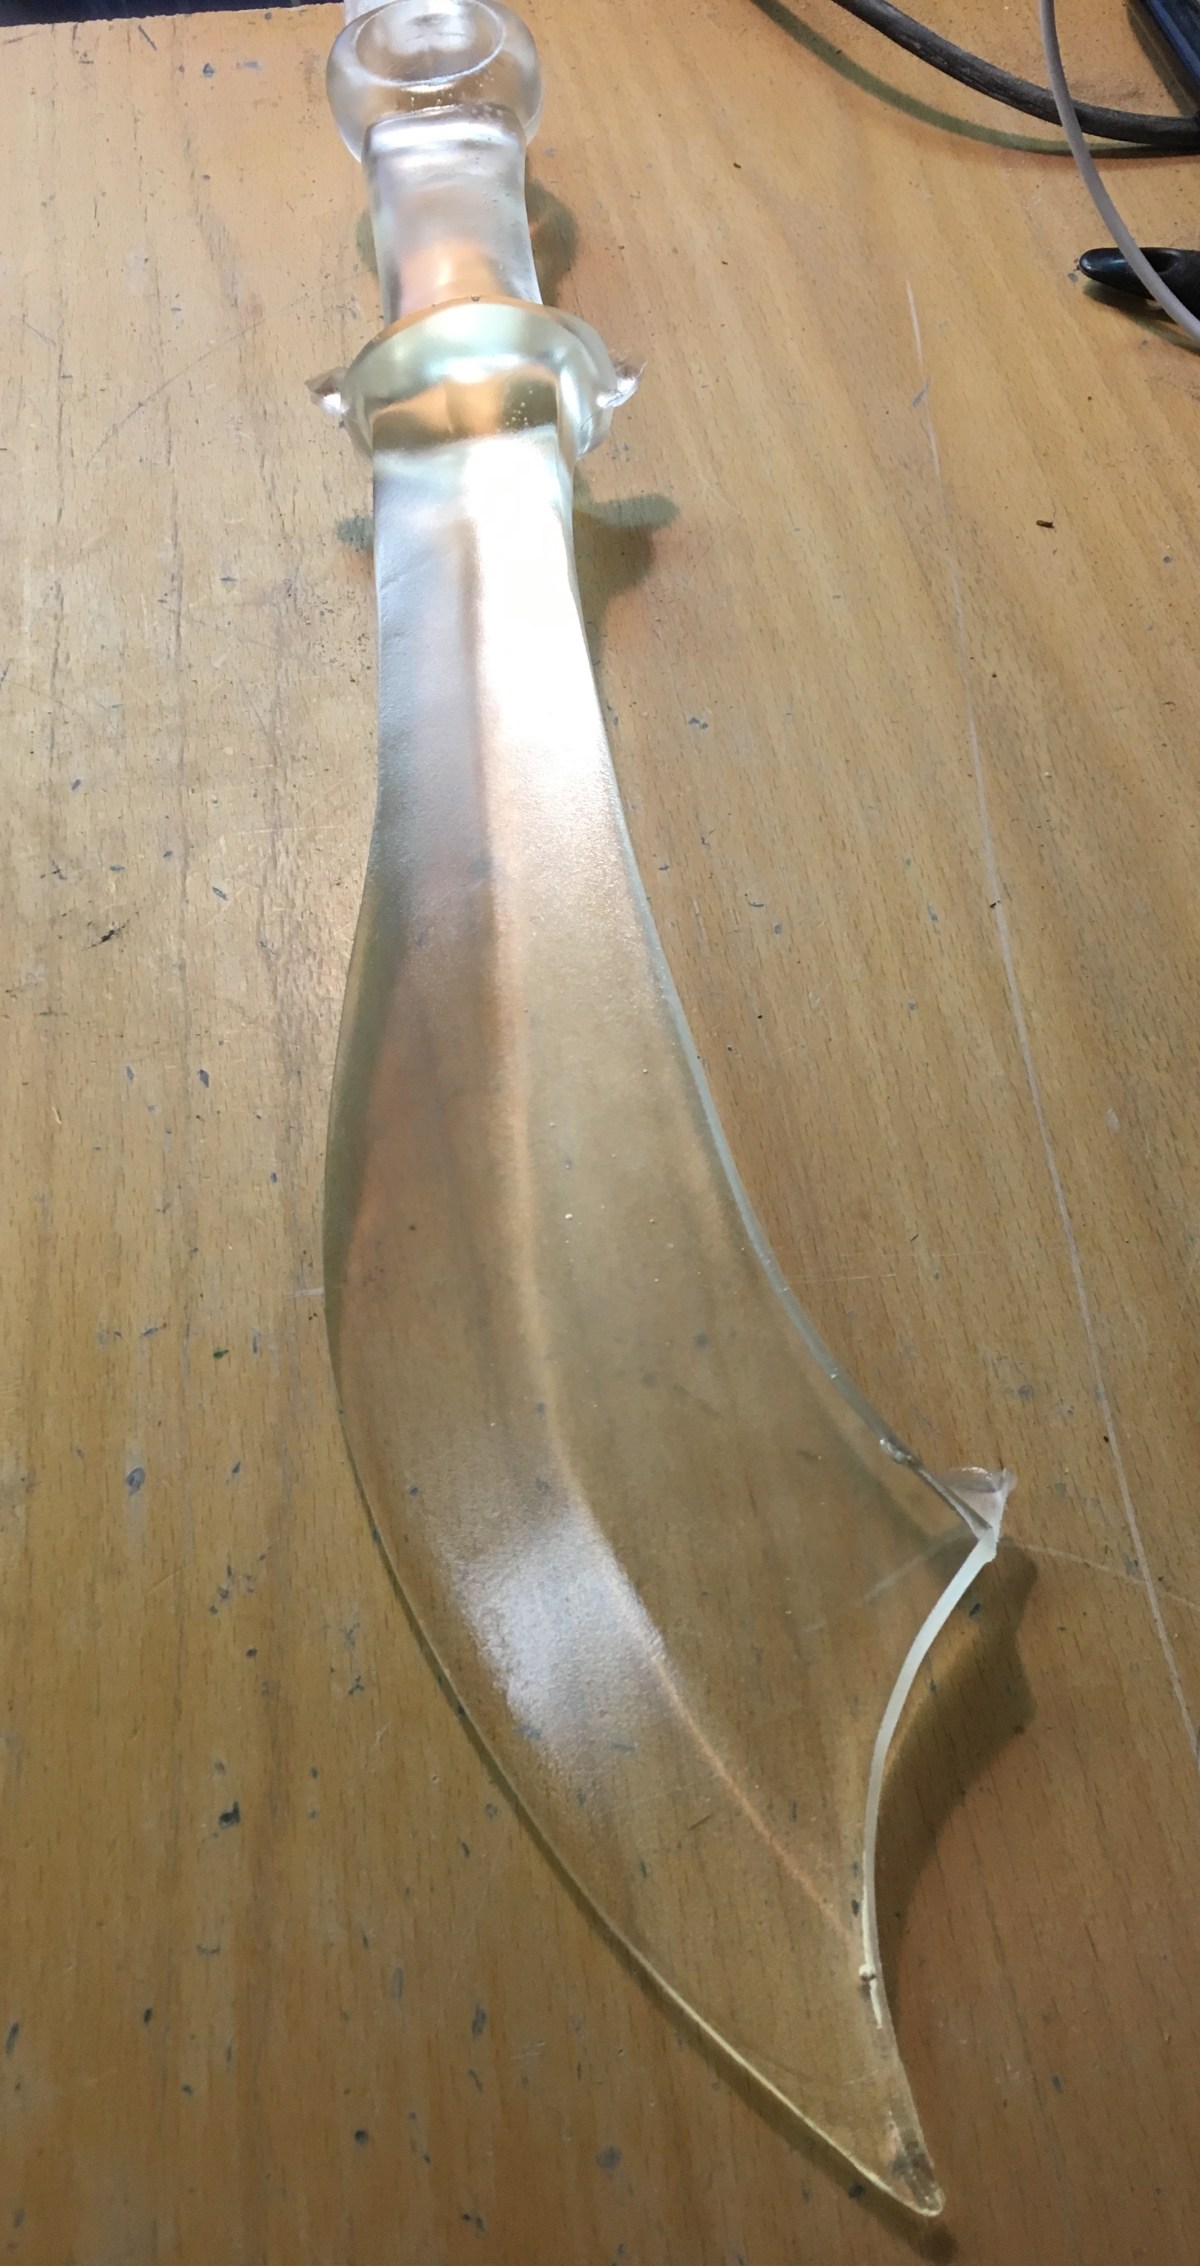
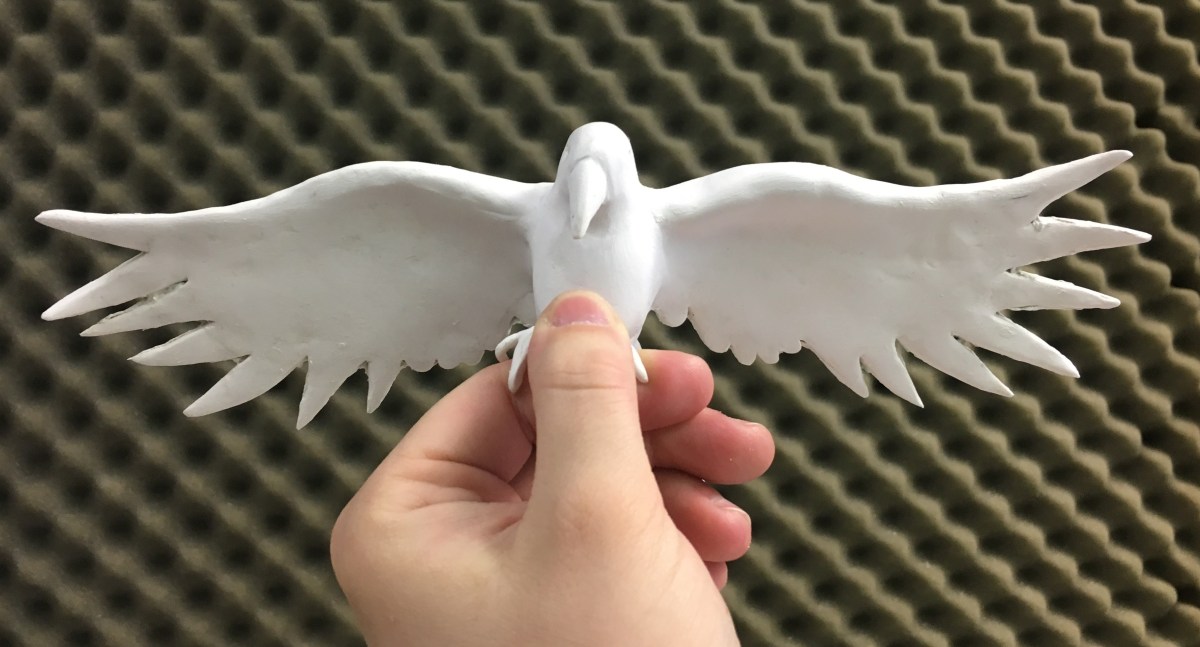
As a bonus-bonus, here is the current state of “Thorn” (working name). It’s so comfortable to hold.
When can we expect to see it appear in my Etsy store? Well … that depends on when the person who asked for it gets back to me. LOL
Okay, time for me to stop yammering and go pick up some more sandpaper. It’s sleeting outside so uh … wish me luck. XD
It’s so cuuuuute! This was a really good test of the new DIY paperclay stuff. Light, strong. mouldable, and sandable. I’m quite pleased!
This here knife is currently going by the name of Thorn, just so I have something to call it. It is double-edged for maximum utility (slashing or stabbing) and provides a little bit of protection to the hand while blocking another blade.
Yes, yes, panicking parents, it’s not actually sharp. I don’t make real weapons. I make art pieces. I do envision how a blade would actually work if it were real, though, so my designs at least make some logical sense. So many fantasy weapons just look … preposterous.
Like A: it’s half the size of your body; you’re never going to lift it, and B: if you managed to, you’re never going to successfully stick it in the other guy, and C: if you somehow managed to accomplish that (like if he was asleep or something) you would never be able to get it out again. Or quite possibly D: your dagger has six blades on it they’re all curved at an angle even a snake would find obscene and half of them are pointed back at you what are you doing with your life?
Much more practical.
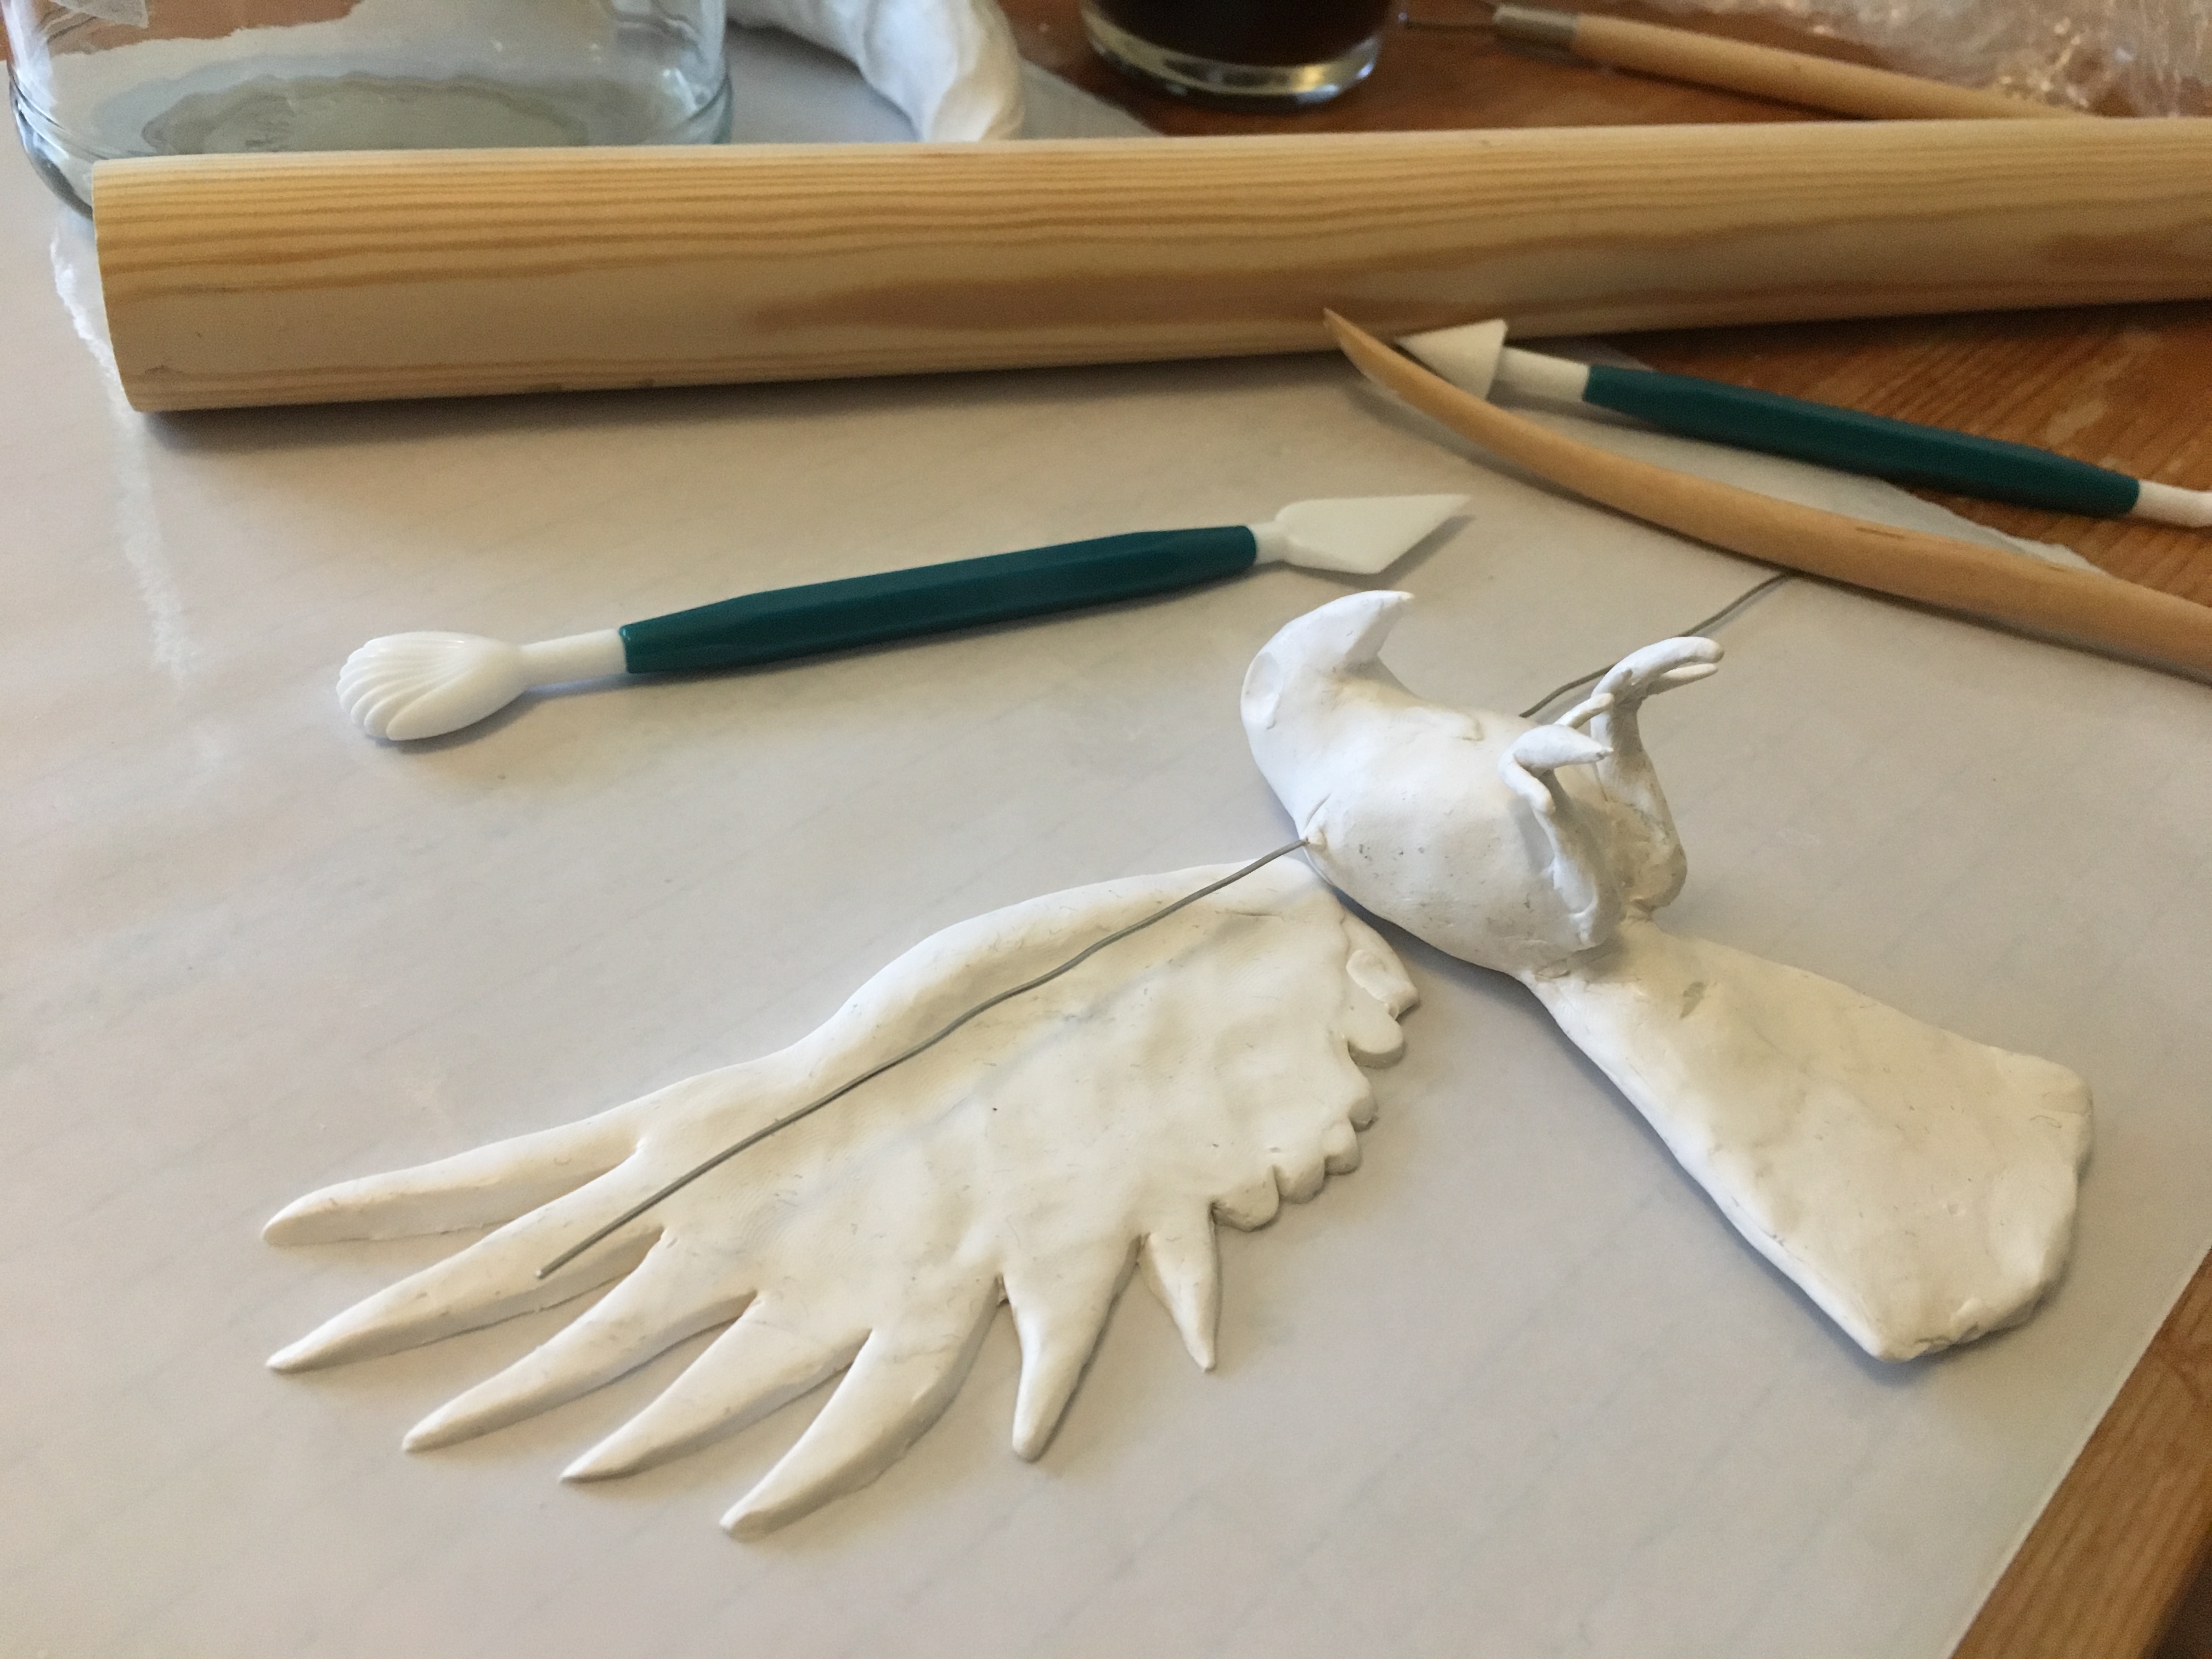
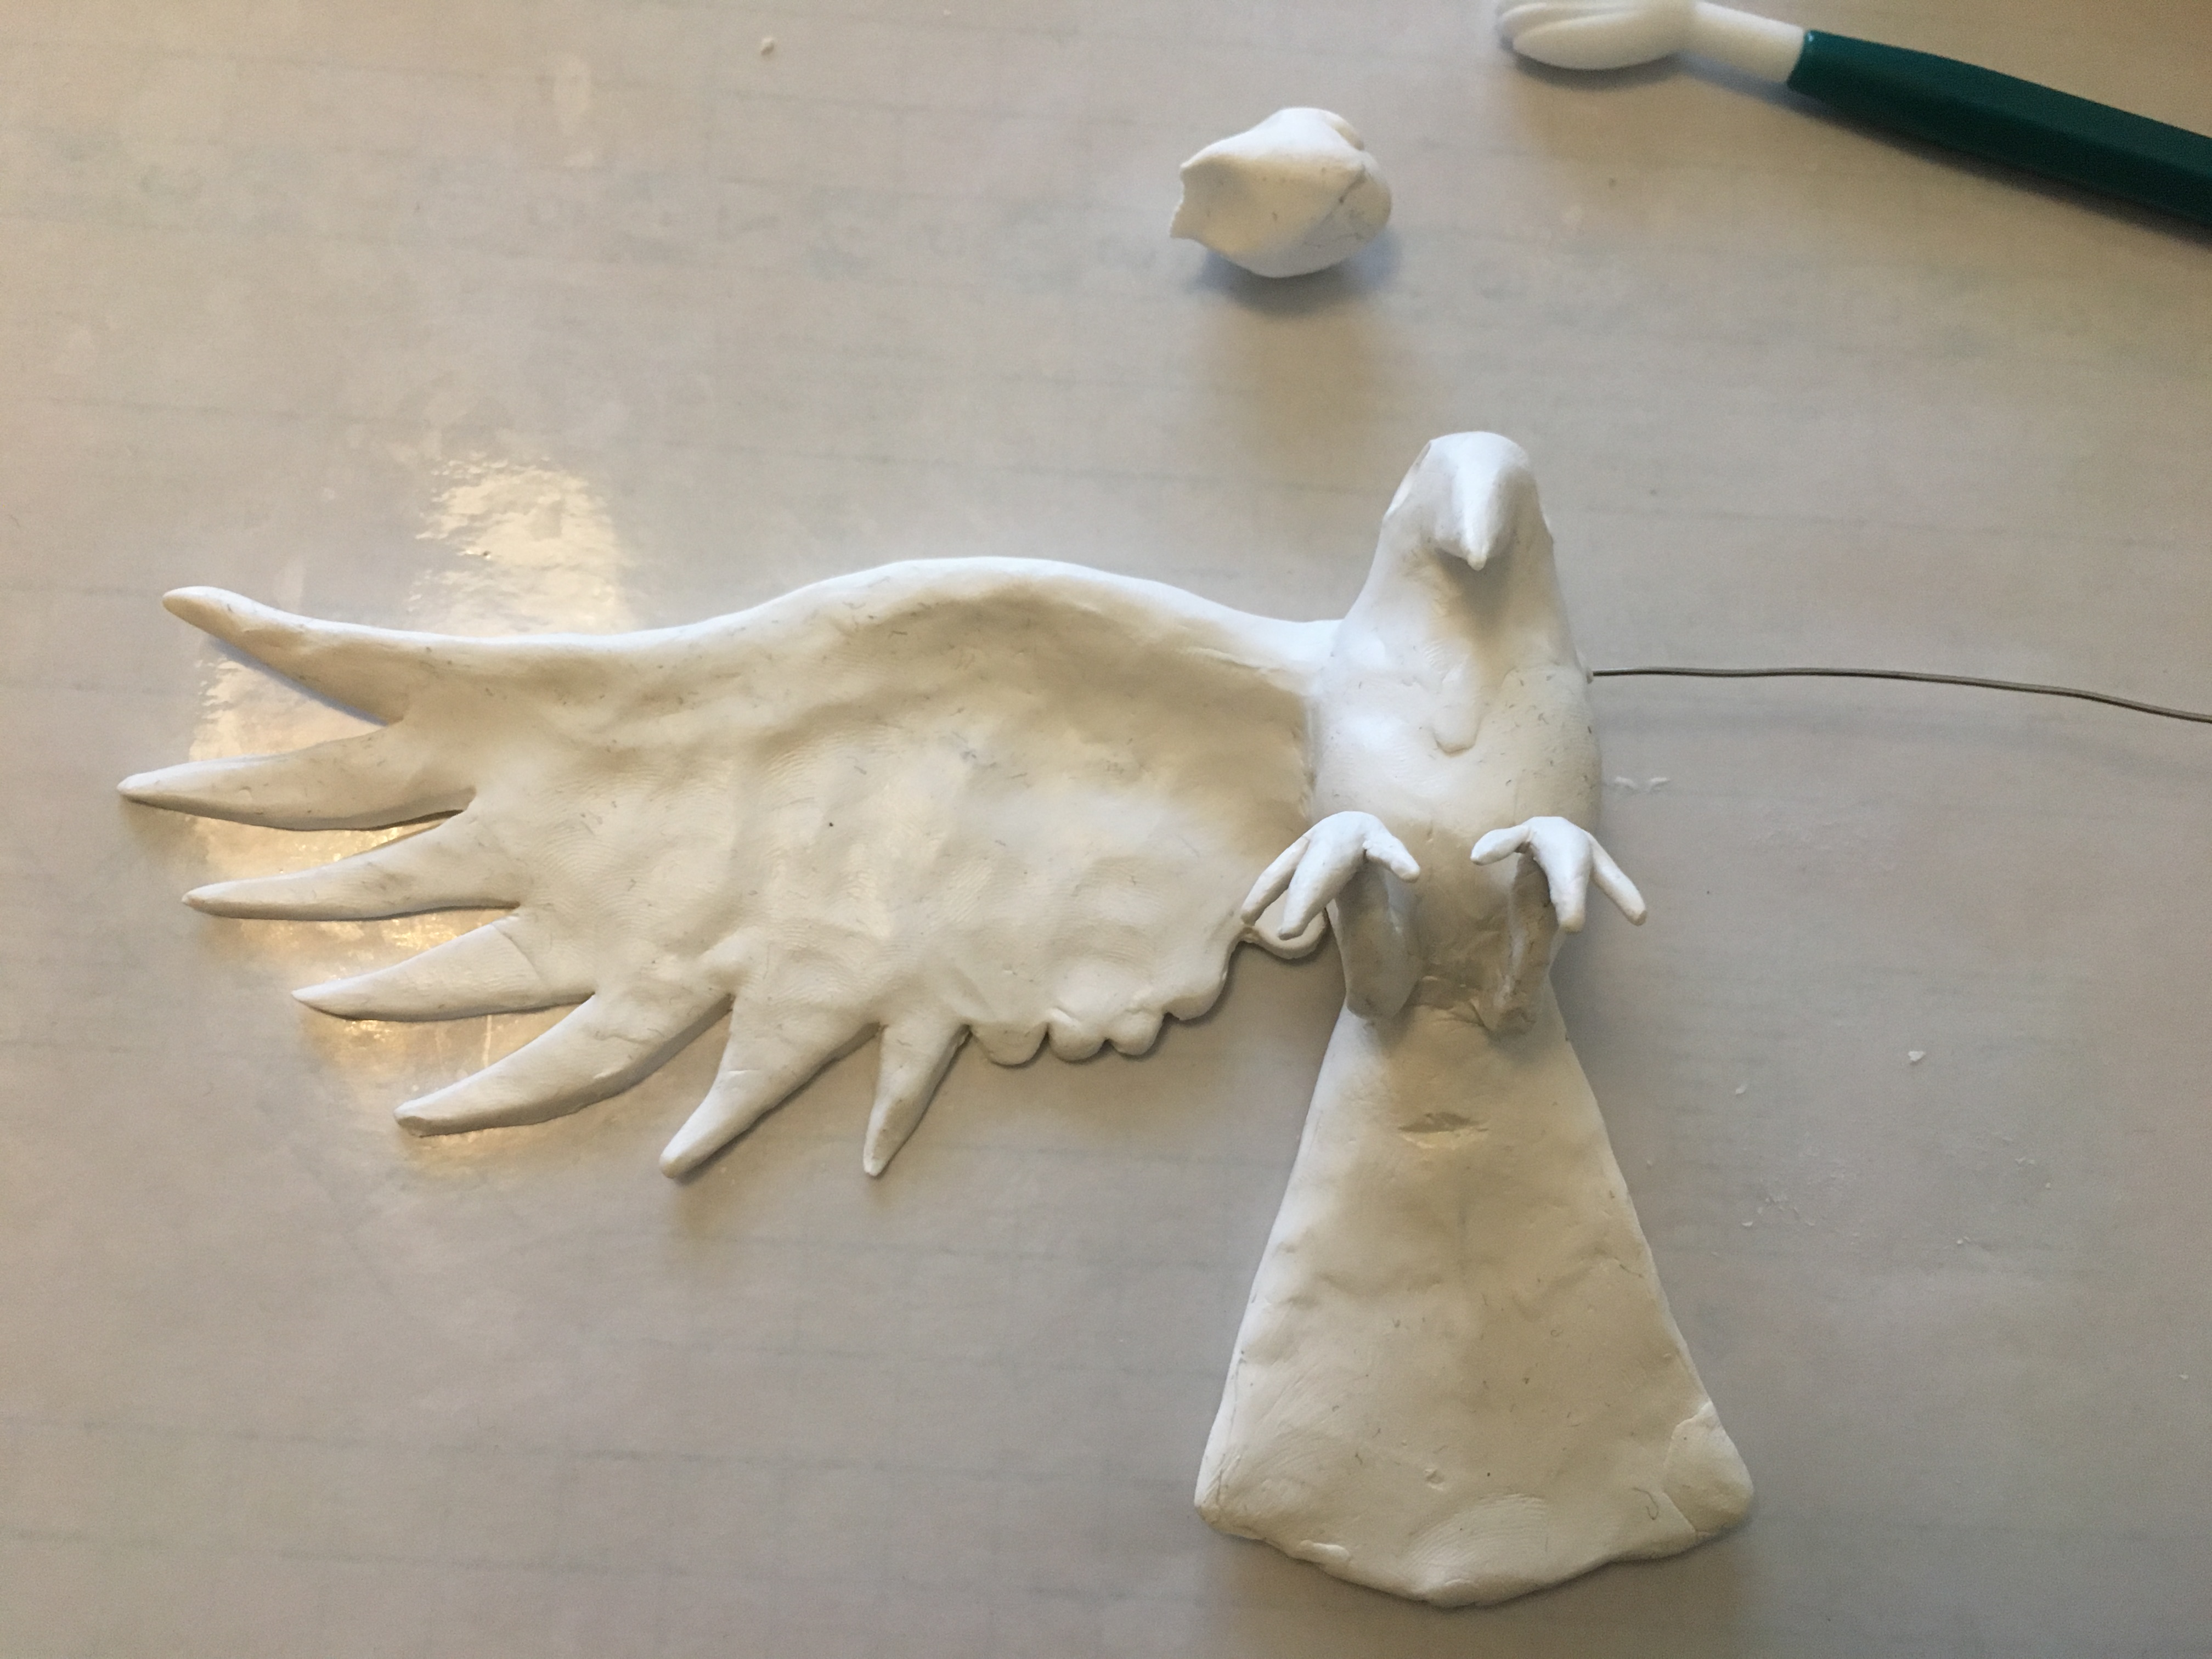
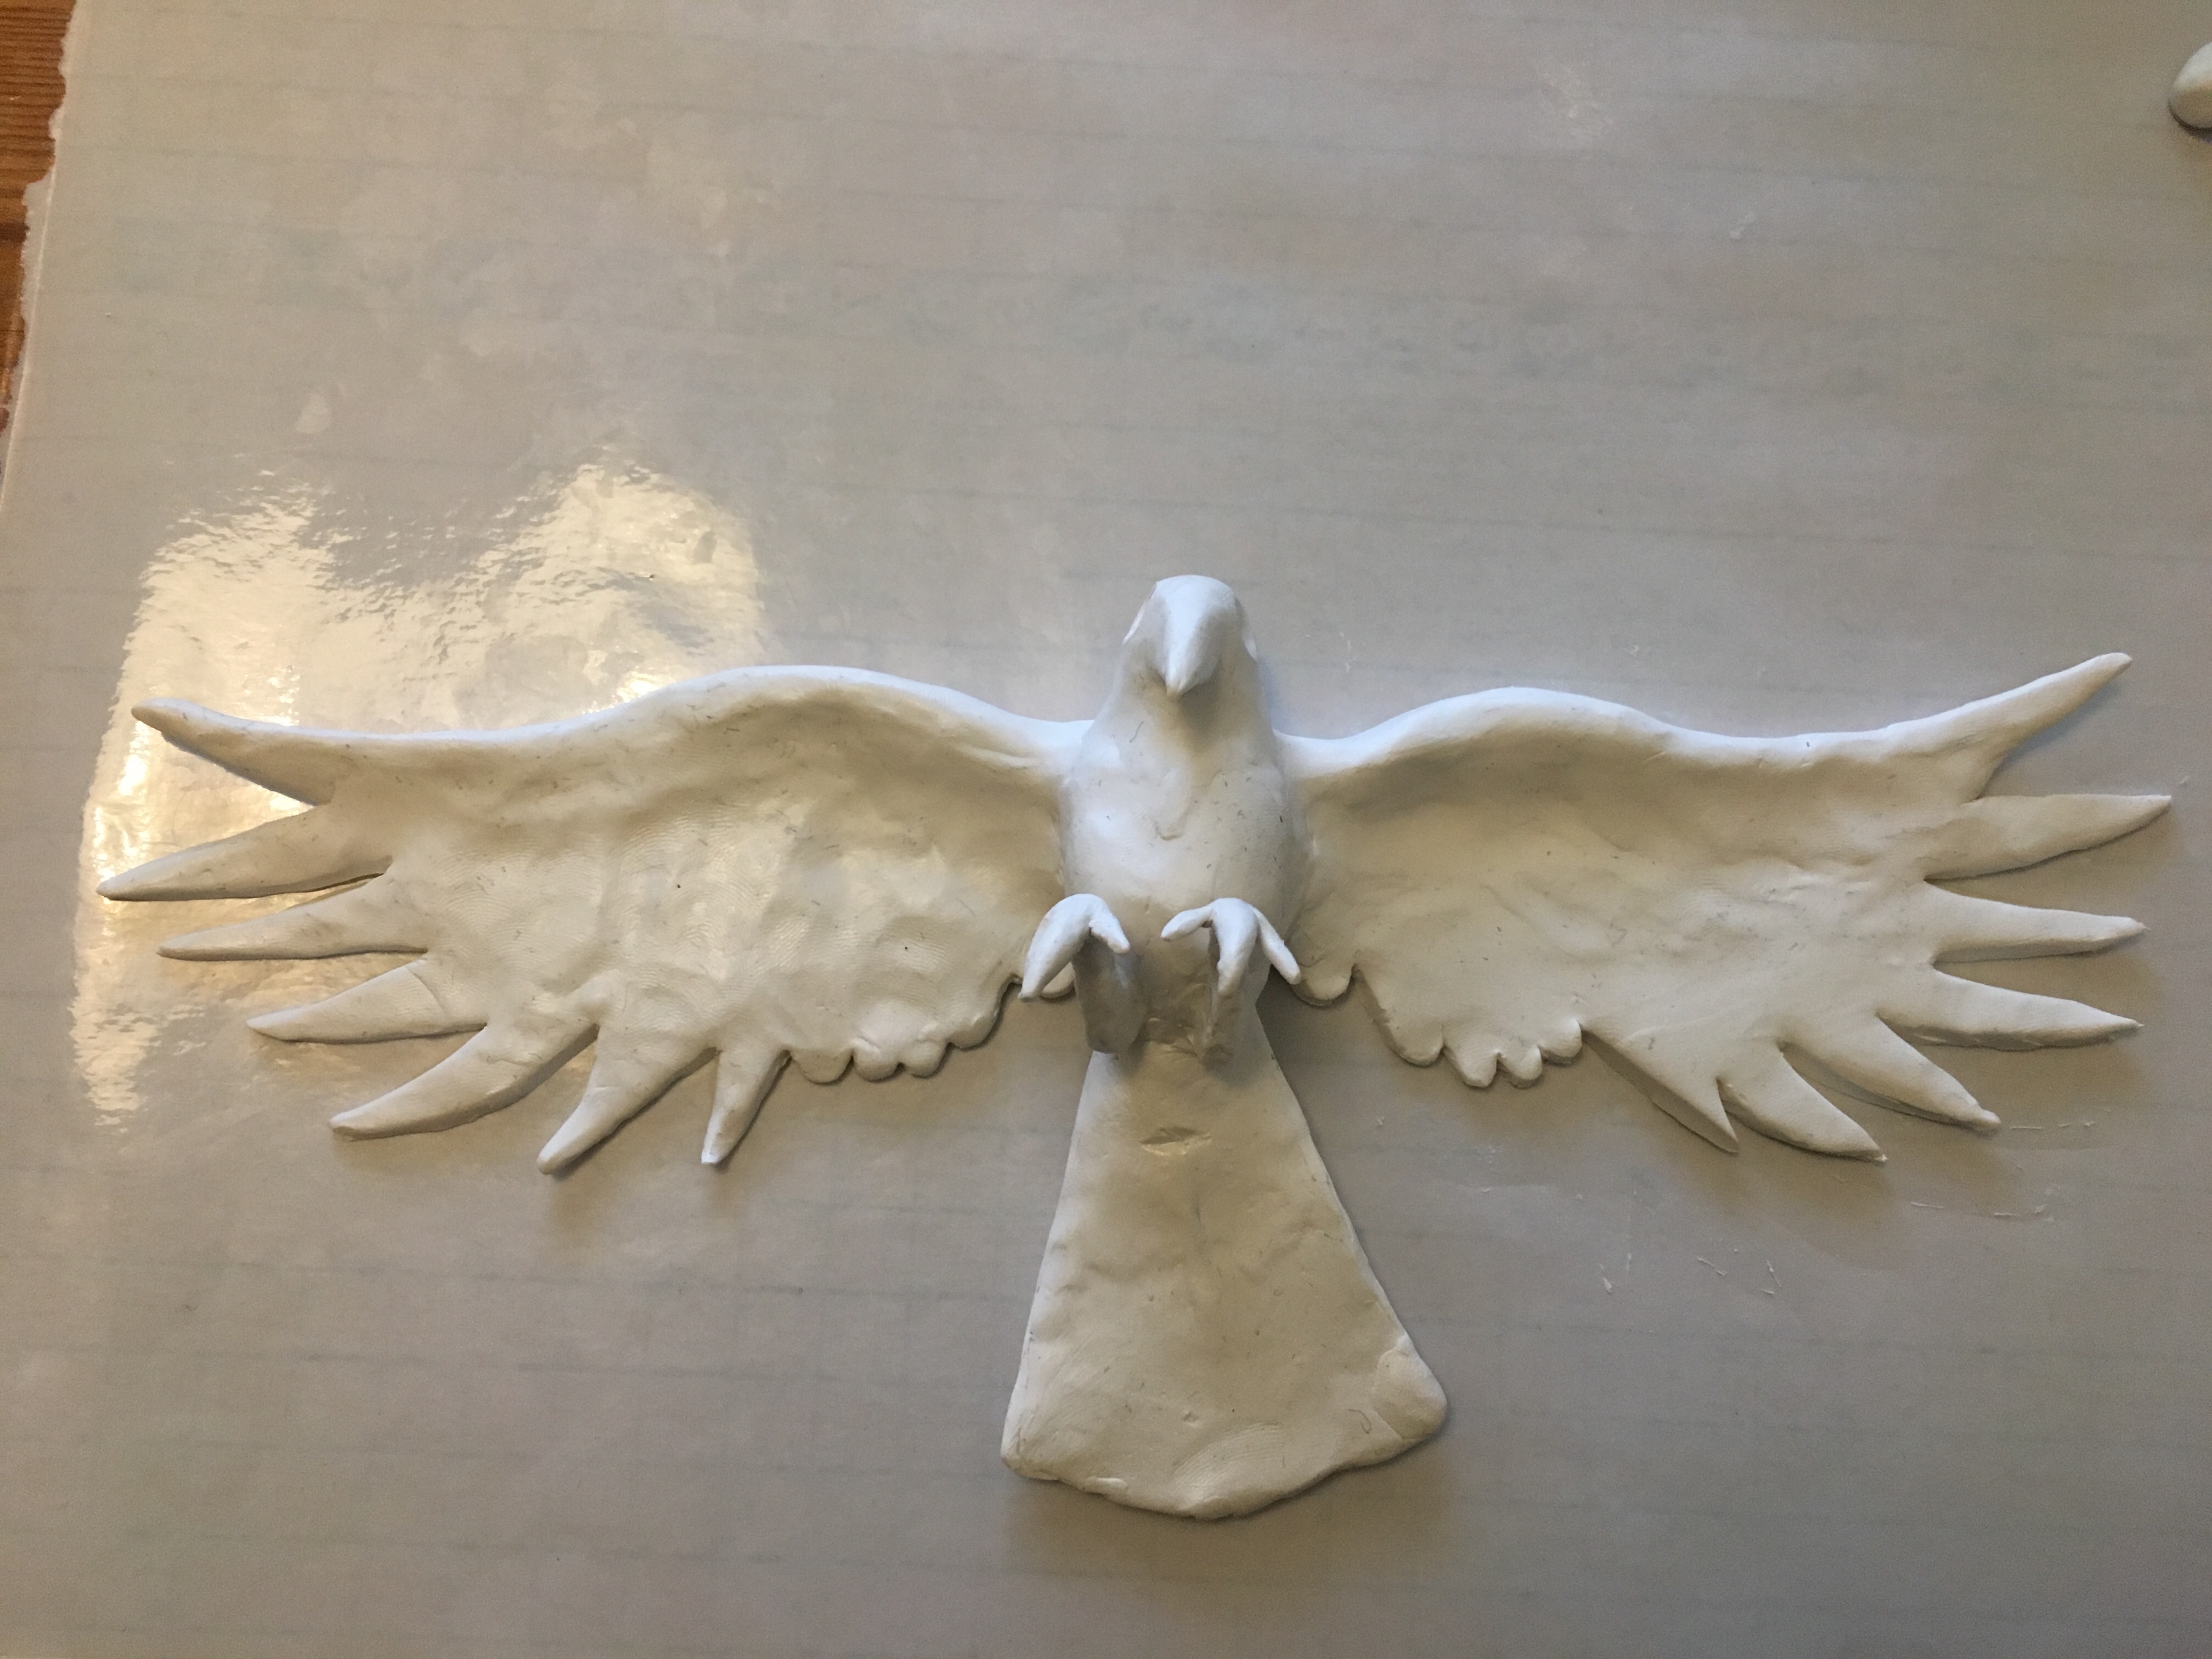
What else have I got for you today? Well, I put some more reinforcement on the wings of the raven.
Cause a cross-guard needs to actually … guard. Yeah. This one is more decorative than anything else though if I’m perfectly honest. I’m okay with that. ^_^
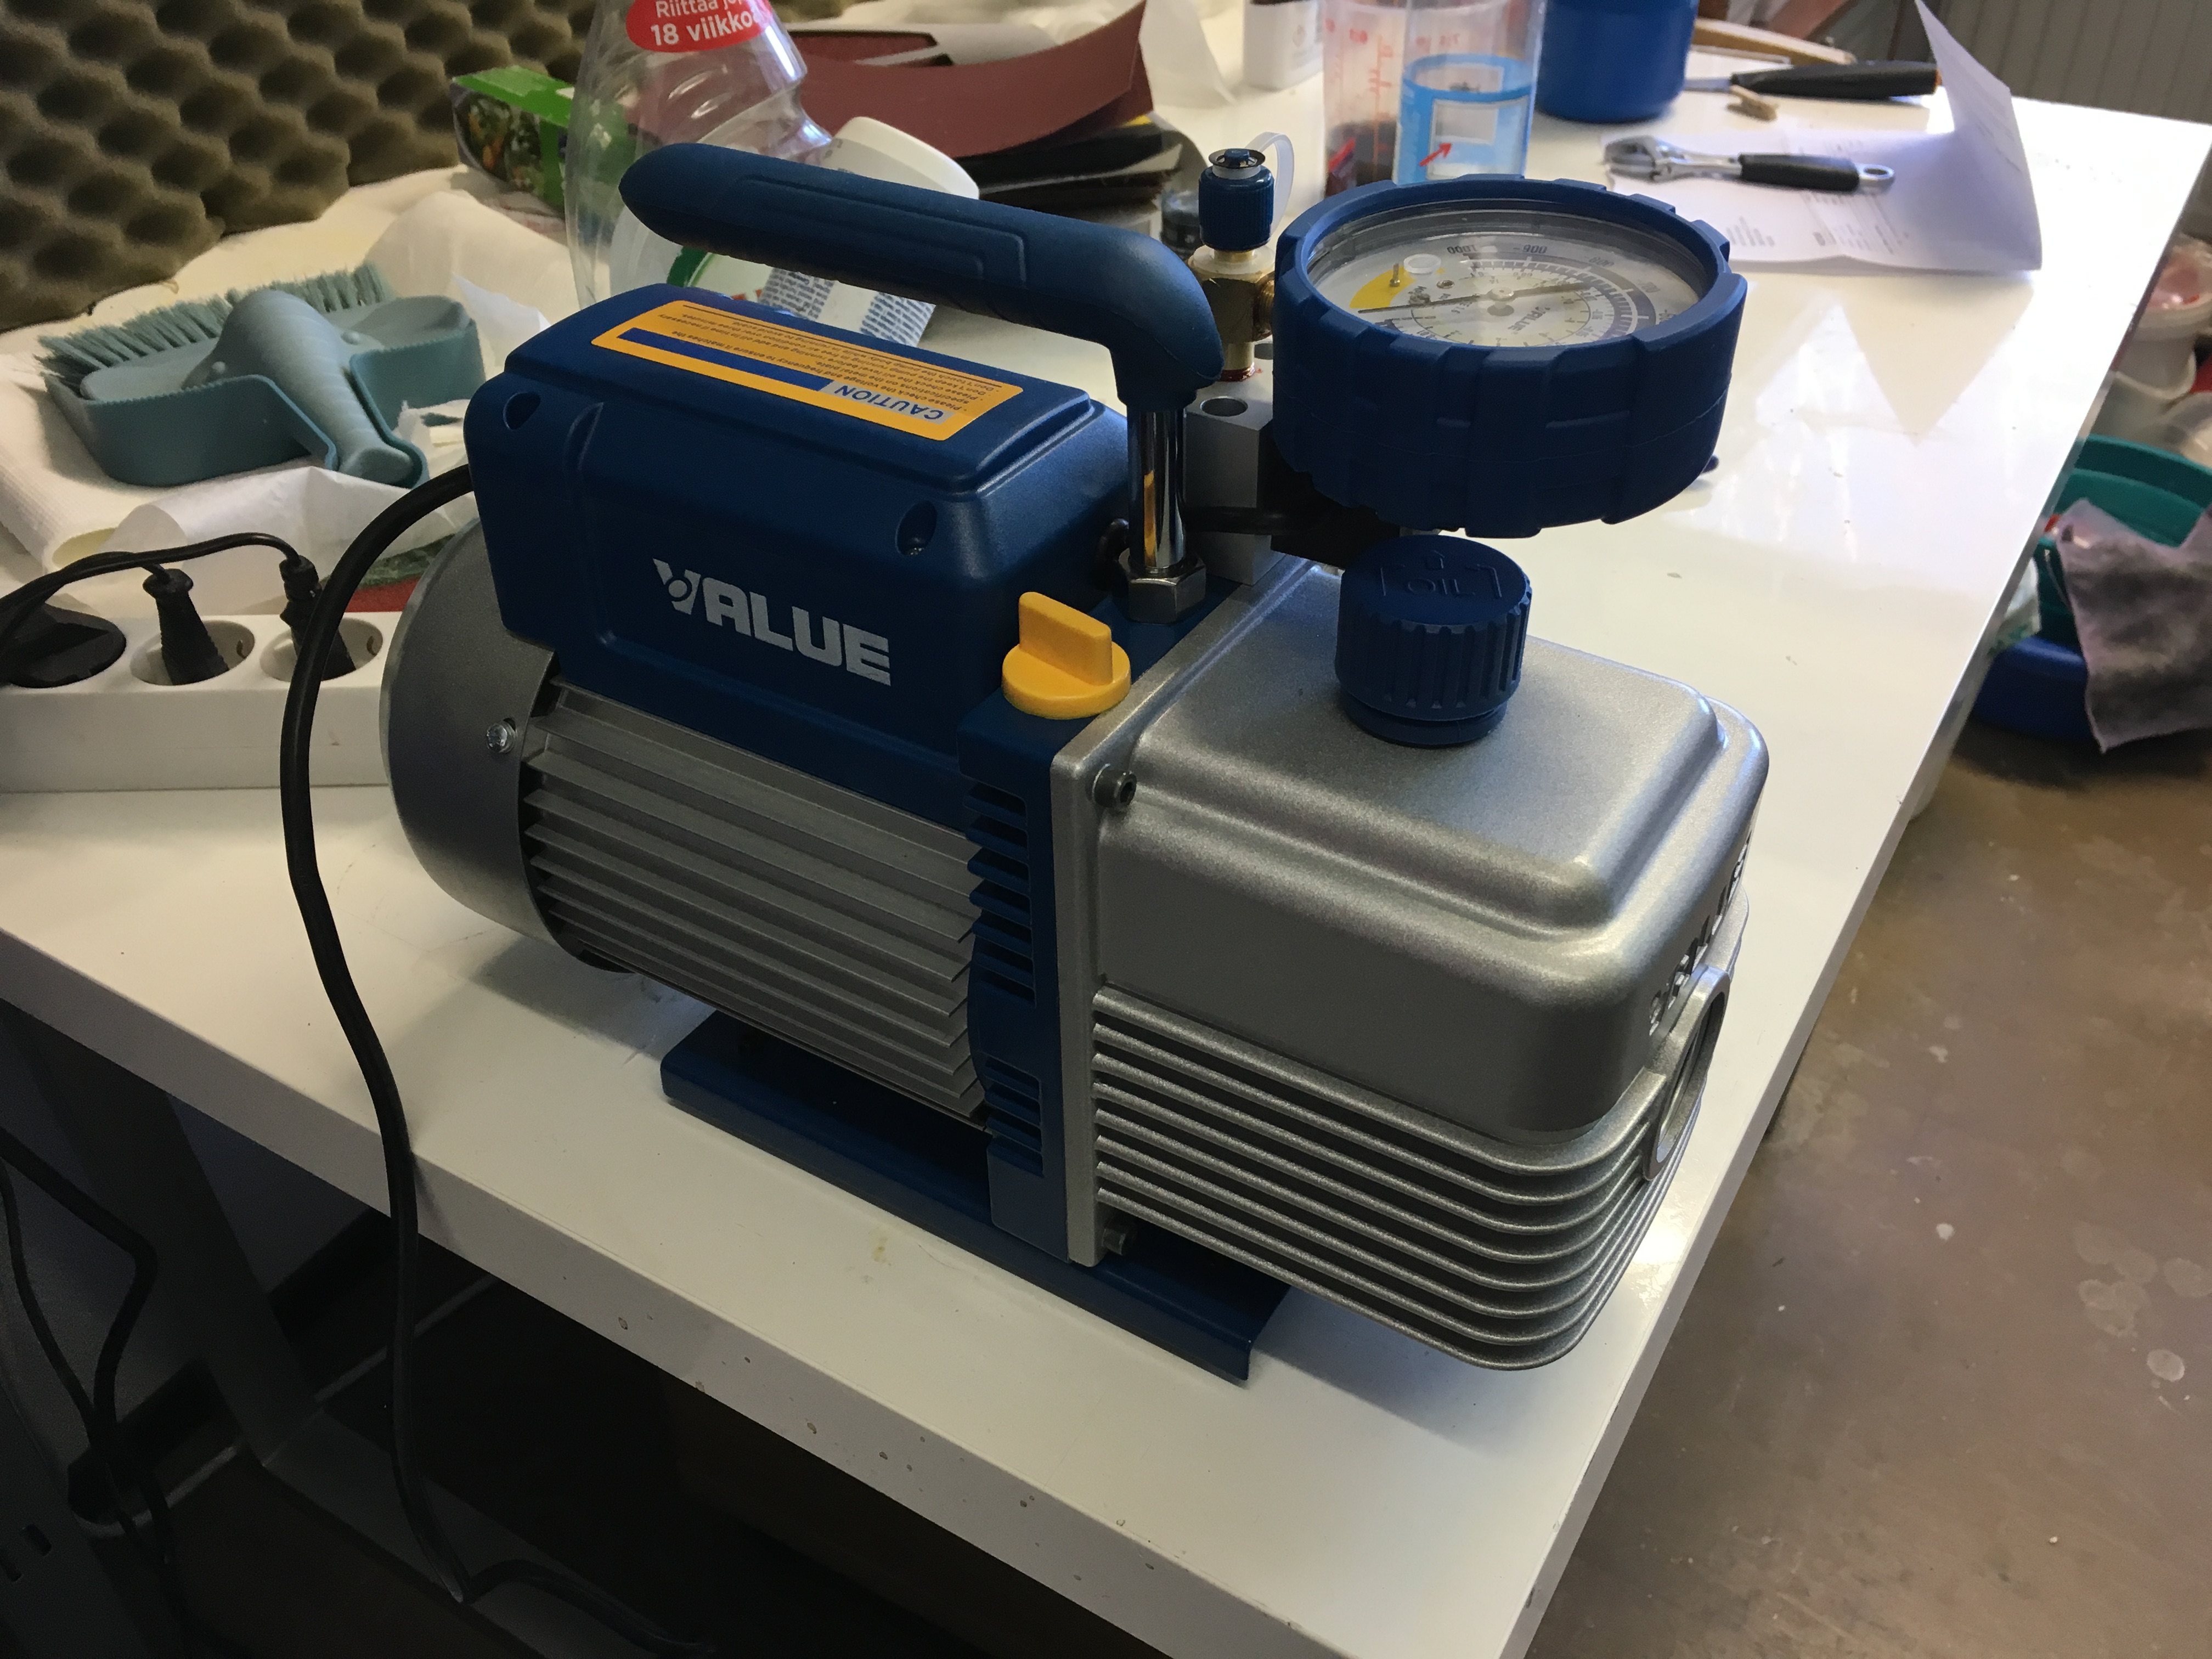
So! My vacuum pump has finally bit the dust. Poor thing. 😦 I am going to try to get the filter cleaned and looked at and maybe something replaced but I wasn’t willing to take the thing apart until I knew I had a nice new pump on the way that I could be sure would work. Cause let’s face it, it’s better to have a pump that sort of works for a short period of time than a pump that doesn’t work at all.
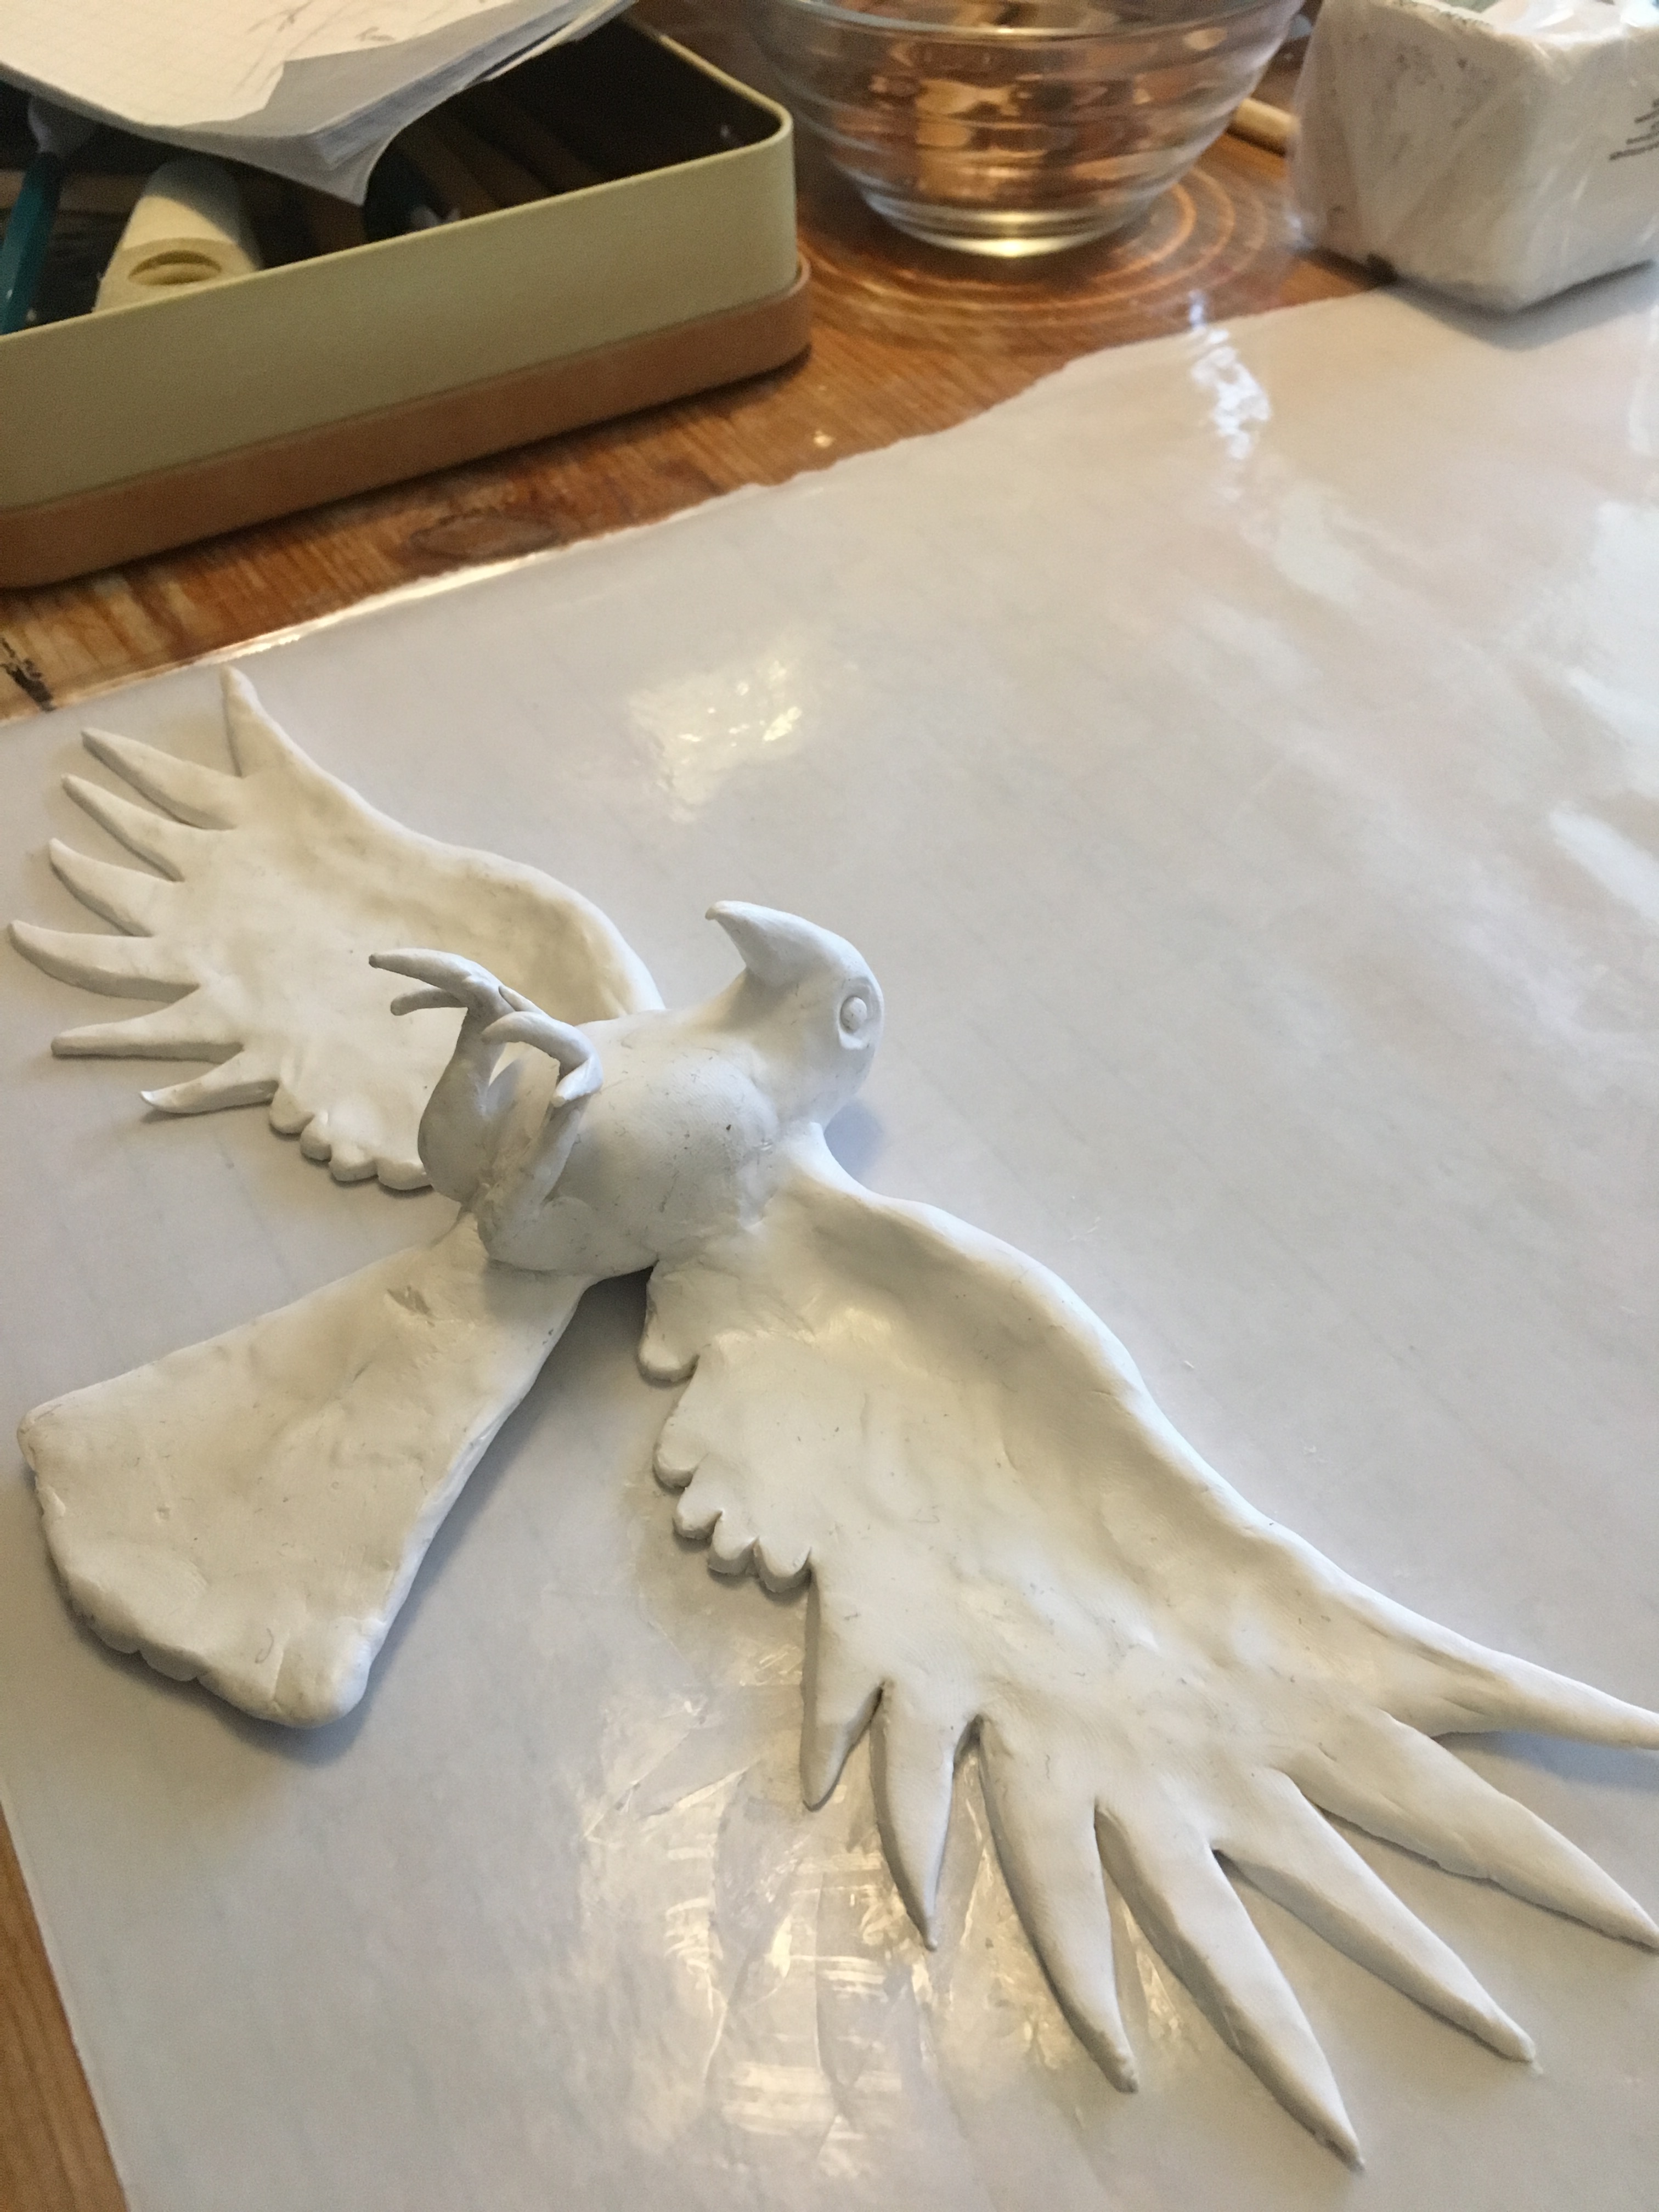
I have ordered that new pump and I am awaiting its arrival. Hopefully it will come soon! What am I doing in the meantime? Some design work. Some experiments with clay. Annnd slowly progressing on that neato raven sculpture I’ve been working on.
I’ve been reinforcing the raven statuette with DAS paperclay. You might remember me mentioning that most of the sculpture was made with Sculpy. I got to the point with it that it was too wiggly to safely work on the details without smushing the back of the wings or vice versa so I just decided to bake it and finish the detailing in an air dry clay.
I’m quite pleased with how it’s going.
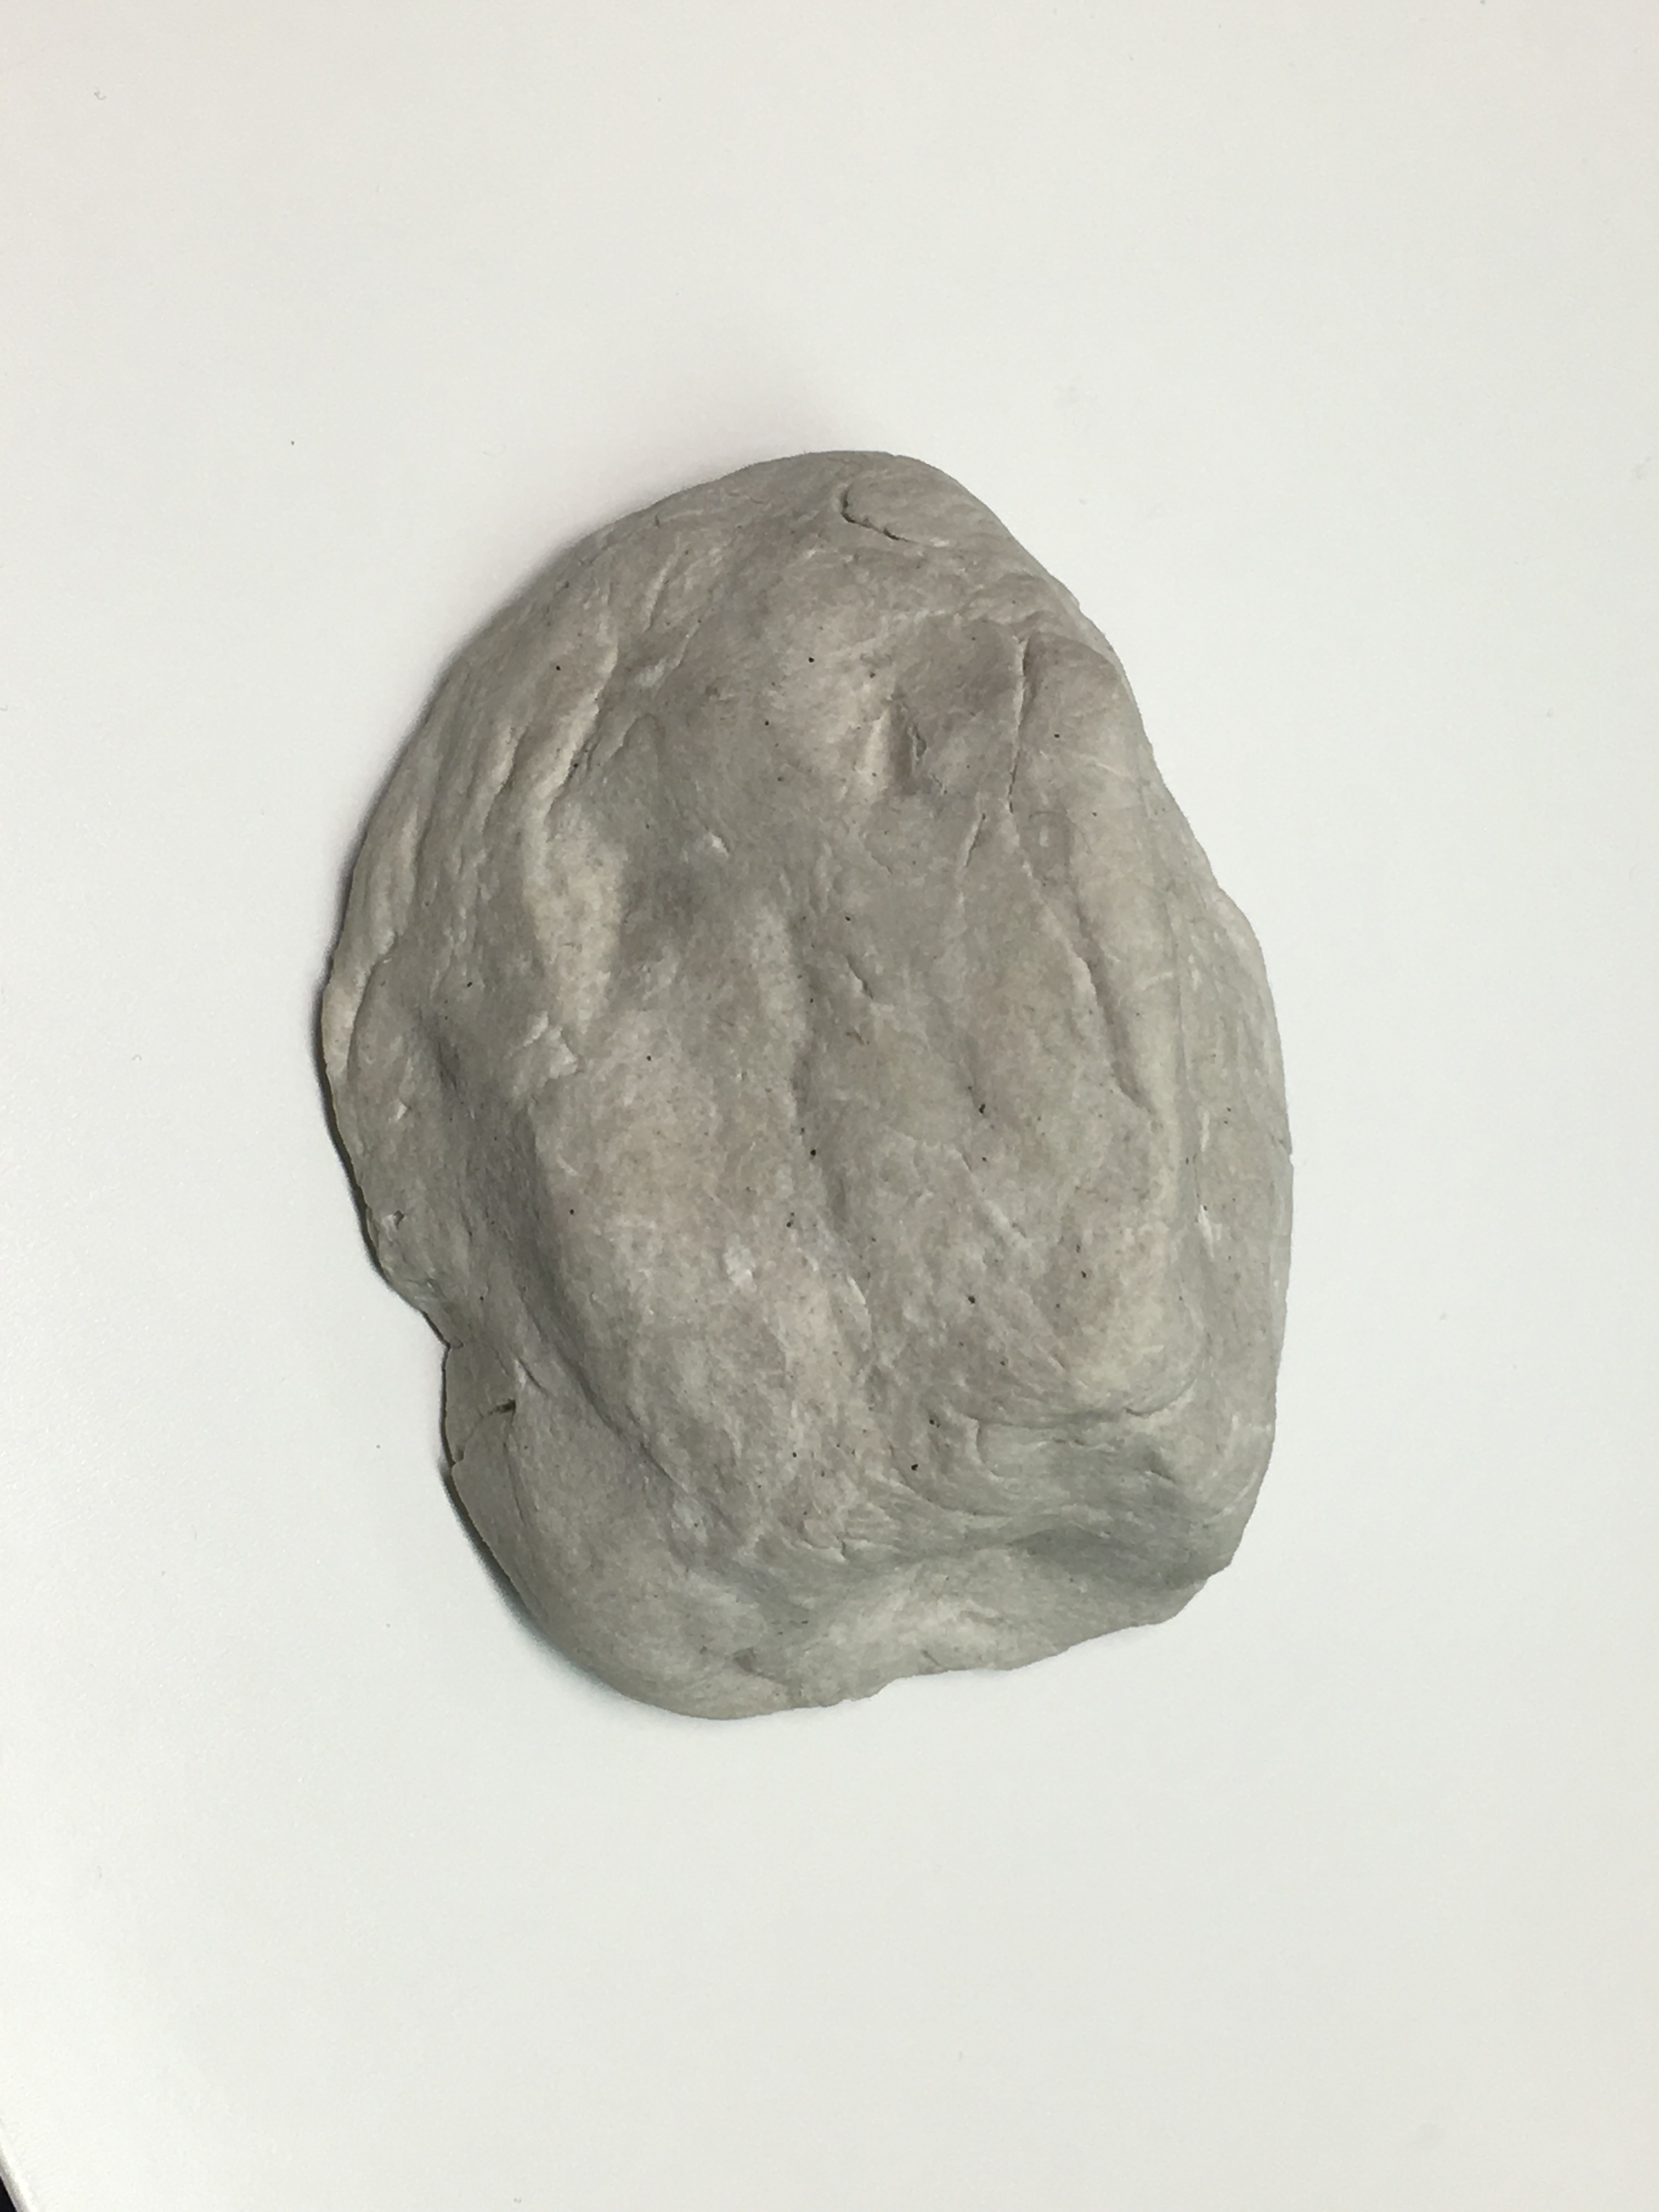
Behold! A rock!
It’s a lovely rock. I know what you’re thinking. Ethan’s finally snapped. Now he’s showing us his rock collection on his work blog. But before you stage an intervention, let me reveal to you that this rock has a secret!
It’s hollow! Remember that DIY paperclay recipe I said I was going to try out? Well, I did and it is fantastic for creating stone-like textures. It’s quite hard but I found I was able to hollow it out quite easily with a small carving tool. This is to be the beginning of my new witchlight model.
Betcha thought I forgot eh? Nope! I’ve just been struggling with the execution of the project. It’s a rather demanding thing to accomplish and I really want to get it right and make it look cool.
Here’s the video of the paperclay recipe I used. I followed it precisely. It turned out great! After five-ish days or so it got stiff and lumpy so I had to add some more water to it and beat it up a little to get it going again. It was still chunkier than it was when it was fresh so I’d very much recommend only making as much as you need and using it within a day or two. I’ll let you know how the rehydrated clay works, versus the fresh stuff.
So I mentioned design work! I’ve had a request for the tiniest little Seraph Blade I’ve ever made. 15.22cm (6″) total. I was stumped as to how I was supposed to make something that wouldn’t look ridiculous and end up with the handle being longer than the blade. But then my wife mentioned skinning knives to me. Those are short but wide and have a really nice curve to them.
I took some inspiration from various models I looked at and came up with this design. The middle, ring, and pinkie finger rest on the handle proper while the index finger goes through the hole in the blade. I added a thumb guard to keep the hand safe from sliding onto the edge of the blade when it’s all slippery with demon ichor. 😉
Demons thinking they’ve caught a lucky break and found a Shadowhunter unarmed will be in for a nasty little surprise. It might be intimidating to get that close and personal with the infernal, but a hunter’s gotta do what a hunter’s gotta do. I know some of you will have the moxie to pull it off.
I’ll have some more progress pictures for you soon. Everybody cross your fingers for a quick shipping of my new vacuum pump so I can get that pretty Arabian sword cast in resin! Can’t wait to show you the completion of that project!
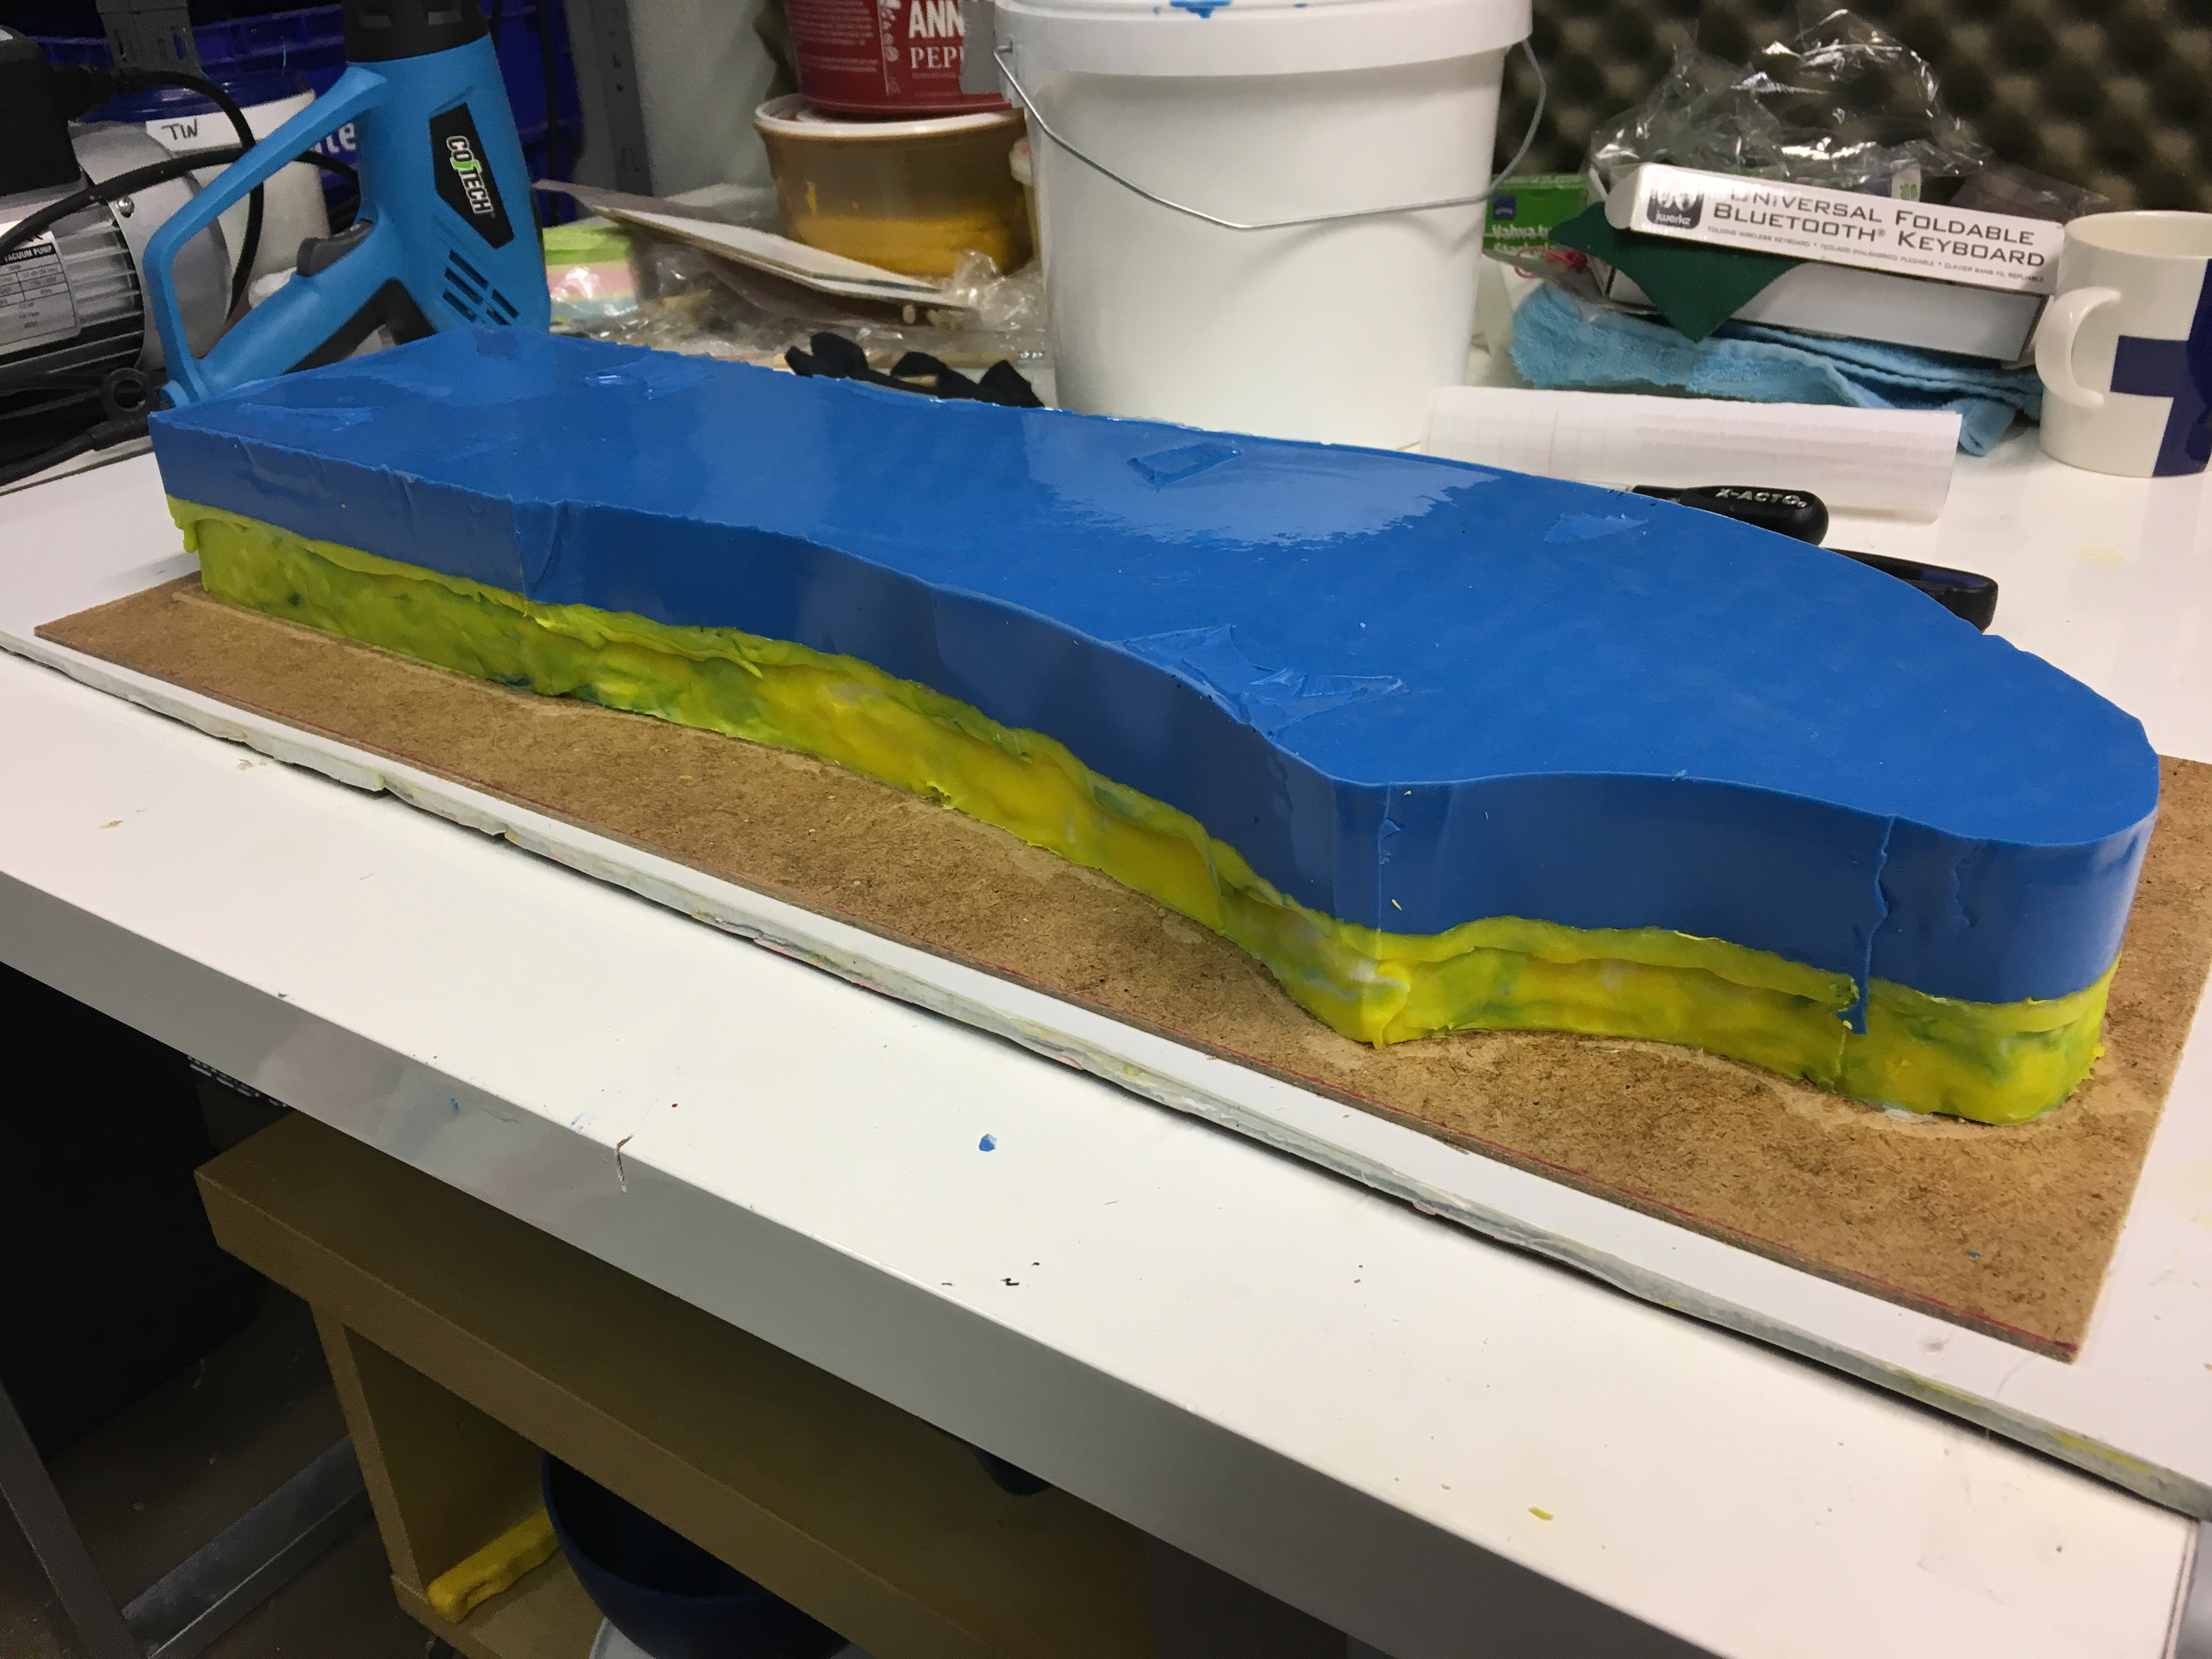
Hoo boy do I ever have a lot of pictures to show you today! First, we get to look at the newly created mould for Zaapiel for the super cool Arabian Nights project. Yay! I am so very pleased with how it turned out especially because my vacuum pump was dyyyying throughout the process of degassing it. (Seriously, I need a new one. My wallet is sad. 😦 )
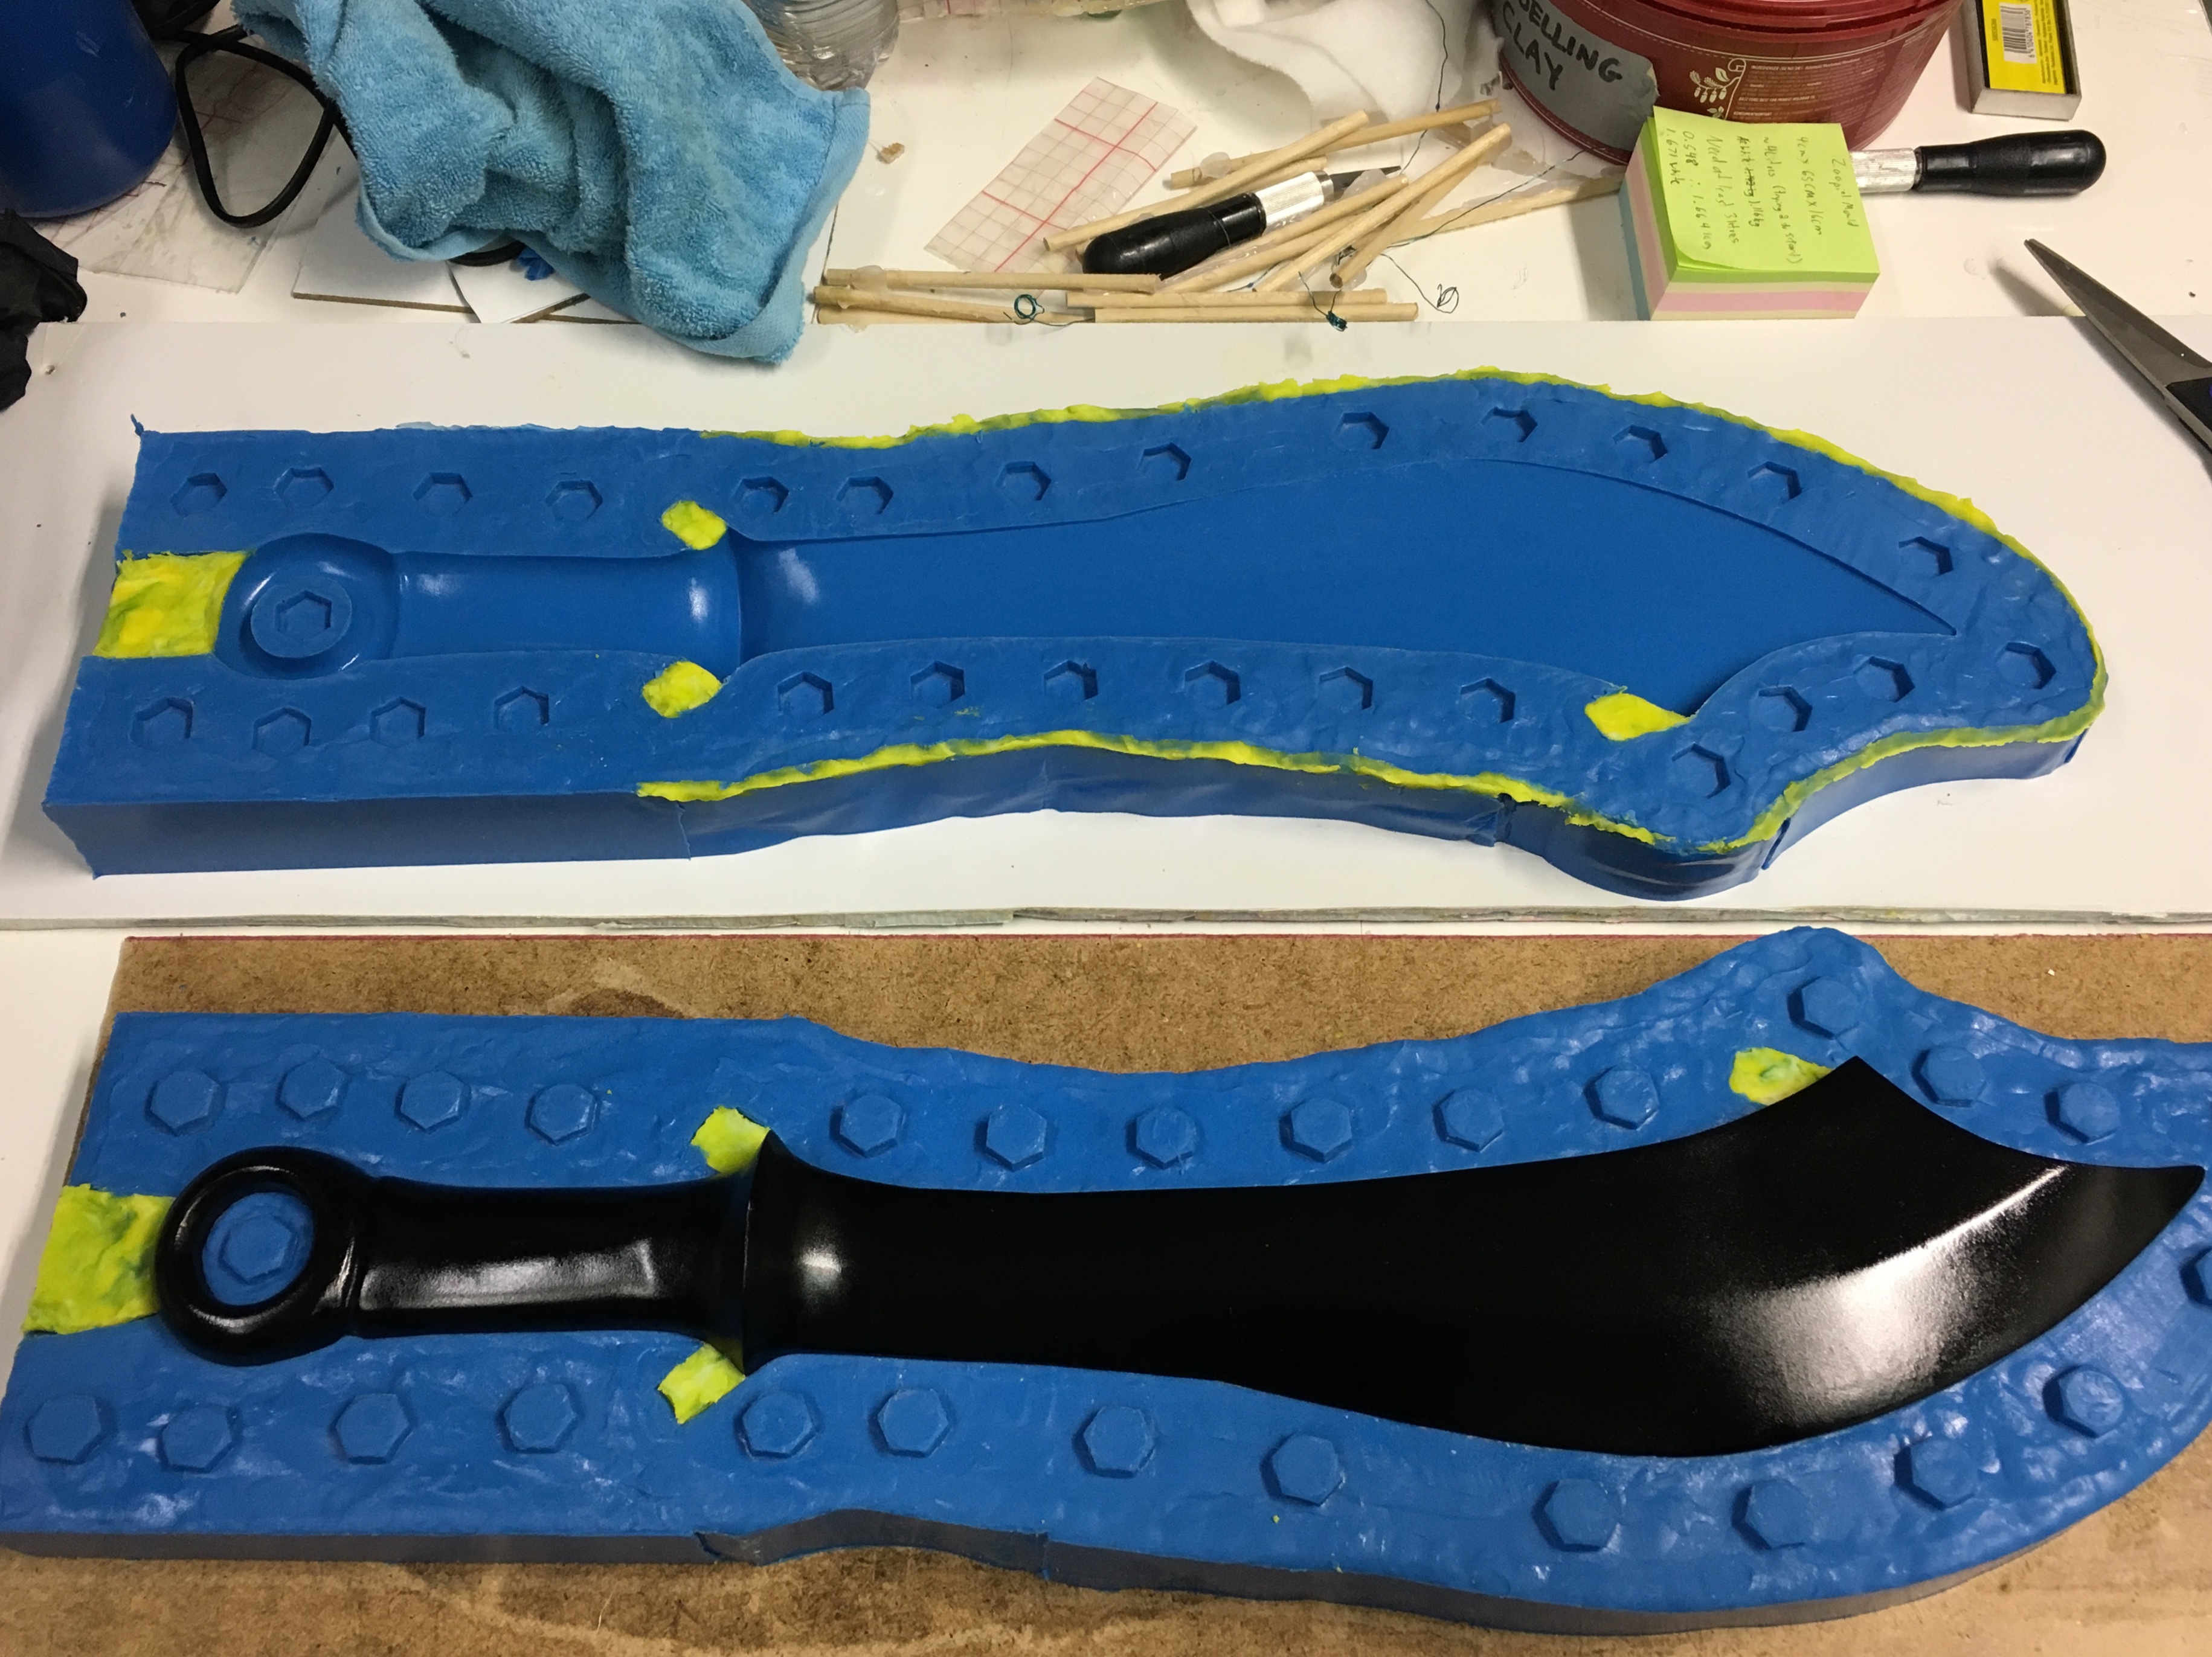
What lurks beneath this slab of blue goo?
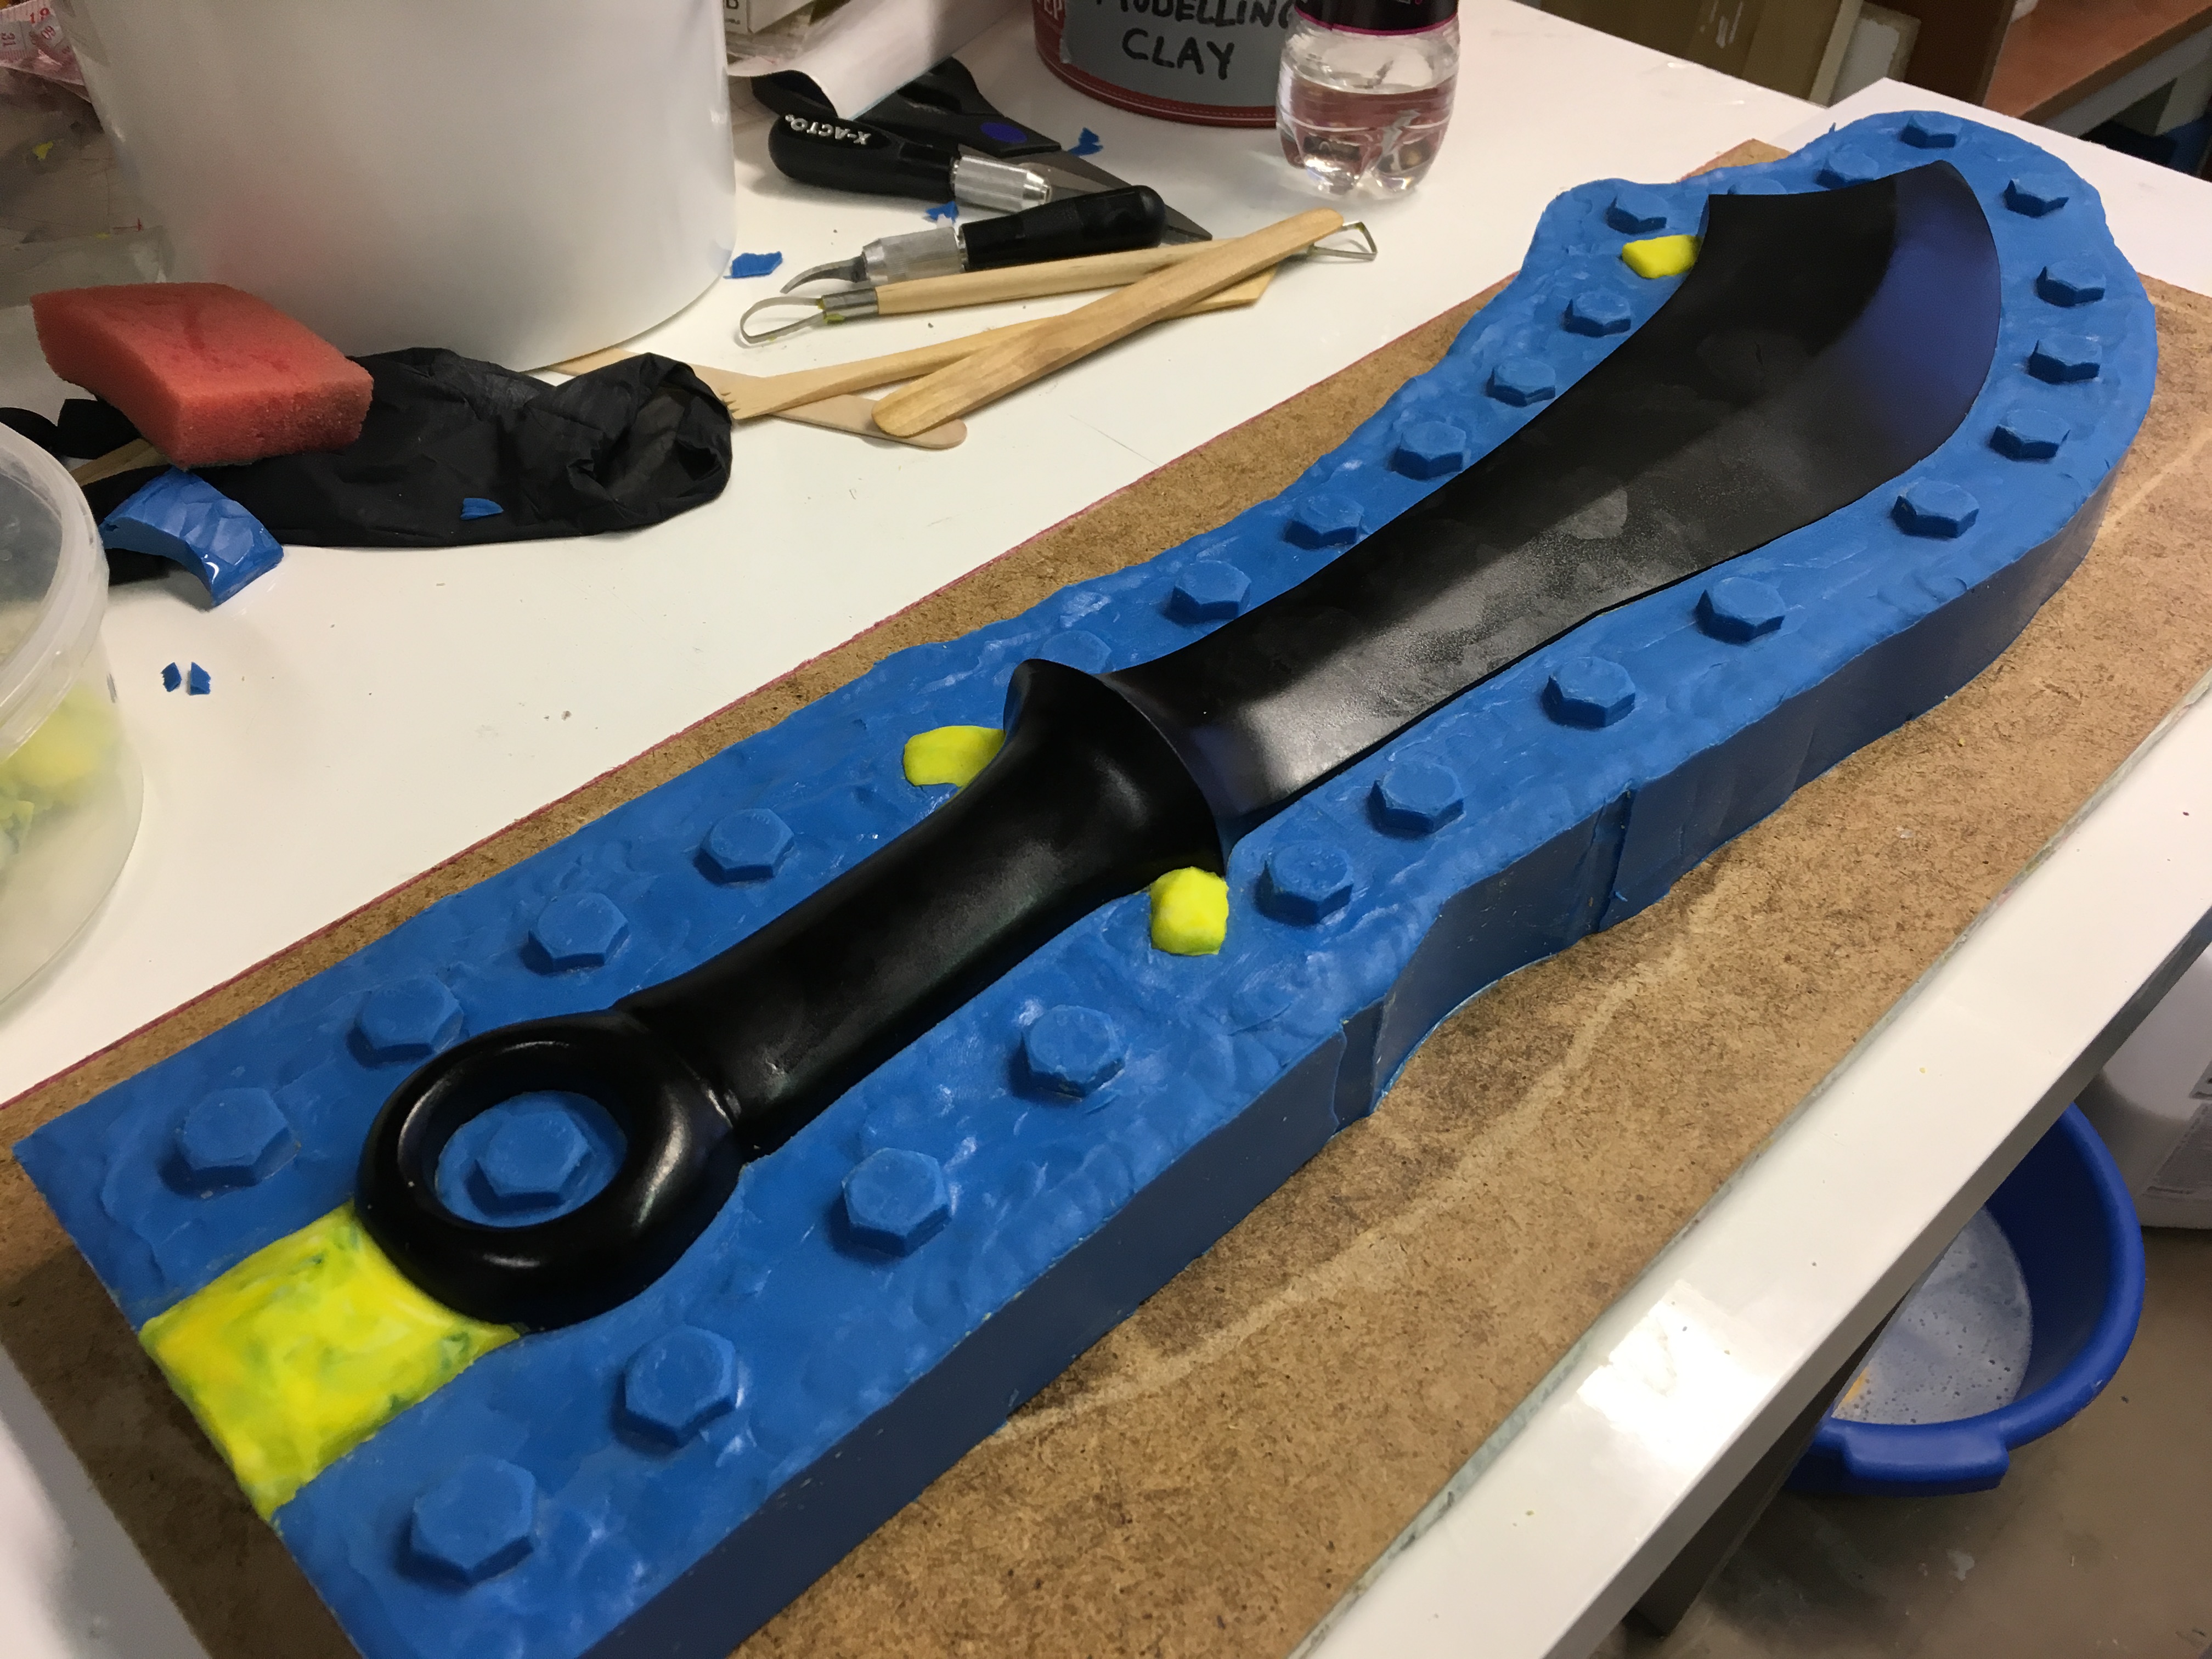
It’s a sword! (As if anybody had any doubts about what it was… LOL) That’s the first side done. I actually managed to remember to take photos of the mould box this time.
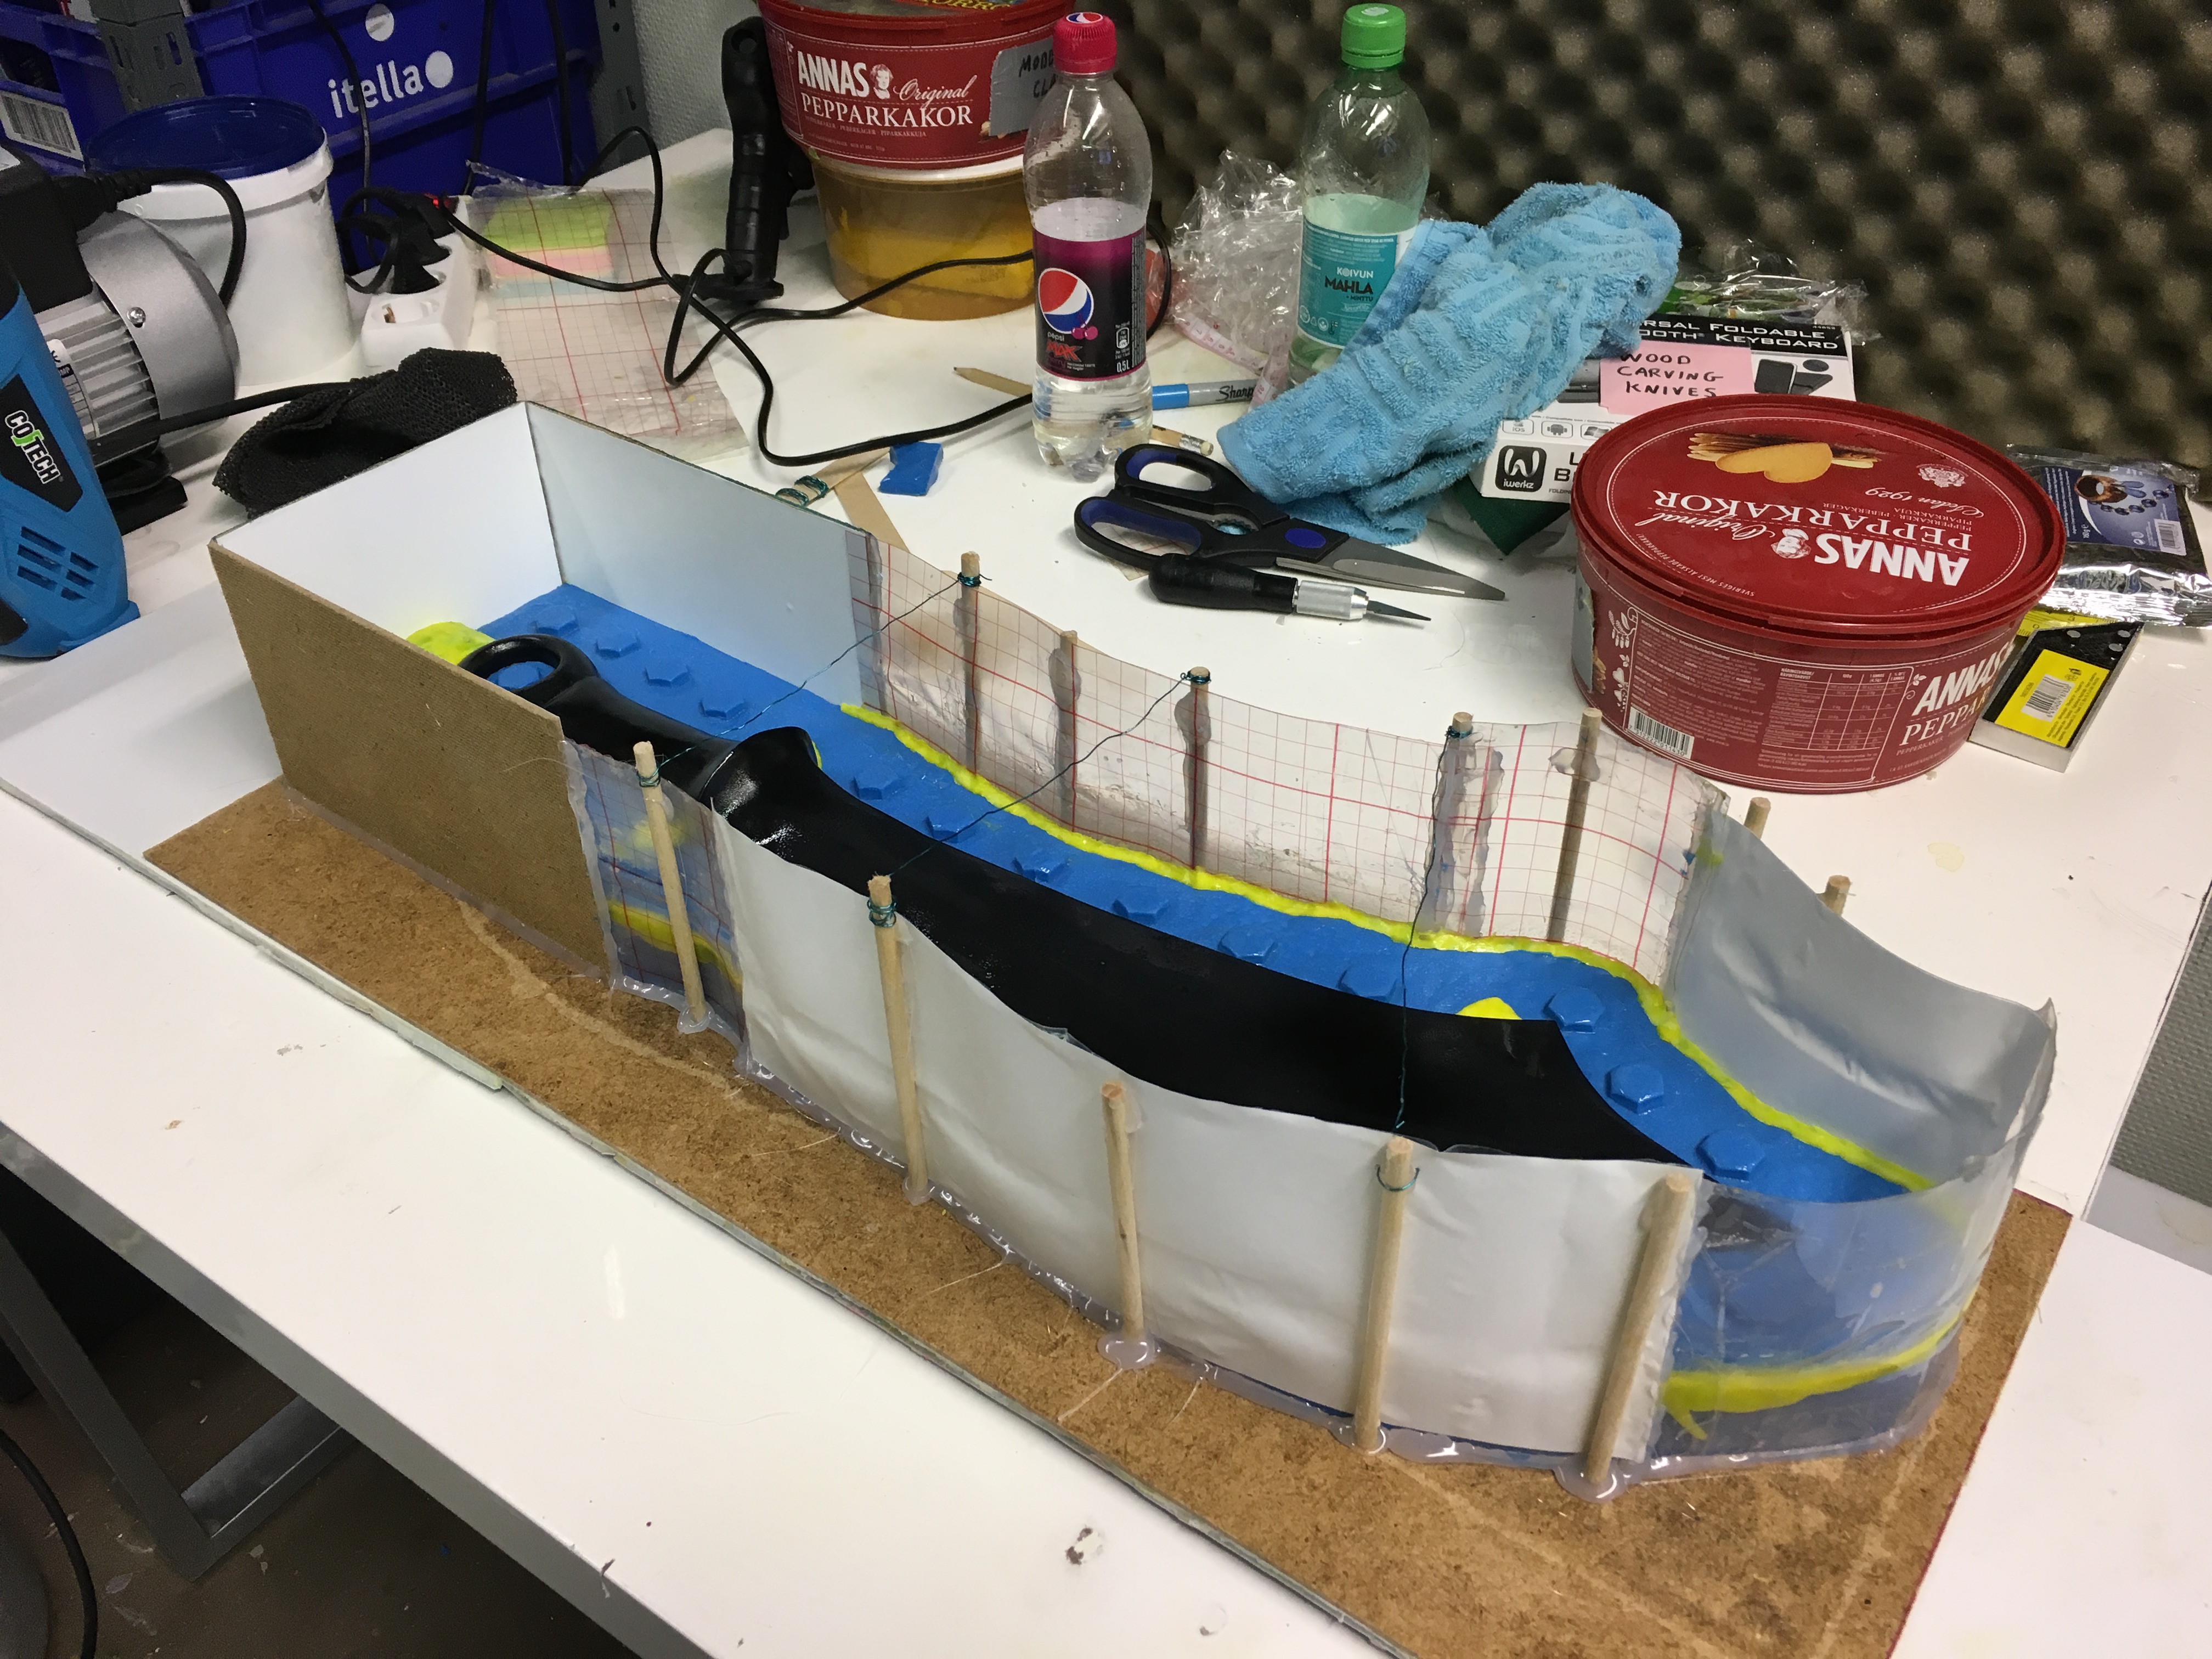
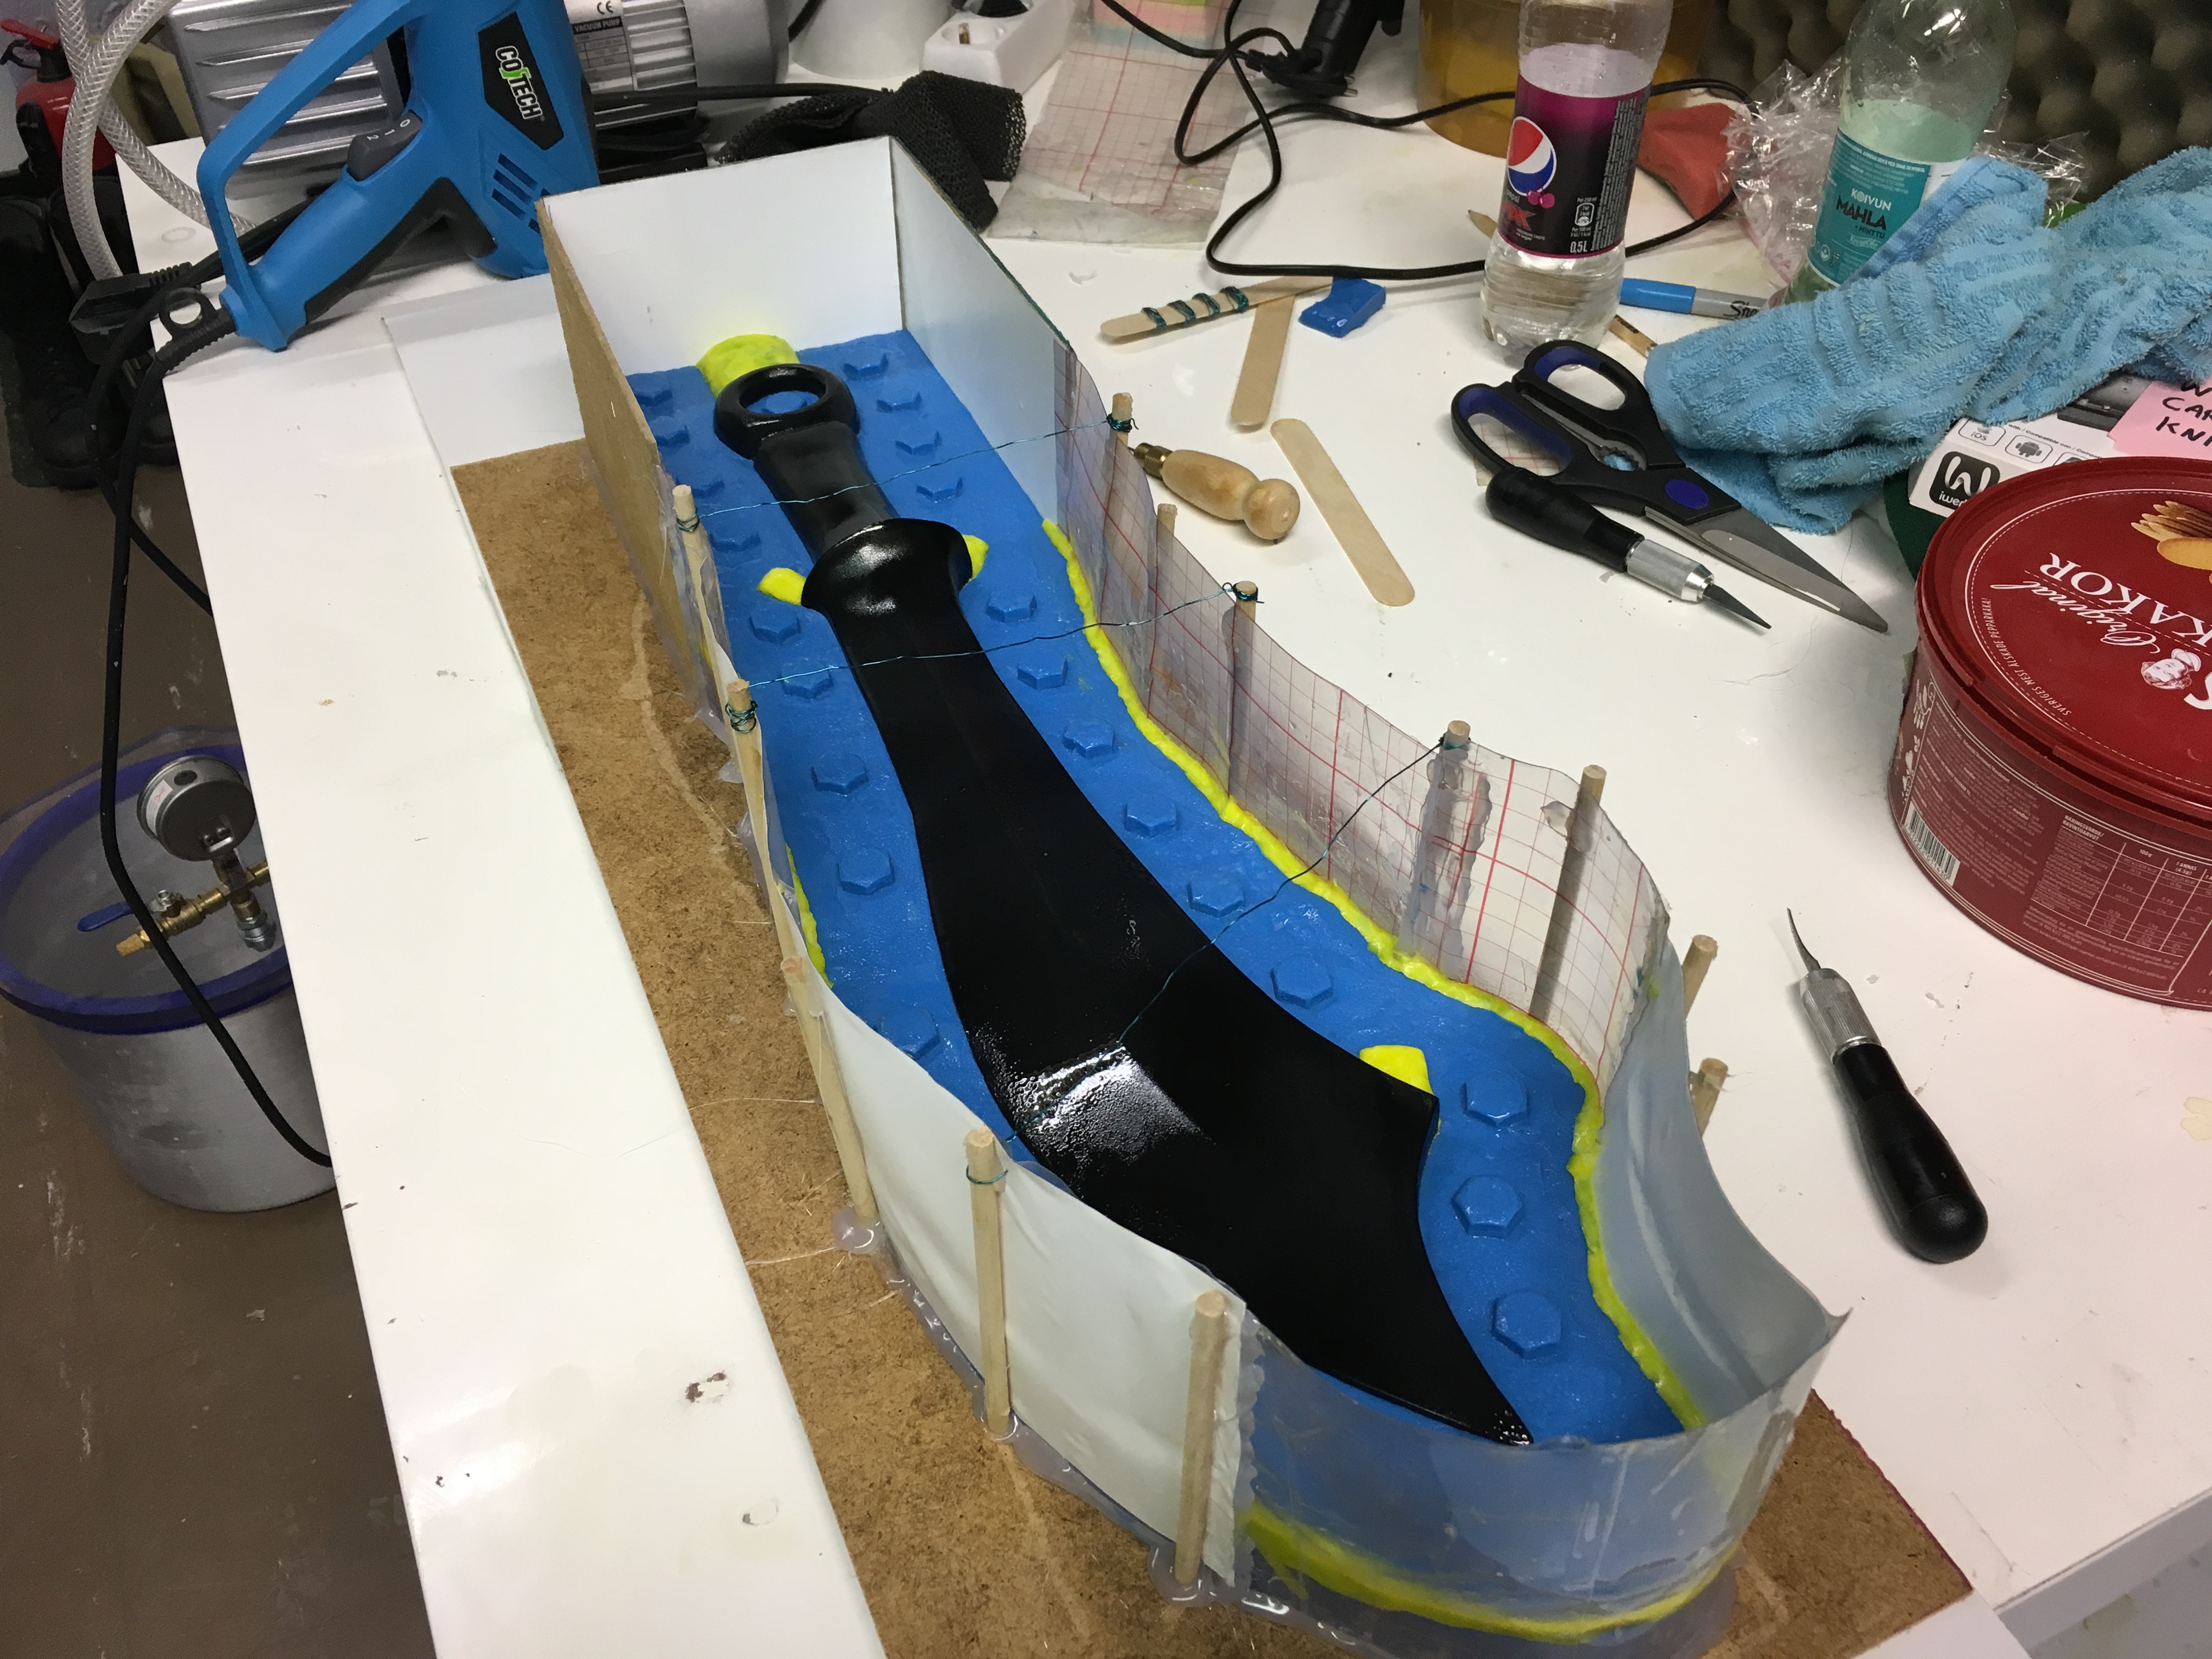
Let’s have a little peek at the anatomy of this mould box here and explore some money-saving tricks! The straight parts near the handle are simple MDF board with laminate on one side to keep things from sticking to its porous surface. The wiggly parts all around the blade are flexible plastic sheet. The upside of using this sort of sheet, is that I can make it the shape that I need instead of one big rectangle every time. This saves money on silicone.
The downside of using the flexible sheet is that it takes longer to set up and it’s more fiddly. It also takes more hot glue to stick together and fill gaps. The wooden sticks you see are there to keep the plastic sheet at a 90 degree angle so the two halves of the mould will actually line up. The wire that stretches across the width of the box in three places helps those six reinforcement sticks from bowing outward when the weight of the silicone starts to push on the walls as it’s poured in.
If you choose to use this method of moulding, take a moment to consider how much you charge (or would charge) customers for your time per hour. Think about how long it will take to get the mould box the way you want it. How much will that time cost? Now compare that to the price of the silicone you will be saving by shaping the mould box more closely to the object you’re moulding. Which will be cheaper?
In this case, I saved approximately 100 euros of silicone. Since I charge 10 euros per hour for my time, and it took me less than 10 hours to fiddle with the mould box, I saved money by using the plastic sheets. Your results may be different, so it’s worthwhile to check!
Back to the pictuuuuures! Here’s the crazy silicone sandwich we all have come to know and love. I’m proud to say I didn’t have any leaks throughout the entire process. Gosh I’ve come a long way from where I began. It seems like only yesterday I —
… you know what, nevermind. Let’s go back to the pictures. Shush.
It’s a win! Two beautiful, bubble-free halves of a sword mould. I cannot wait to get resin into this baby and see what it can do. Will my new bubble-trap design work? Is everything truly straight and perfect? I don’t know! We’ll have to find out when I get my new vacuum pump so I can degas the resin properly. No skipping steps! That’s the way to get a crappy result.
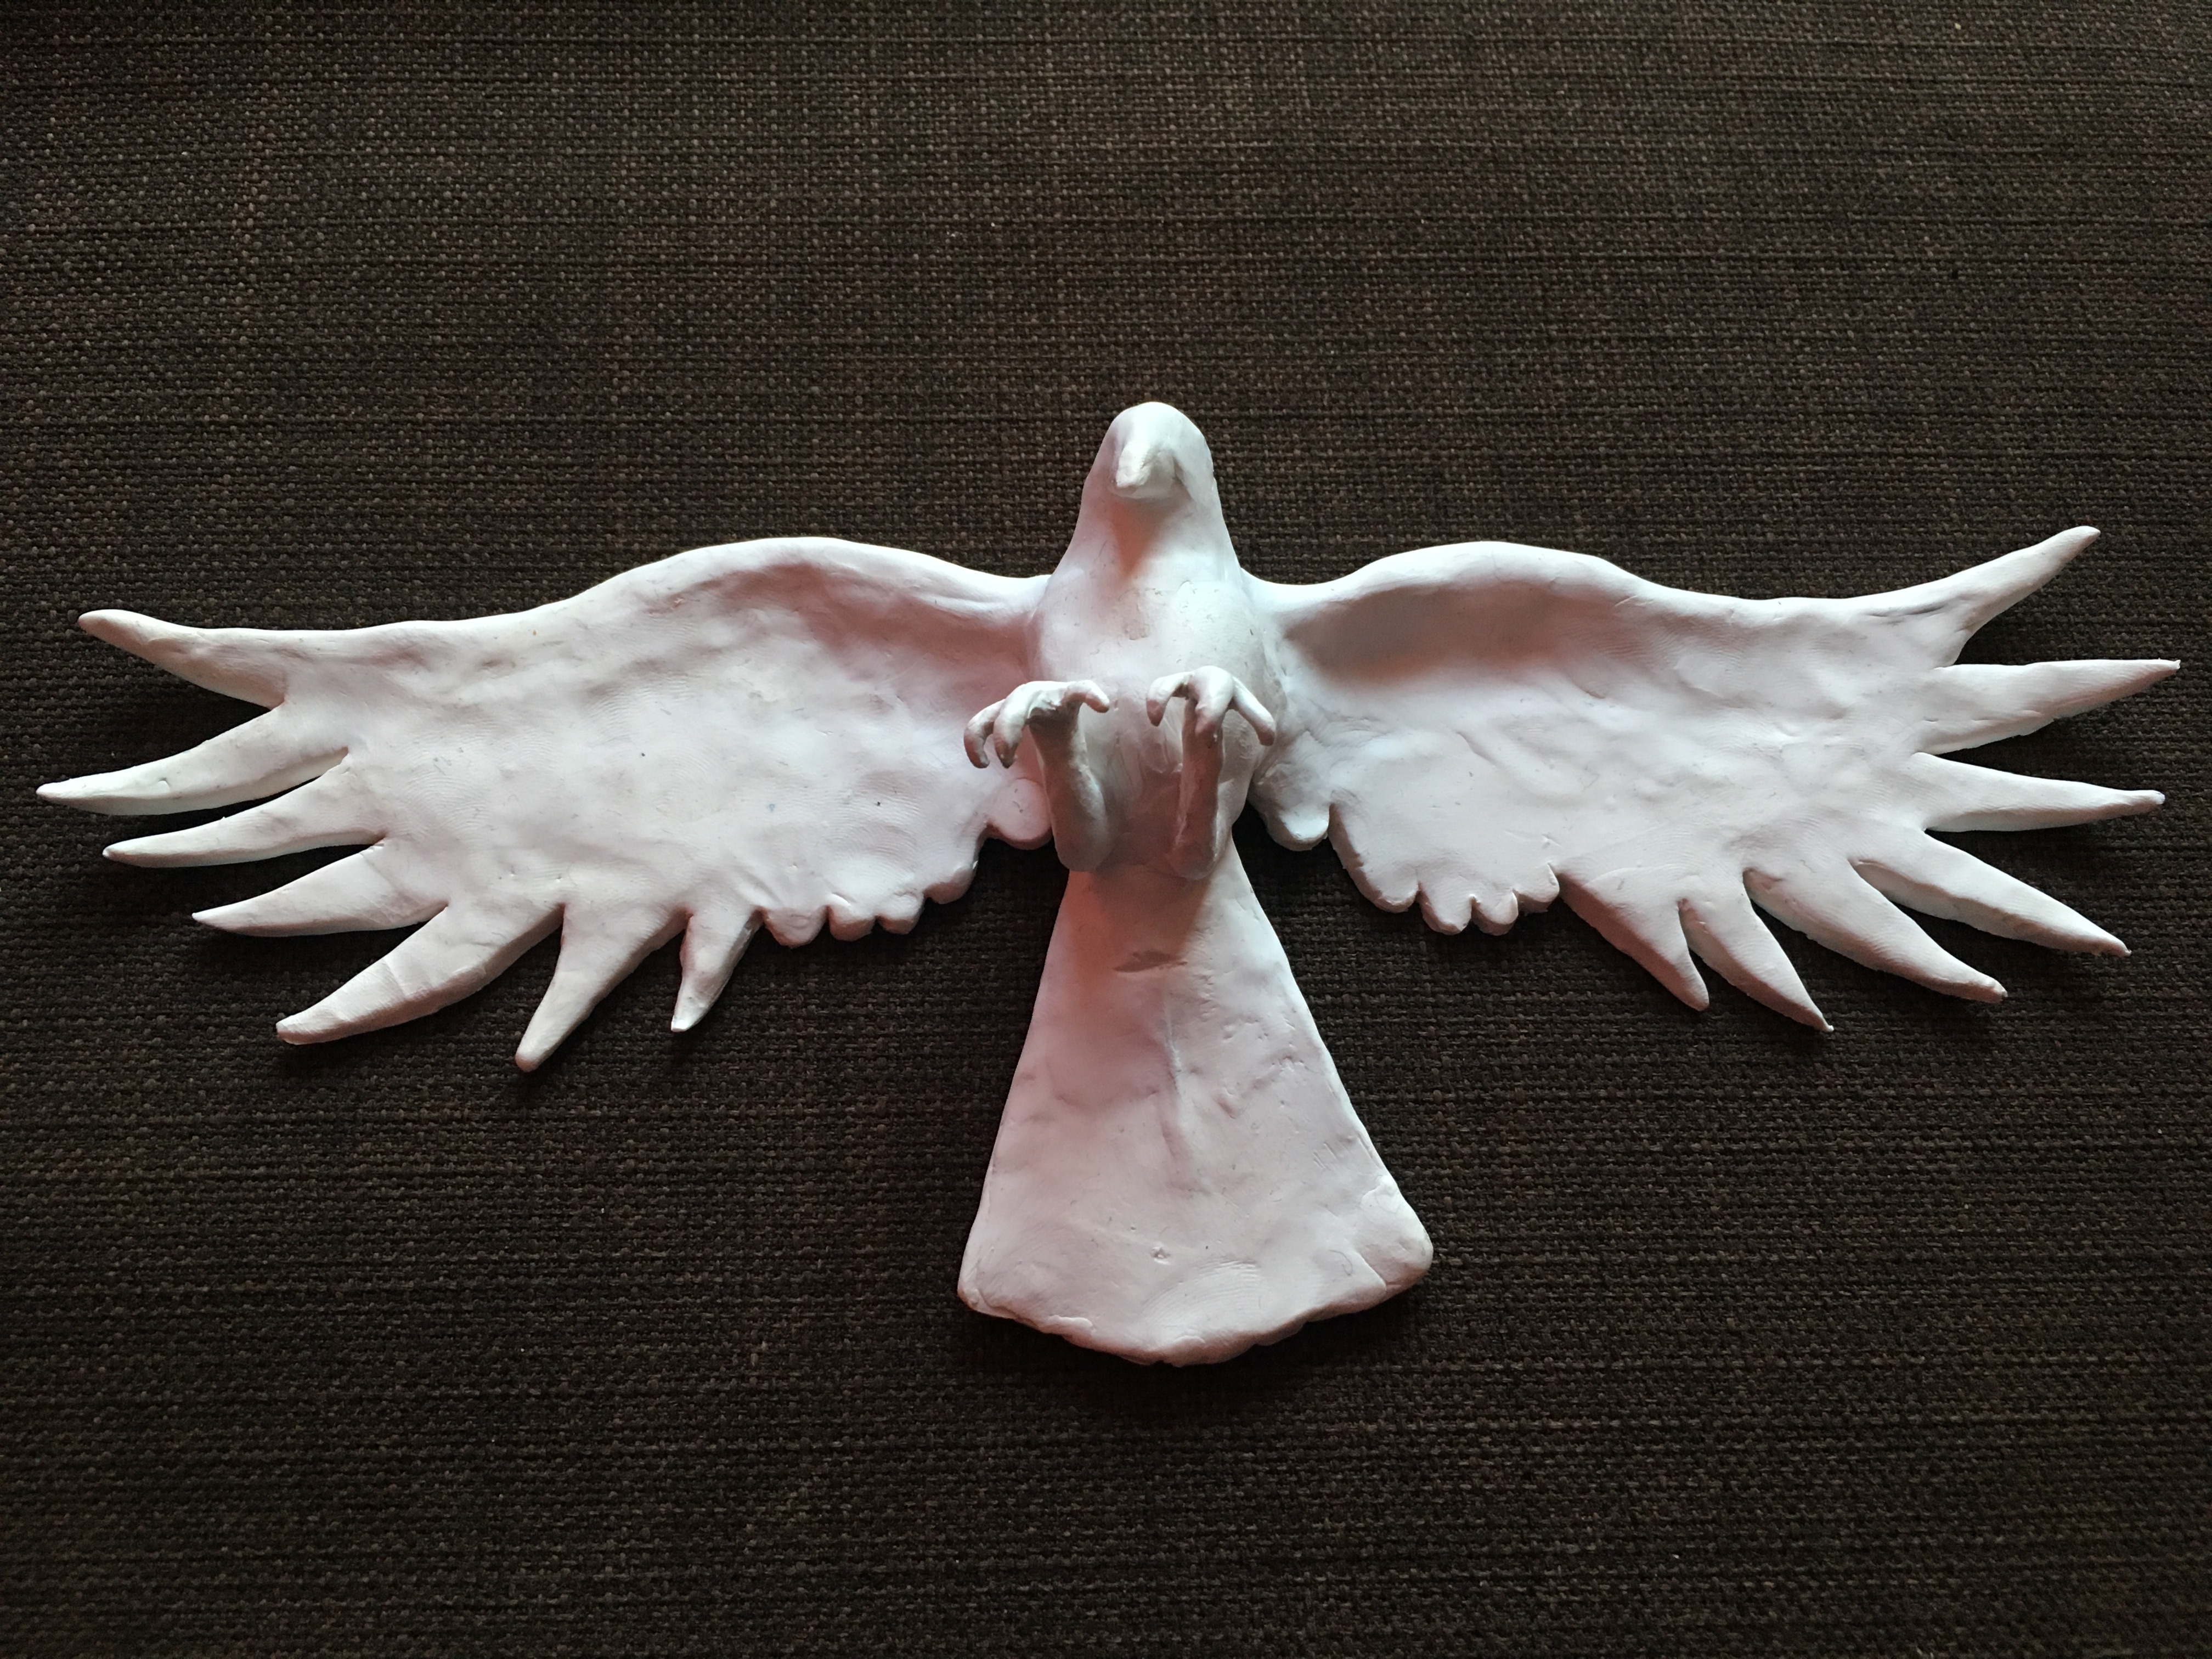
Now, I mentioned birds in the title didn’t I? What was that all about? Well! I’m ready to reveal to you the beginnings of a new project. It has nothing to do with Shadowhunters. (*gasp!* I know. It’s crazy isn’t it?) This new project that I’ve been so secretive about is part of a creative vision that has deep personal meaning to me. I hope to share this dream with you so we can all enjoy it together.
If you guessed “raven” you are correct! This bird is fully baked now so the clay is hard. It still requires a lot of detail work, smoothing, and tinkering, but I had to render the clay stiff enough to support my sculpting tools fixing and fussing around on it without getting bent out of shape. The rest of the shaping will be done with either an air-dry clay or Milliput. I haven’t decided yet.
This project has a long way to go still, I hope you’ll stay tuned for its evolution. Until next time, wish me luck!
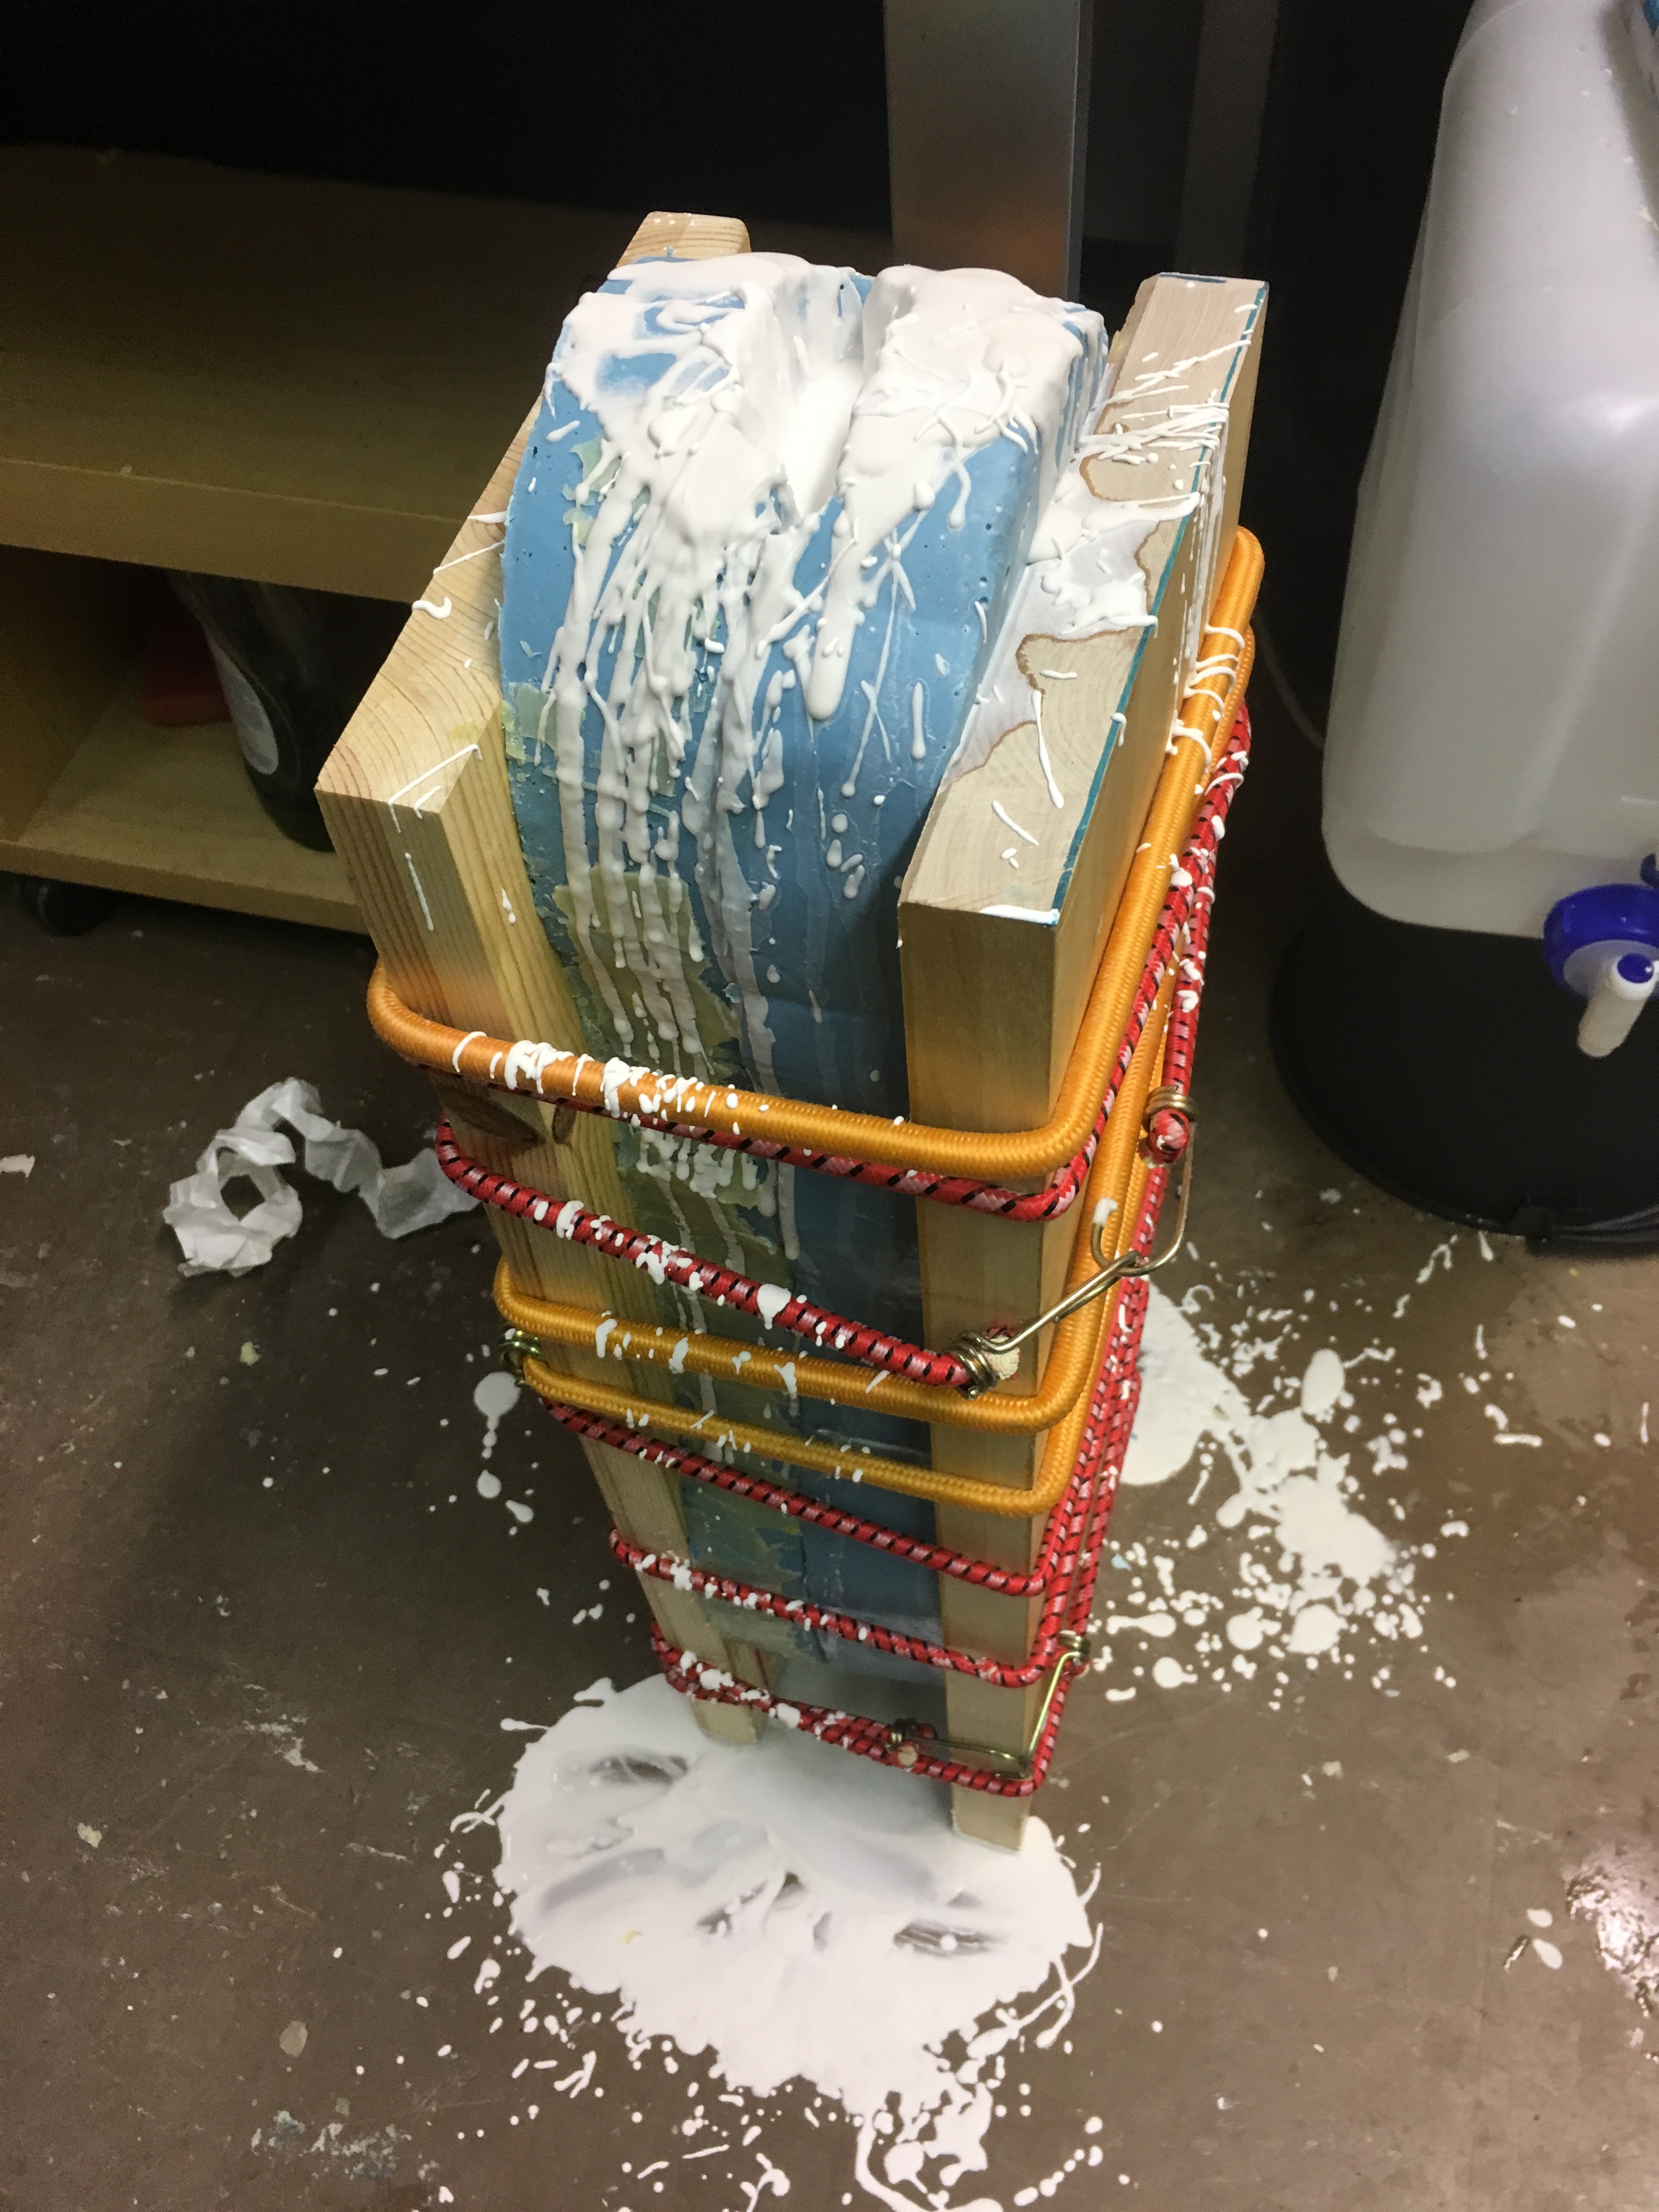
No that wasn’t a typo. Goo! Sticky slorpy blue goo! It is time to pour silicone all over this beauty!
When you see something halfway buried in clay, you know the wacky wizardry is about to begin.
So right now I have Zaapiel sitting in its mould box (which I didn’t take a picture of because I was dead tired at the end of the day on Friday) awaiting my arrival this morning.
What else is afoot at the workshop? Well, I found a few DIY recipes for air-dry paper clay that I’m dying to try out. If it goes well, I’ll have a supply of much cheaper self-hardening clay I can use to sculpt my prototypes instead of using foam insulation. Foam insulation is not very good for the environment and is also annoyingly porous so it has to be sealed over and over again with layers of glue and paint before I can actually take a prototype mould of it. It’d be great if I didn’t have to do that! Let’s see if I can find those recipes for you and maybe we can try it together.
Hello everyone! I’m so happy to be back from the holidays! I never know what to do with myself when I have time off. I’m kind of bad at relaxing, haha!
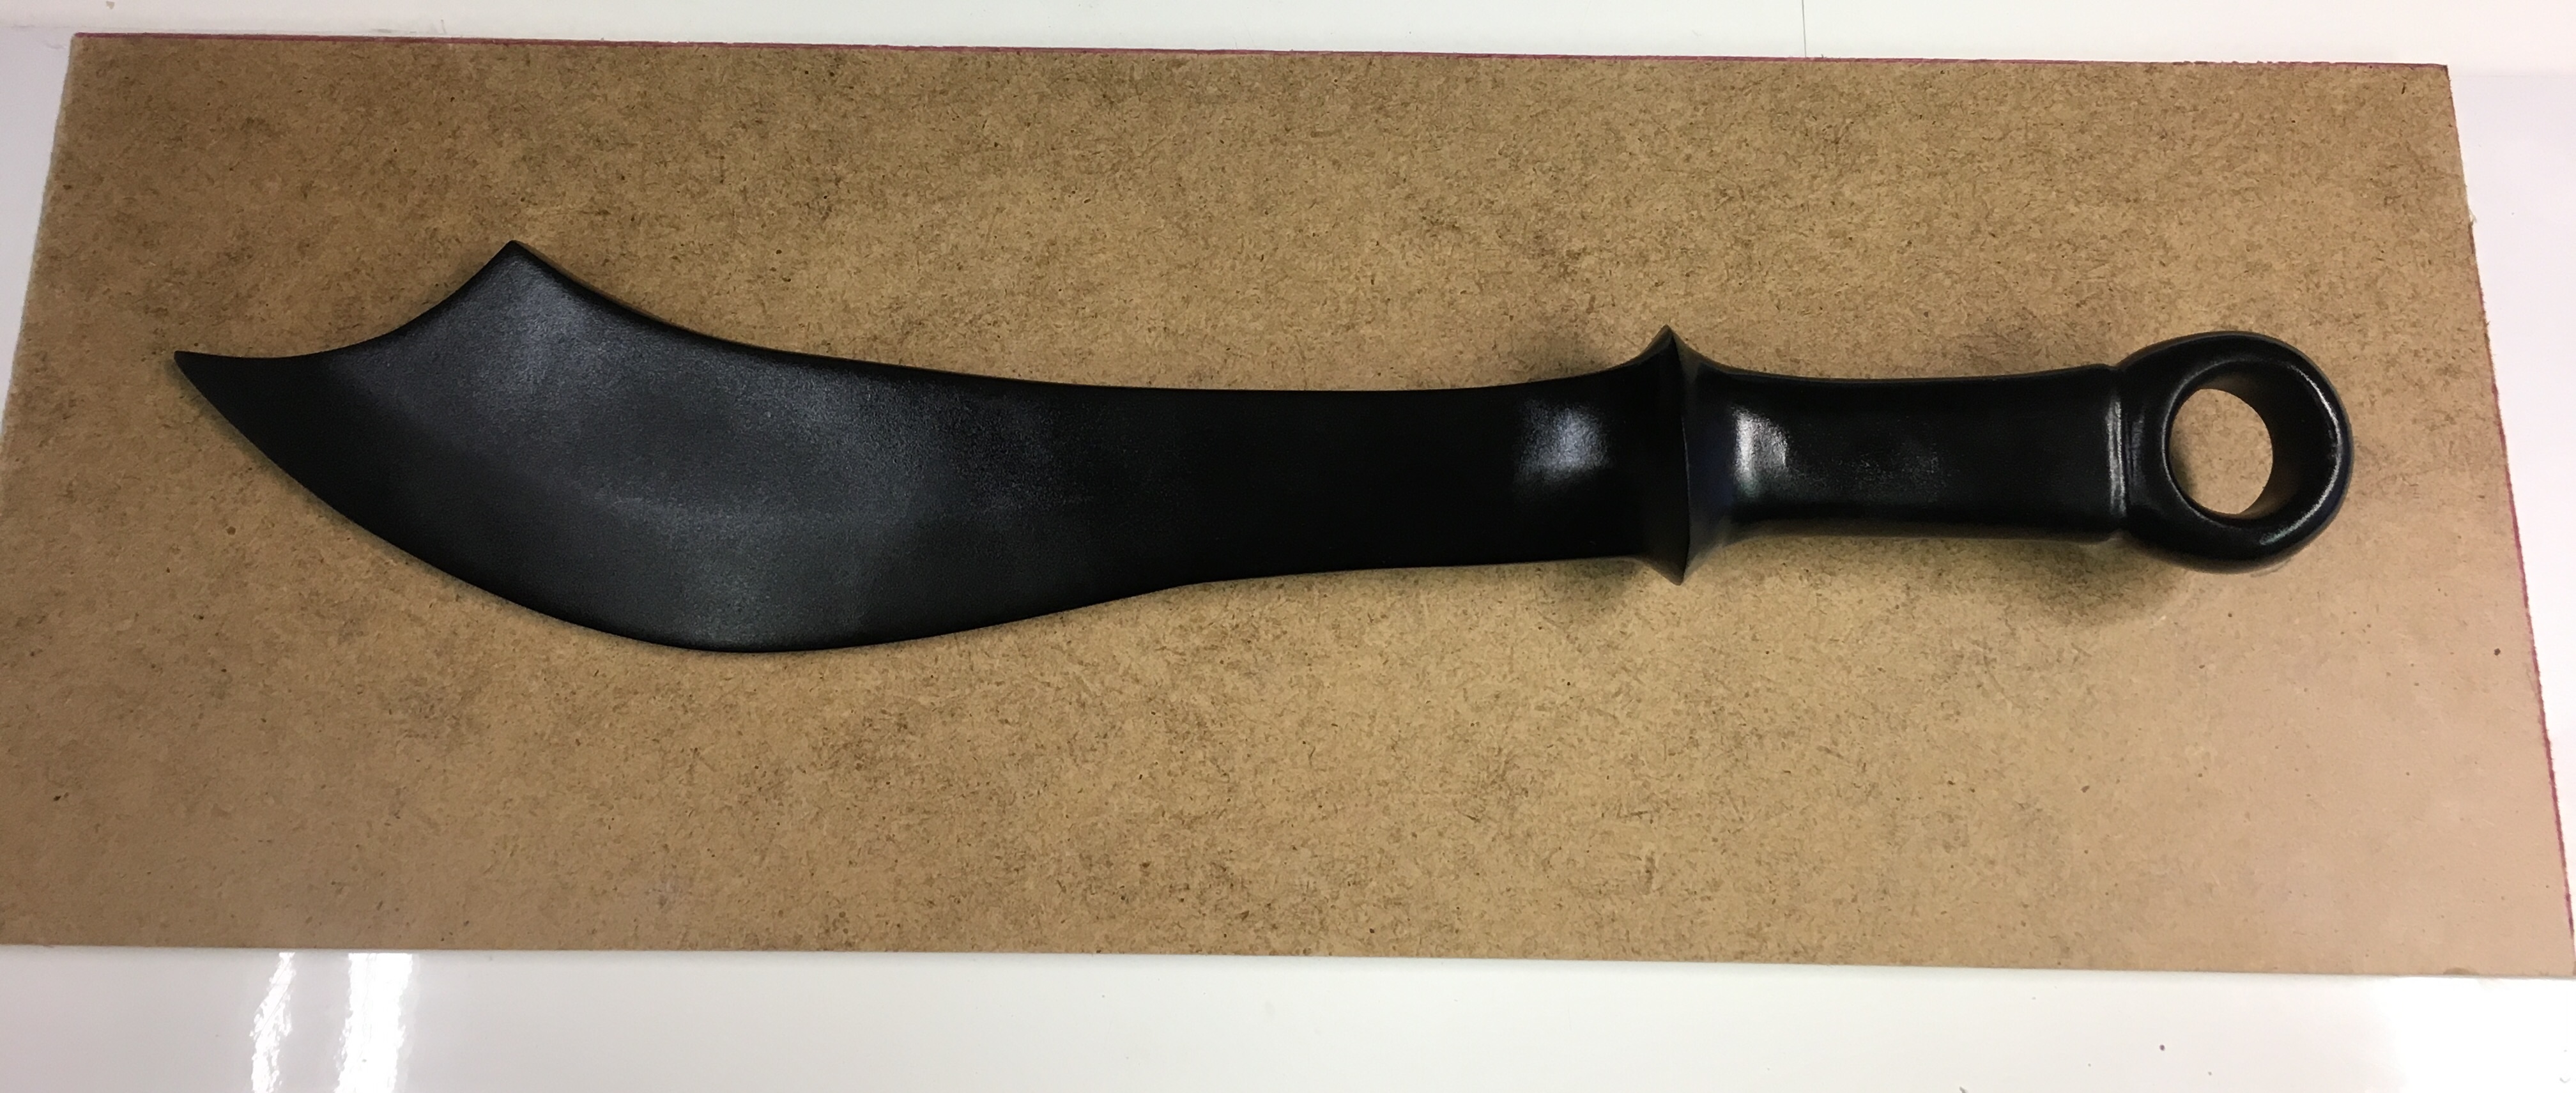
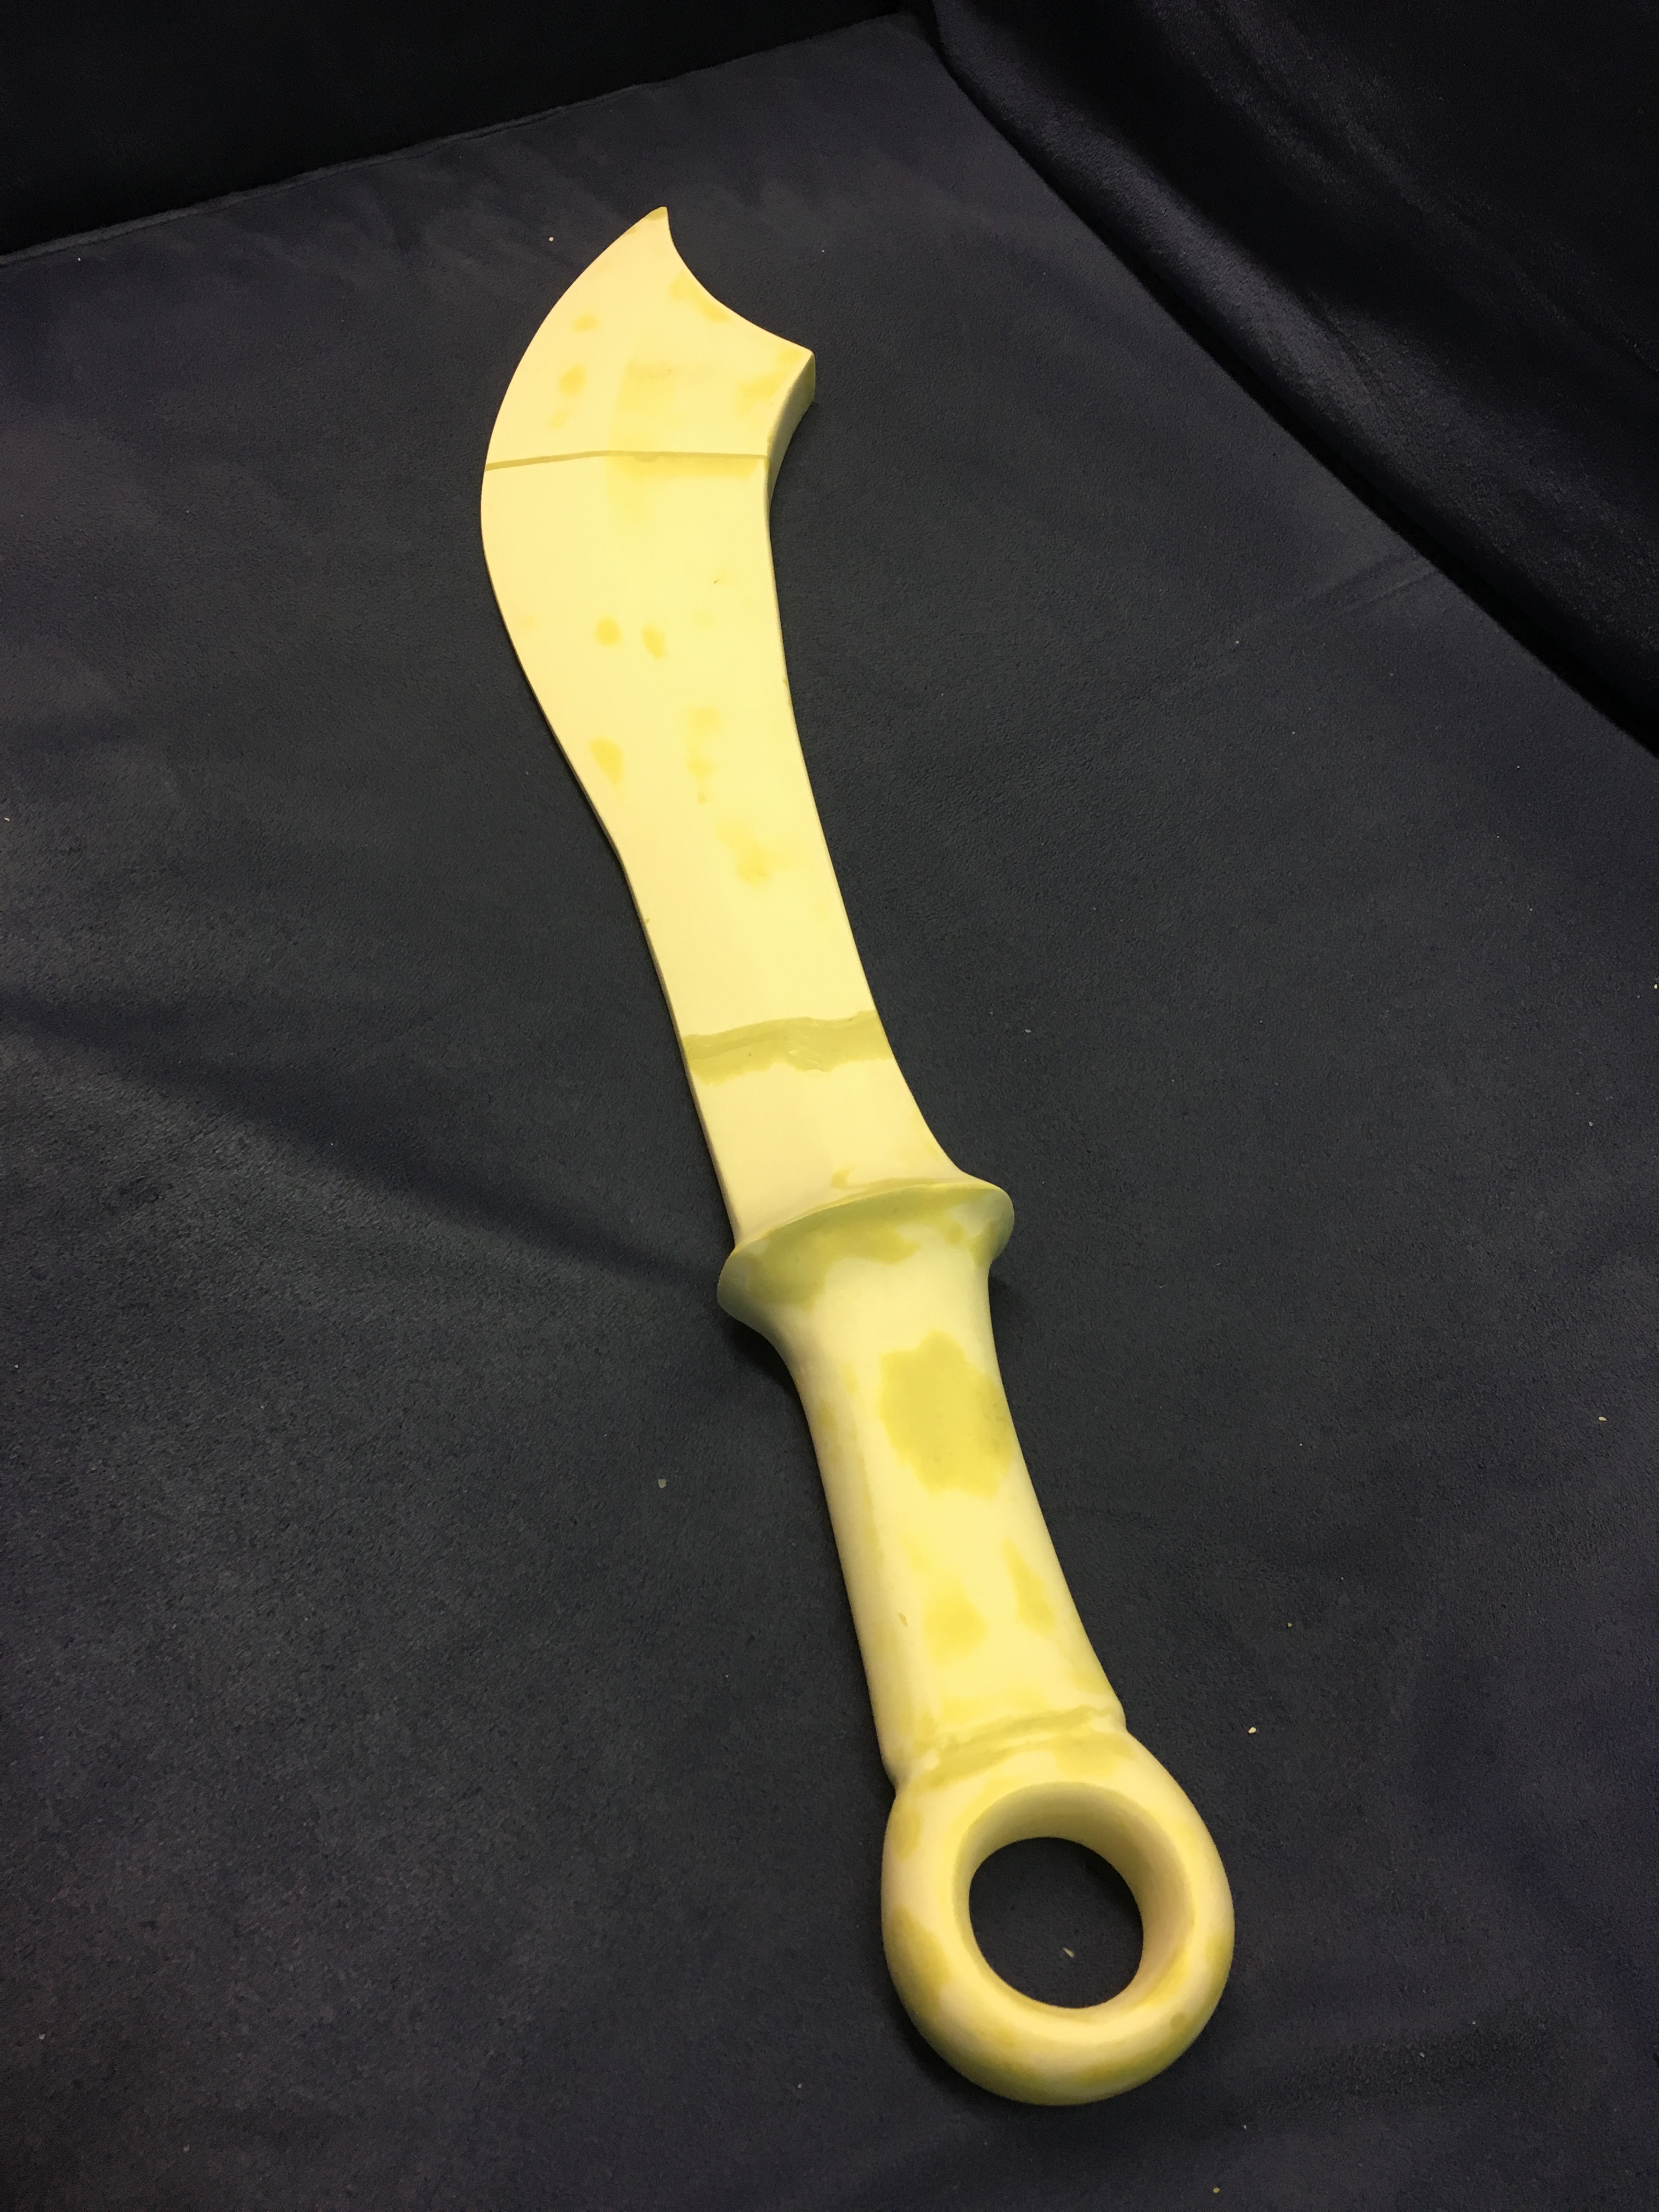
So what was I doing just before I ran away to sleep and eat sweets for a couple of weeks? I’m very pleased to present to you the new sleek shape of Zaapiel, my Arabian-inspired scimitar! Let’s take a look at how the sanding and refining process went.
Now careful with the belt sander, or the sword might …
Oops.
Well then! Time for some good ol’ Milliput to save the day. No worries. Good as new.
Now let’s … are you serious?
The other strap on my face mask broke so I was forced to stop and fix it again. Well, now that that’s taken care of, let’s go back to the belt sander and …
Really? Okay Chewie is way too aggressive for shaping plaster apparently. Milliput to the rescue! Again!
I went out and got myself a set of metal files and used them in combination with my wood rasps to get the sword all shaped as I wanted it.
Then smeared Milliput all over any pin-holes, indents, or just anywhere I didn’t like the texture. Look at this thing! It looks like a troll sneezed on it. Ew.
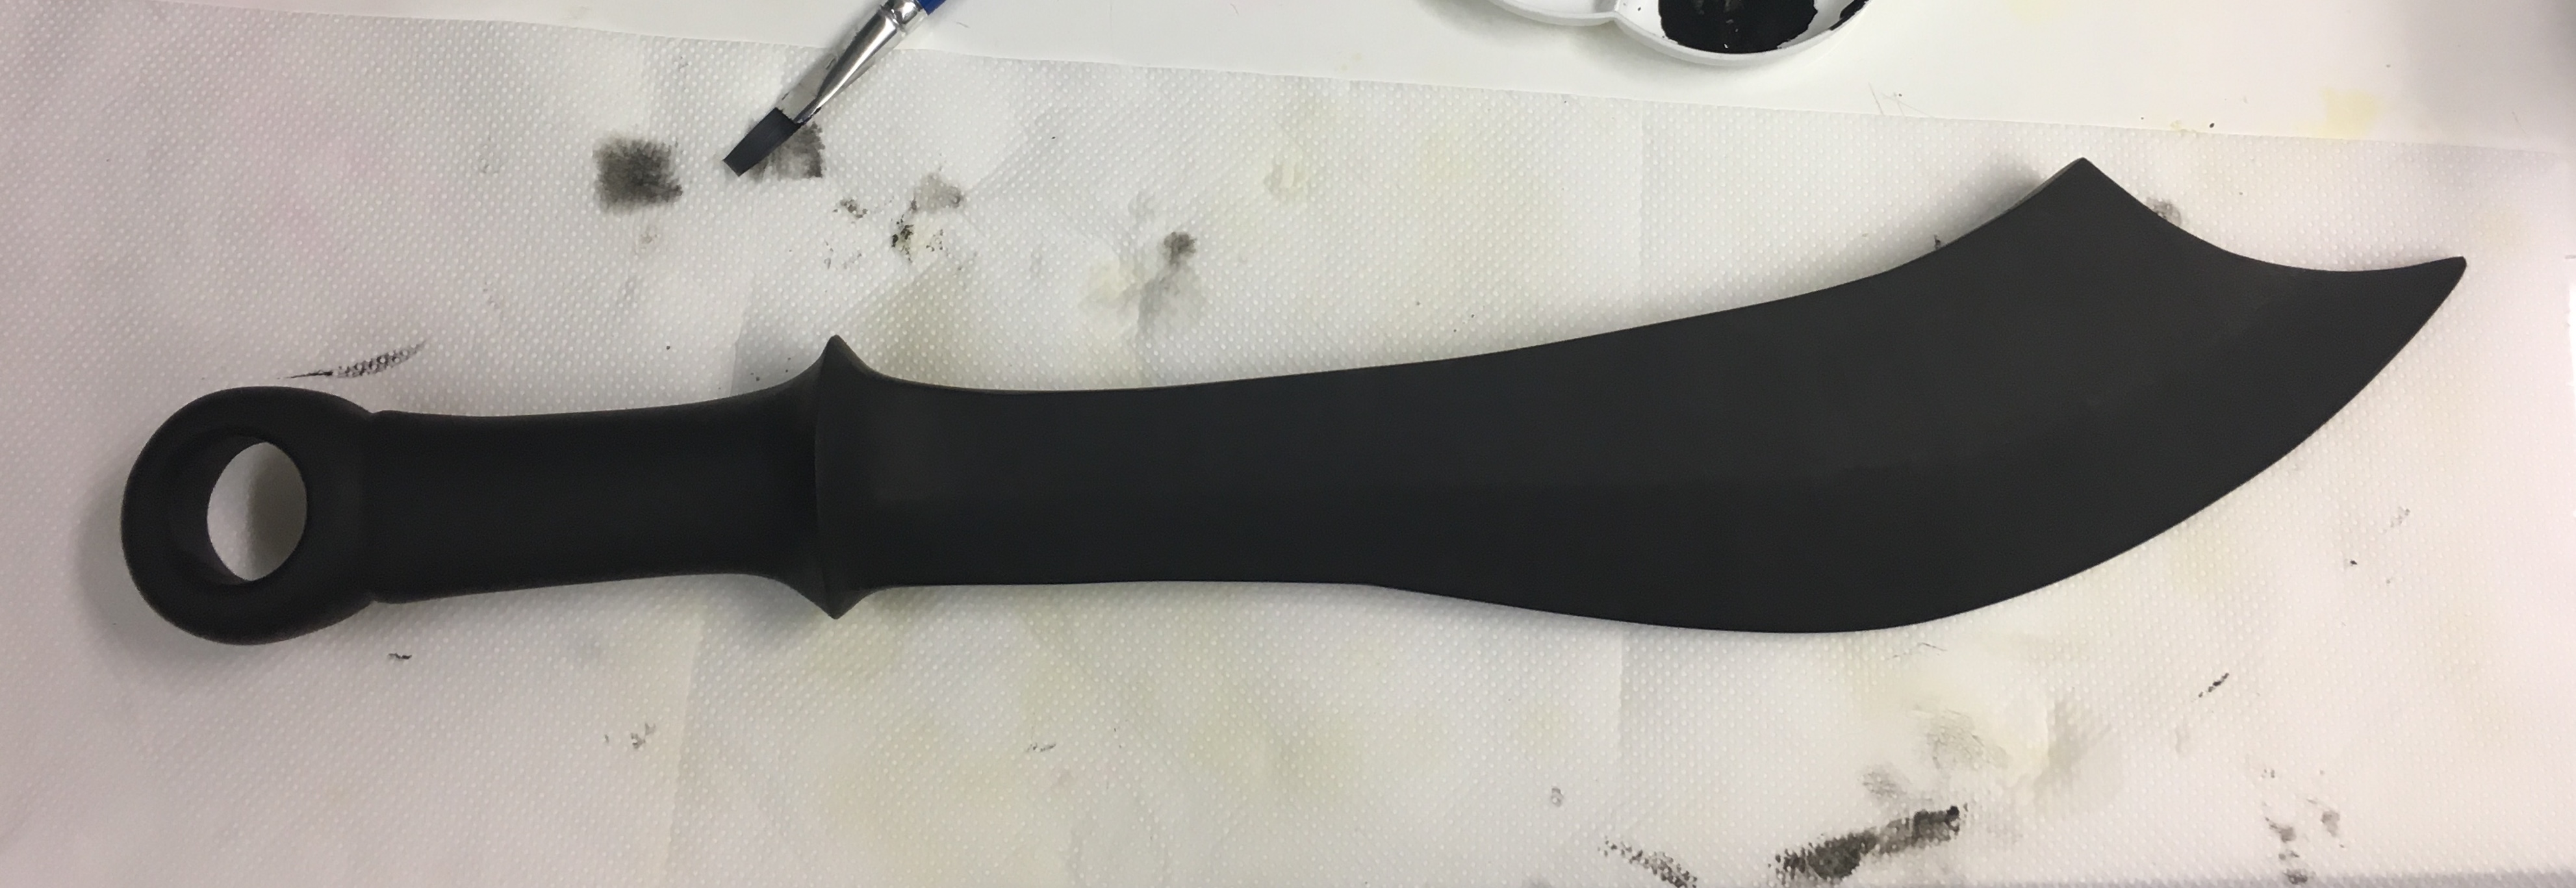
Here we are all sanded nicely (by hand of course) and looking decidedly less sneezed-upon.
Now it’s time to get it all painted and sealed for the final moulding. The paint I happened to have on hand at the time was black. So we get a nice svelte-looking sword to feast our eyes upon.
Hurrah! Now it’s time to order some silicone and do the final layers of sealing. While I await the arrival of my goo, I will polish this beauty up to the best shine I can manage and work on a secret sculpting project that I haven’t yet revealed. What could it be? This mystery item is not related to Shadowhunters nor is it a doll! Stay tuned for future reveals!
I have two crystal-clear, LED-equipped Seraph Blades in my Etsy shop for only 370 Euros each! Is one of them for you? Regular price is 415 Euros so if you want reaaaally want one, this is your best chance.