
EDIT: Fuckyeahdrow was kind enough to reblog this post for other Drow fans out there. If you’re interested in dark elves, go check them out.
So, I’ve talked about how use alcohol-activated paint in a previous post but I haven’t really touched on the rest of the process to getting a good dark elf look. Of course, the colouration of the skin is difficult for any costume that requires a big deviation from your usual tone. Anyone who’s done a Wicked Witch of the West, Avatar, or Hellboy costume, for example, knows the headache that ensues when trying to get paint to stay on the skin and not wander all over wigs and clothes and everything you touch. If you’re doing a Drow in particular, your makeup coming off on your lovely white wig is a particular concern.
Well, the good news is, there are solutions. I’ve found two that work particularly well. One is a water-based paint makeup job. The other is an alcohol-activated paint job. Both have pros and cons and I’ll go through both of them so sit tight y’all, this is gonna be a long one!
I should also mention, before I get started, that although these tutorials are specifically geared toward dark elf makeup, the techniques described are useful for many other kinds of costumes so feel free to browse through for anything you can use.
To begin, let’s compare the pros and cons of the water-based and alcohol-activated makeups.

Water-Based Makeup
Pros:
- Cheap and easy to find.
- Easy to put on. (Brush or makeup sponge + water.)
- Easy to take off. (Soap and water.)
- Lightweight and breathable.
Cons:
- Easy to take off. (Even when you don’t want it to.)
- Not a viable solution for colouring hands.
- Requires a fixing spray or other sealer.

Alcohol-Activated Paint
Pros:
- Easy to put on. (99% Isopropyl alcohol + paint)
- Will not come off. (Except in areas with a LOT of rubbing. ie: palms.)
- Viable solution for colouring hands.
- Does not require fixing spray or sealer.
Cons:
- Expensive and has to be specially ordered.
- Difficult to remove.
- Hard on the skin.
Now that that’s out of the way, onward to the first method!
I did a Drow costume for last Halloween that used Mehron’s water-based cake makeup as a base. I was very pleased with it and it absolutely did last the entire night. The only two things I was displeased with were the fact that it rubbed off around the inside of my wig and I could not colour my hands with it and was obliged to wear gloves all night.
Nevertheless, it is a viable solution. Here’s how you do it:
Ingredients:
- Mehron Starblend water-based cake makeup.
- White eyeliner.
- Black eyeliner.
- White mascara. (If you can find it. If not, sit tight I have solutions in the other tutorial.)
- White eyeshadow.
- Black eyeshadow.
- Barrier spray or hairspray.
- Black, dark blue, or dark burgundy lipstick.
- Spirit gum + ear prosthetics.
- A wig cap + hair clips + a white wig.
- Makeup applicator sponge or large soft brush.
- Small brush (for eyeshadow around the eyes.)
- Contact lenses in red if possible. (Although the Forgotten Realms Wiki states that it’s possible for Drow to have blue eyes, I got a lot of remarks on how unusual this was so I recommend either red or amber contacts if you can get them.)
Step 1:
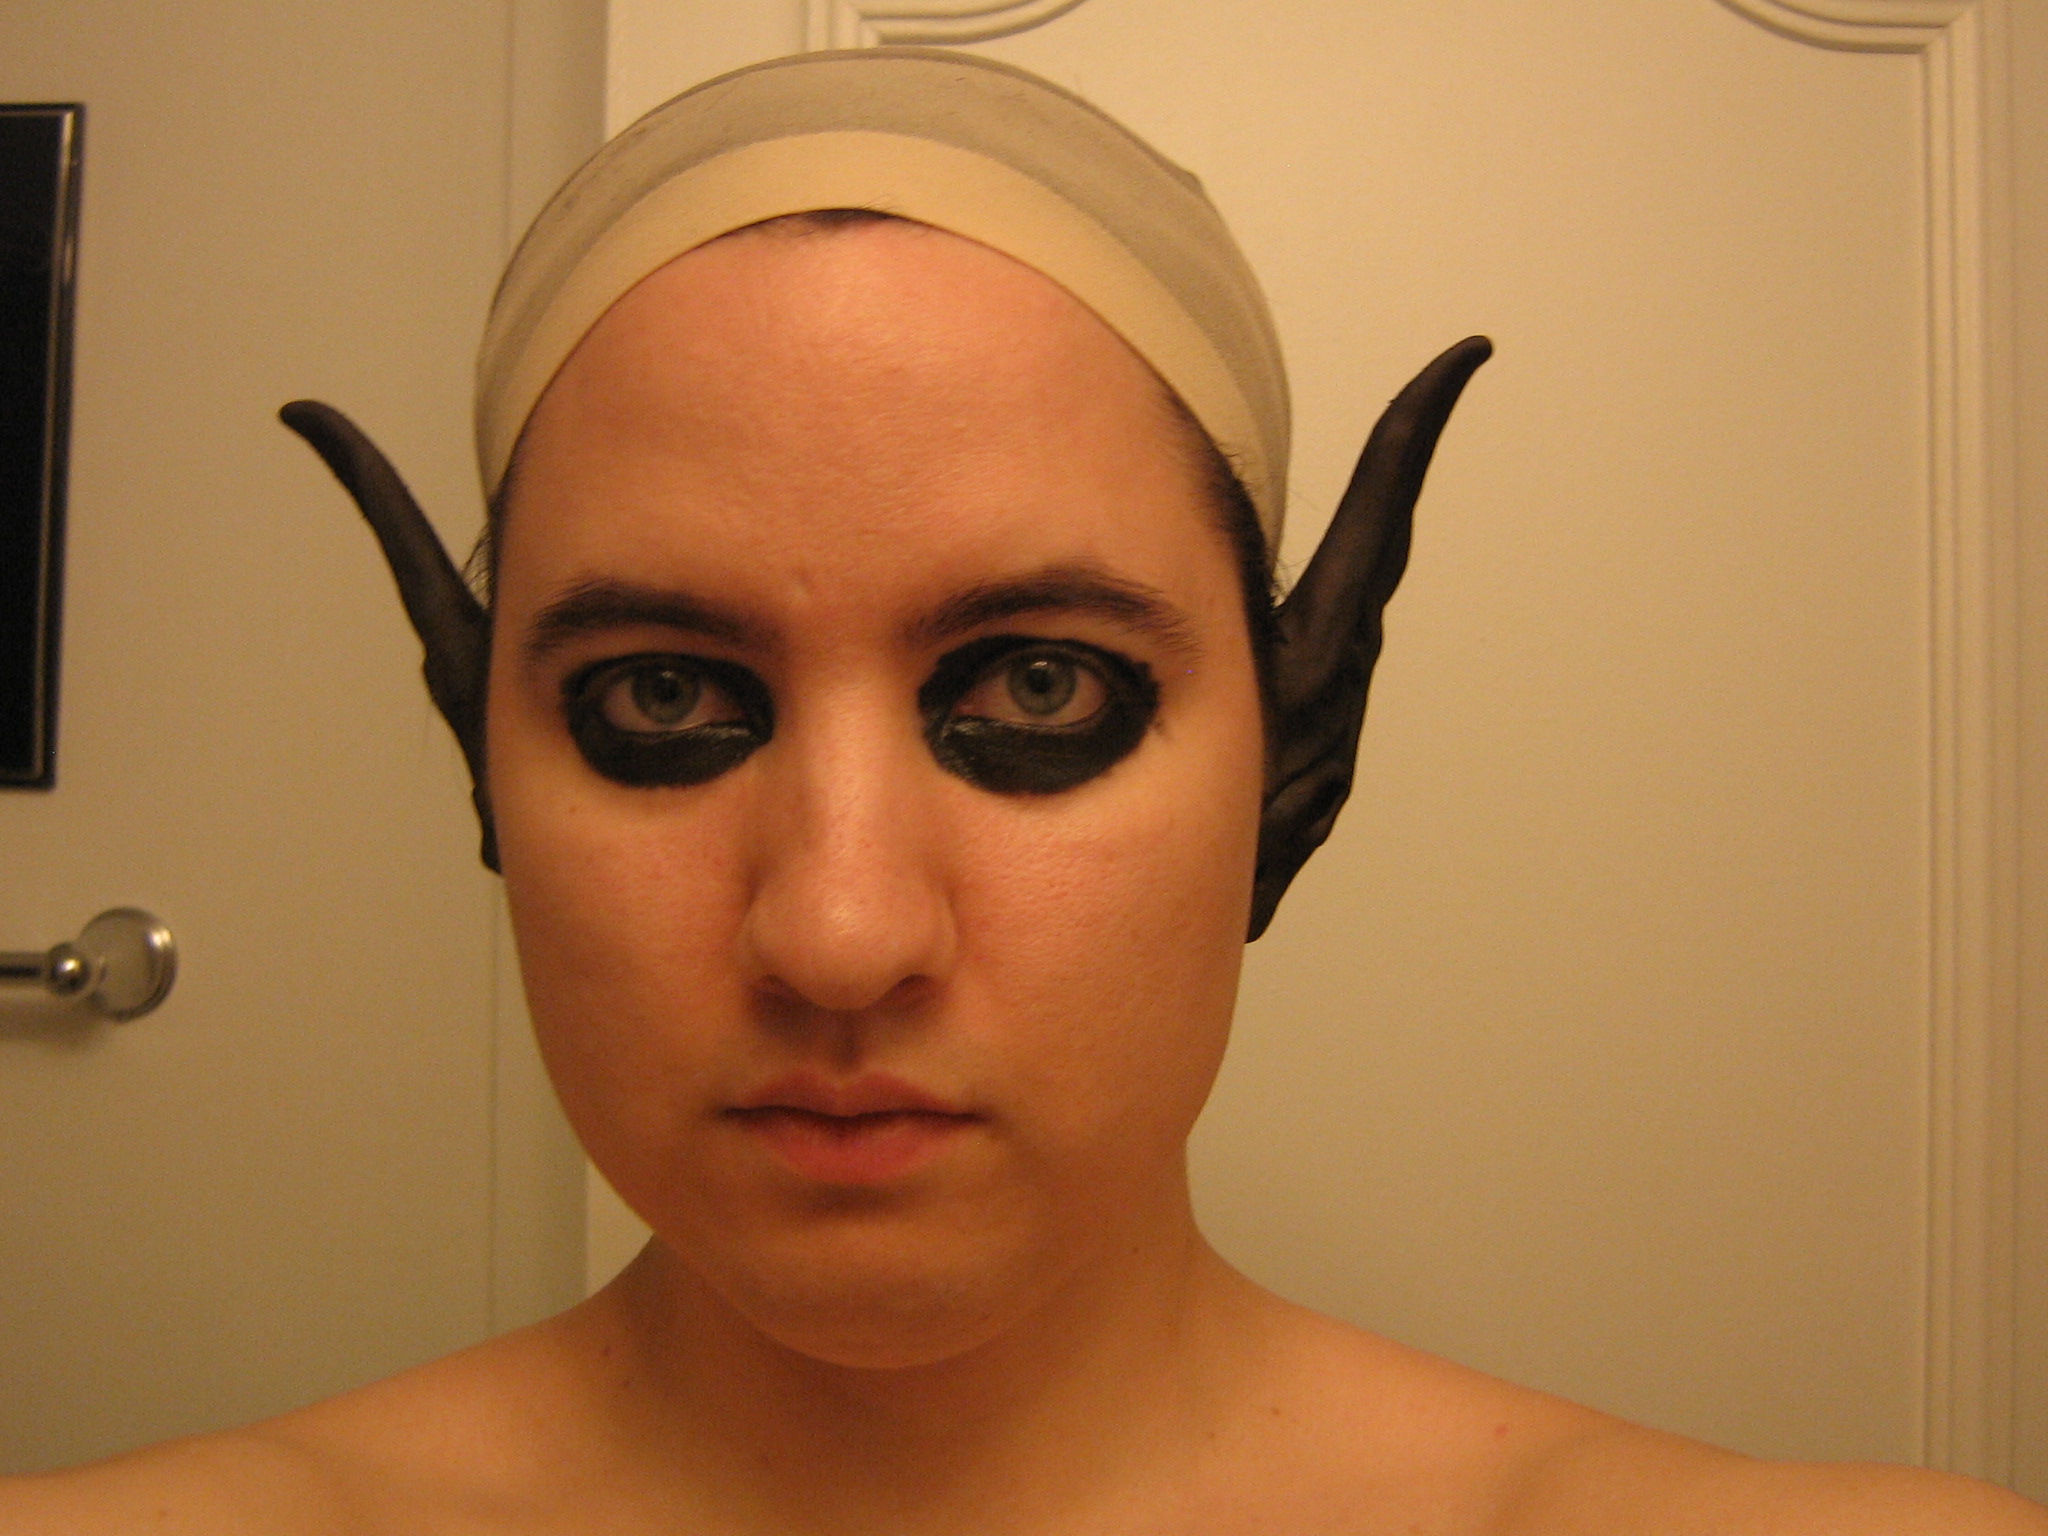
If you’re wearing contacts, I suggest putting them in BEFORE you start with the makeup or you may have to deal with some eyeshadow smudges. Now is a good time to pin up your hair and stick on a wig cap to get your hair out of the way. (Details on the best way to pin up long hair will follow in the next tutorial.)
Start the makeup by tracing around the with black eyeliner and filling in the eyewells. A creamy eyeliner works nicely for this. I’ve found both Annabelle Khol and Rimmel ScandalEYES to work well.
It should go without saying but I’ll say it anyway: guys, if you have facial hair, be sure you’re freshly shaven before starting your makeup job and trim your sideburns way up to where they’ll be hidden by the wig. Also, for everyone: be sure to spot test all your makeup items on the inside of your forearm if you’ve never worn them before to make sure you’re not allergic to anything in them.

Step 2:
Apply your ear prosthetics. These ones are Woochie Werewolf Ears painted black. I like them because they sit completely over the ear and spirit gum in only two small places along the jaw so I forget I’m even wearing them. I recommend using the Mehron watercolour paint on the insides of your ears before applying the elf ears, otherwise you’ll be able to see your actual skin tone inside the ear. If you forget, it’s okay. Just poke the paint in there with a wet sponge.
Step 3:
Apply a coat of black Mehron cake makeup over your face with a damp sponge. You can also use a brush but I prefer sponging as it is less streaky. Be sure to extend the coverage to at least a few inches below where your clothing will sit so you won’t have any gaps.

Wait a minute or so for it to dry and apply another coat until it is nice and even.

Also, make sure to get in the nostrils. It will be very noticeable if you don’t.
Step 4:
Take a large, soft makeup brush and highlight your brow ridge, cheek bones, the ridge of your nose, and your chin with white eyeshadow. The reason why we do this is because even though Drow are supposed to have ebony or obsidian coloured skin, your features will not show up well when your photo is taken unless you emphasize the lines of your face this way.

Simply load up the brush with eyeshadow and dab it onto your face where you want to highlight your features. Continue patting the eyeshadow in place until it is nicely blended. (You don’t want to look like you’re wearing war-paint or like someone threw a handful of flour at you.) Remember that dark elves have sharp-featured, narrow faces so do your best to make those cheek-bones pop and leave the hollows of your cheeks dark to emphasize this shape.
Now is also a great time to go over your eyebrows with the white eyeliner. Stroke in the same direction as the hairs grow pausing frequently to wipe the tip of the eyeliner pencil with a small piece of tissue. The pencil will pick up the black paint and you want the eyebrows to be white as opposed to a blended grey.
Step 5:
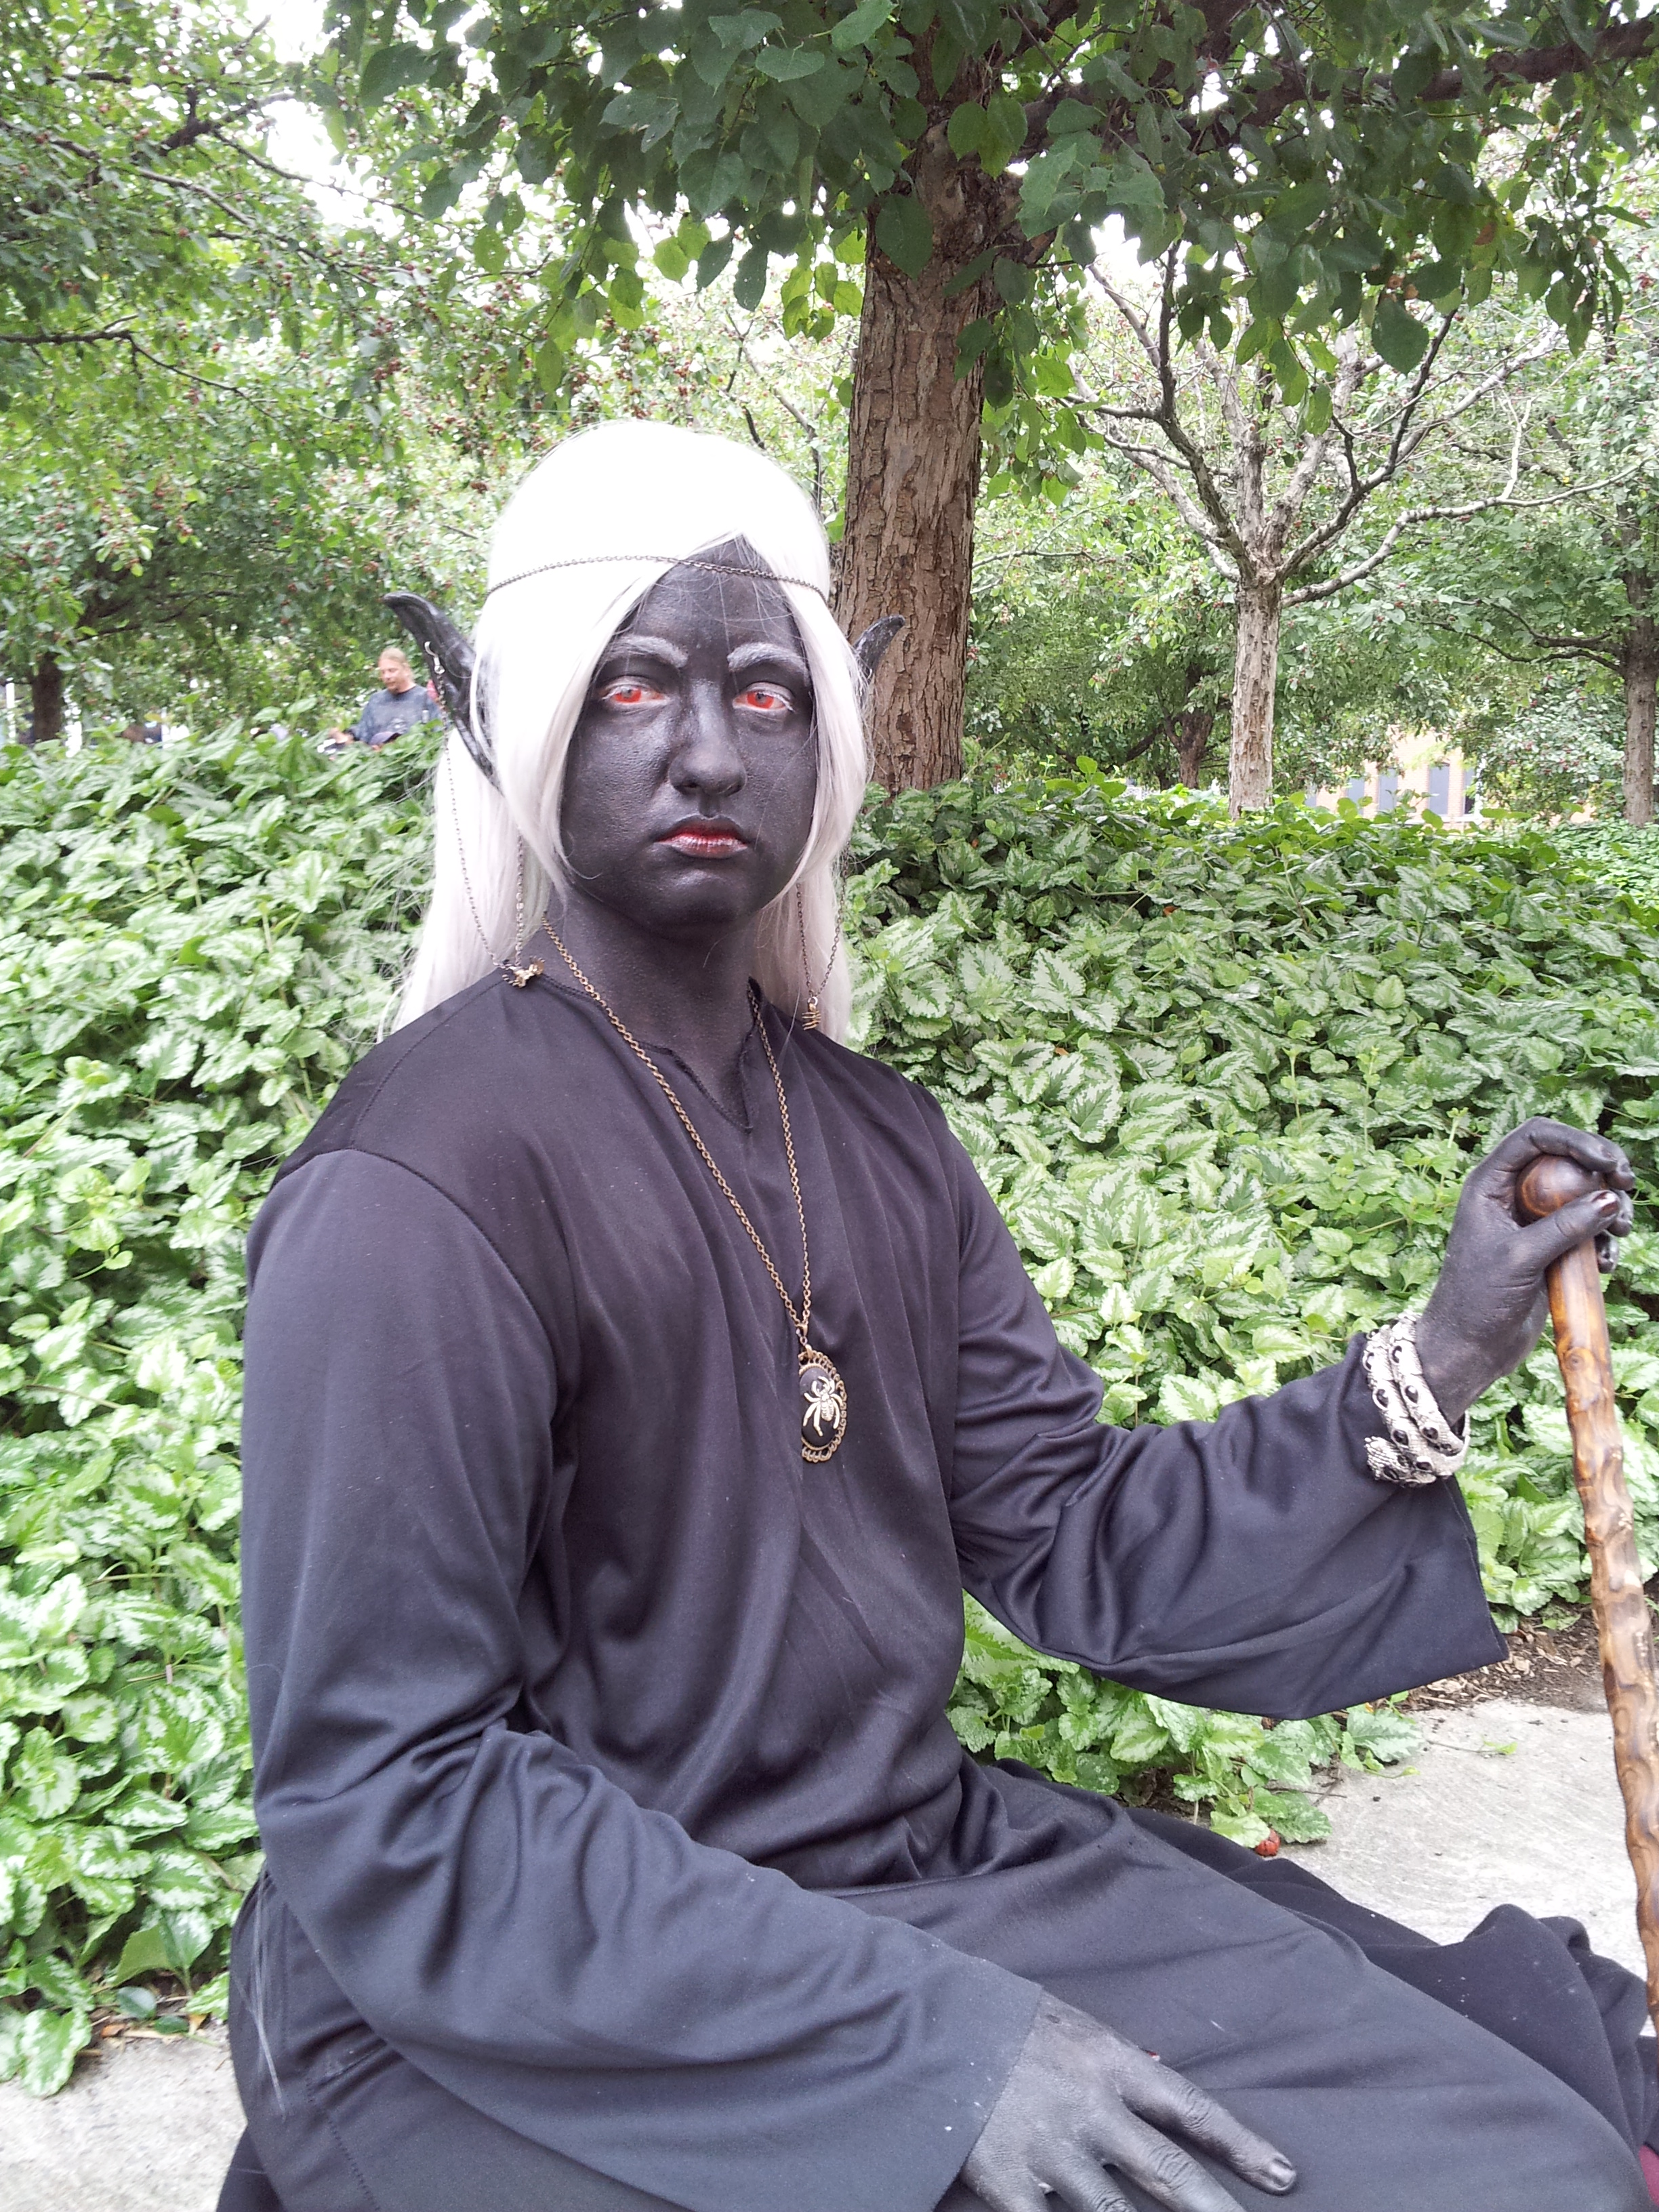
Go around your lips with black eyeliner to ensure good coverage and blending into the rest of your paint. Apply your lipstick. Here I have used a very dark blue as Forgotten Realms Drow are said to have a slightly blue cast to their skin. (It varies by version.) Just make sure that whatever it is, it’s dark. You can also blend the black eyeliner into the lipstick for a more “natural” look.
Now is a good time to dust over your eyelids with some black eyeshadow to seal the eyeliner. Spray over your face with a barrier spray or a few layers of hairspray. (I like the hairspray better than the actual barrier spray because it’s a very fine mist unlike the Mehron barrier which I find rather streaky.)

Step 6:
Put on your costume and wig and you’re done! This is a California Costumes White Working Girl Wig. I upgraded my wig this year but this is a serviceable option for an affordable price.

In case you’re wondering why I look so grumpy in these pictures, Drow typically do not smile. They’re very neurotic. Good rule of thumb: if the Drow is smiling, you probably shouldn’t finish your drink.

Now for the alcohol-activated tutorial:
Ingredients:
- Reel Creations Black Color Pot
- 99% Isopropyl alcohol (Any lower percentage will not work.)
- Makeup applicator sponge.
- White eyeliner.
- Black eyeliner.
- White mascara or white cake makeup and mascara applicator.
- White eyeshadow.
- Black eyeshadow.
- Black, dark blue, or dark burgundy lipstick.
- Dark blue or dark burgundy nail polish.
- Spirit gum + ear prosthetics.
- A wig cap + hair clips + a white wig.
- Large soft brush and a smaller brush for around the eyes.
- Contact lenses in red if possible.
- Cotton makeup remover pads. (A whole package of them. Maybe two.)
- A skin moisturiser that means business. Hemp or vitamin E cream would be good examples.
Step 1:
As before, make sure you start clean-shaven, maybe give your face a run over with some of the isopropyl alcohol first. If you have longish hair, put it in two pigtails at the nape of your neck in the back.

Loosely cross them in the back and wrap them up around your head in an X pattern. Pin them on top of your head with a flat clip like this:


Then, put on your wig cap.

The reason for this is that you don’t want there to be any lumps and bumps under your wig that will make it not fit right and make your head look strange. You want the anything bulky (the hair ties) to be down at the nape of your neck where it can be easily hidden by the back of the wig. If your hair is longer than this, just keep wrapping it around the head making sure it’s as evenly distributed as possible.
Step 2:
Take your Reel Creations alcohol-activated paint, a sponge applicator and the 99% isopropyl alcohol and apply the paint all over your face EXCEPT around your eyes. You will know you’re getting too close to your eyes when you feel a tingling sensation in your tear-ducts. This is the alcohol getting into the pores. You don’t want that in your sensitive eyelid tissues so respect your skin and stay away from them. You’ll also want to hold your breath for a few seconds or breathe through your mouth while you’re working around the nostrils because the evaporating alcohol has a really strong smell.


This paint does not work the same as the water-based stuff. The reason we use 99% isopropyl alcohol is that it evaporates crazily fast. When the alcohol has evaporated, the paint will once again be inactive meaning that it won’t move around. Although you apply it with a sponge in the same kind of patting motion, there is no waiting time for it to dry. To blend it, and get a good coverage, you simply keep loading the paint onto the sponge and mixing it right on your face with a dab dab dab dab dab dab … If it’s too light, you may have too much alcohol in the area you’re working. The solution is to add more paint. Play with the ratio of alcohol to paint a little bit. You’ll get the hang of it fairly quickly.
And don’t be shy. This product goes a long way. Once the alcohol evaporates, the paint once again becomes inert so you don’t have to worry about wasting it. You can mix the whole thing with alcohol if you’re really ballsy and let the stuff you don’t use simply dry out. It’ll be ready for you to use next time. You can apply it with an airbrush, however, I don’t have one so I can’t speak to that.
Step 3:
Go around the eyes with black eyeliner. Seal the eyeliner with black eyeshadow.


Step 4:
Use a white eyeliner to colour your eyebrows.


Step 5:
Apply the white mascara to your eyelashes, or load up a mascara brush with white cream makeup and apply it carefully.


Step 6:
Time to contour the face! Just the same as for the water-based tutorial, we use a large soft brush to place the white eyeshadow on the brow, the ridge of the nose, the cheekbones, and the chin. Blend it gently until you have the desired effect.


Step 7:
Apply the eyeliner around the lips and then the lipstick. I chose two tones so that I could blend them to the desired shade. A black cherry, and jet black. If you’re doing this as well, put the colour on the inner portion of the lips and blend outward into the black to the edge of your lips.


Step 8:
Apply the prosthetic ears. This year, I added some spider ear piercings to the ears which I made by re-painting some plastic spiders and affixing them to a necklace chain and two earring hooks.


Step 9:
If you’re painting your hands, be sure to apply the same colour of nailpolish to your fingernails as you used in the lipstick. The nail-beds of people with dark complexions are not the same colour as the rest of the rest of their skin. Remember this when creating a realistic Drow.

Step 10:
Put on your costume and wig and you’re done until you want to take it off.
Step 11:
Dear Gods how do I get it off?! Don’t panic. It’s quite easy if time-consuming. Put some 99% isopropyl alcohol on a cotton makeup remover pad and begin wiping at the paint. Using a clean, dry cotton pad after you re-activate the paint with the alcohol will help in getting it off more quickly and easily. It actually looks pretty creepy in the process of coming off.

Be gentle with your skin. I’m not kidding. That moisturiser is not optional. Do not put this paint on your skin if you don’t have moisturiser to put on afterward. Isopropyl alcohol is harsh on skin (it’s used for disinfecting things in hospitals). It will kill all the bacteria on your skin and will also take all of the moisture and natural oils out of it.
This is what happens if you just slap on the alcohol willy-nilly and rub it off with a paper towel:

Yes, that’s a chemical burn from the alcohol because I was tired and impatient and ran out of cotton swabs. You have nothing to fear if you clean it off correctly. Don’t be a jerk to your face and this won’t happen to you.
Step 12:
Apologize to your skin for putting weird crap on it and stealing all its nice oils.

The facial cleansers here are soothing (provided you’re not allergic to tea tree) and will help get the paint out of your pores. They’re not strictly necessary. The moisturising cream, however, is. Don’t skip this step. Be nice to your skin for a couple days and baby it a bit. It might seem stupid but it will ensure that you have a nice costuming experience without a tender, blotchy, or itchy face afterward.
Other notes:
If you’ve never worn contact lenses before (as I had not before this year) please allow me to share this little tutorial with you to help you get them in and out painlessly. It’s the best one I’ve seen so far.
Painting the sides and back of your neck may require some tricky work with mirrors or someone to help you. If you have a crazy long wig like I did …

… you may also need some help getting that on.
Don’t neglect the spider accessories unless you’re a “good” Drow. Also, feel free to add embellishments on the makeup job with white paint or other high-contrast things. I did not because I’m a guy but female Drow can feel free to be as fancy as they like. As most Drow live in a heavily matriarchal society where males are second class citizens, females typically flaunt their femininity by baring a lot of skin to make their sex very clear to an observer. You might need more paint than I used for cleavage, arms, midriff, legs, etc. It’s up to you.
Praise the Spider Queen! We’re done! I hope this has been helpful to you all. Feel free to ask questions or make comments and suggestions. Thanks for stopping by!


Nice tutorial! I like drow cosplays a lot and I’ve always been curious as to how they did the make up for the skin. I found this post through the fuckyeahdrow Tumblr blog and I think this is a very informative ans helpful tutorial and the photos make it even better. Good job! By the way, I have that same necklace as the one you are wearing in the first photo.
LikeLike
Thank you! I love this necklace. It can be hard to find spider jewellery that is actually elegant.
LikeLike
Just found this thread, so I know it’s a bit late to comment. This is really helpful. I’ve done four or five Drow costumes that were fairly successful for an amateur costumer like me, but the suggestions here would have made it a lot easier.
Believe it or not, the first two or three times I did a Drow costume, I used black shoe-polish on my face. Yeah. It was fine for the first four hours but then it started itching, so the last two times I’ve used some Ben Nye stuff. It’s messy and smears EVERYWHERE.
I hadn’t thought about using eyeliner on the eyebrows. I have always used white-out, which, while it is unconventional, works REALLY WELL if you very lightly run it along the eyebrow hairs. I’ll be doing another Drow costume in April at a convention, so I look forward to trying some of the makeup used here.
LikeLike
Awesome! I’m glad it was helpful. Have fun with your cosplay. 🙂
LikeLike
Found this tutorial, which was EXACTLY what I needed. I’m going to the Imbolic Ball next weekend for the first appearance of my Drow at LARP. Looking forward to this! I’m hoping that I can take this tutorial one step further, and use a bald cap and paint for my whole head (yes, I’m going to go as a bald Drow).
LikeLike
Awesome! I hope you will send pics? Have fun!
LikeLike
Is your soap dispenser a penis?
LikeLike
Hahaha! Oh I forgot that was in the picture. Whoops. Well yes, it is. Best gag-gift I ever got. I love it when someone comes to my place for the first time and bursts out laughing in the bathroom.
LikeLike
Great tutorial, I am a drow serial killer villian in amtgard and have hid behind mask, have to try this out. PS death to lloth long live the lord of murder!!
LikeLike
All is permissible provided you don’t get caught. 😉
LikeLike
Hello, I’ve been working on a costume for my D&D Warlock character who has black smokey markings covering his fingers and most of his hands and while looking for temporarily, but durable/waterproof theatrical makeup brands, I found your review on the alcohol activated paints from Reel Creations! This form of makeup is exactly what I need for my costume, but since I intend to spend several hours “in costume” (maybe even all day) I’m worried that it might not be safe for me to consume any food while I have the paint applied onto my hands.
I’ve done a lot of research since reading your review and yet while I have learned a great deal more about how to safely use alcohol activated paints, I still can not find anything that would give my an answer about it’s safe to eat while wearing the paint on my hands. So I was wondering if you would know since you have far more experience with the specific paint brand I plan on using and doing full costume outfits such as your Drow costume above.
LikeLike
Yep. I was able to eat, drink, bathe, and sleep normally while wearing this stuff on my hands and face. It’s really no more concern than accidentally licking lipstick while eating or getting a bit of chipped off nail polish in your food. It’s meant to be worn on skin for a prolonged period of time. You might need to touch up your fingertips a bit from time to time since it’s a high-traffic area but if you don’t need a perfect, uniform black colour like I did, you might not have to fuss with it at all.
Kryloan also has alcohol activated paints for theatre and I’ve worn those as well though not as often. I recently moved to Finland (2 years ago) where it’s quite difficult for me to get my hands on Reel Creations products, since Reel Creations is located in California. (The shipping costs … holy crow …) Depending on availability in your area, either the Kryloan or Reel Creations brand paints might be more accessible to you and I recommend either one of those.
LikeLike
Hey, this looks very similar to blackface. I know that probably was not the intent, but it just feels weird to teach others this technique specifically due to that. (also probably stray away from darker colors in magical looks if you are white) I just don’t trust others to not use this with malicious intent.
LikeLike
Sorry it took me awhile to respond to you! I had a problem with my website and I wasn’t getting notifications for some reason. Weird! I’ll respond to this in full because I think it’s a subject that is important.
Don’t worry about people confusing Drow for blackface. Blackface has a very specific design and is done for a very specific reason. If you’ve ever seen someone actually doing blackface, you know it. There’s always exaggerated red lips drawn around the person’s mouth and usually also white drawn around the edges of the eyes to make the eyes look larger. Usually, the person is also wearing white gloves (or other coloured gloves) because, of course, the hands are difficult to paint and the paint there just doesn’t stay put. The hair of the person is either painted black or a black wig is put on their head.
The clothing associated with blackface is clownish, traditionally. Even now, when people use more brown than jet-black when performing blackface, you’ll find that their clothing is still heavily stereotyped. A rapper. A basketball player. A pop star. A “gangsta”. You know exactly what you’re looking at when you see it. It’s quite obvious. You won’t mistake a dark elf for a blackface performer any more than you’ll mistake a vampire for a mime just because they both have an unnaturally white face. In the same way, you can tell the difference between someone dressed up as a bright red demon or tiefling and someone making fun of indigenous North Americans.
There is no way for you to control other people’s reactions to what you do and say and how you present yourself to the world. There may indeed be people who are uninformed or misinformed who will get offended. There’s nothing you can do about that. If you’re wearing a wizard robe, a long, straight white wig, jet black skin colouring, red contact lenses, bluish lips, long pointy ears, a spell book, prominent spider ornamentation, and possibly a staff or sword … and someone insists you’re in blackface? They probably have some kind of vision issues and just need a little explanation.
Only you can decide how you’re going to limit yourself based on how other people might react to you. That’s a very personal decision.
When I go to a convention wearing a costume that consists of little more than a loincloth, I’m going to have to assume that some people will interpret this as too provocative or attention-seeking or that I really, really like having everyone ogle my butt. It’s up to me to decide if I’m fine with potential body-shaming I may encounter or if I need to change my costume. If I dress up as the Devil for Halloween and go around town doing my usual stuff on the 31st of October, my appearance may very well annoy or disturb some Christians who see me. I might get a lecture about hellfire and whatnot from some particularly adamant believers. Only I can decide if I care or not. If I consider participating in a drag show, there may be some folks who are perturbed that I’m wearing their gender as a costume and possibly propagating some negative stereotypes about it. Between their comfort and my need to explore the idea of gender and express myself artistically, what is the right decision?
I can really only guarantee my own comfort, joy, and sense of fulfillment. Even that isn’t 100% sure, but it’s much more definite than trying to please everyone else. I have offended people even while trying to be polite and considerate and doing my best to serve others. Heck, I’ve been verbally abused for wearing beaded and feathered ornaments by people who don’t understand that I’m Algonquin. Being racially mixed can suck sometimes!
My advice is simply to take care of yourself as best you can, be aware of your surroundings for safety’s sake, and do what makes you happy. Only you can determine if the way you want to express yourself will put you in danger where you live. But if the risk is only that your look might not be to somebody else’s taste? Go for it anyway. Someone will always have an opinion about it. They can either approach you and ask about your presentation or they can mind their own business like a mature human being. 😉
LikeLike